Main configuration
- Active Directory synchronization with AD groups
- Command filter configuration for SSH and database queries
- How to enable 2FA(TOTP) auth
- Installing OpenSSH for account management for Windows
- Syslog configuration
- RemoteApp configuration for application publishing
- How to configure access to asset web-interface, HTTP session configuration
- Setting up Panda for application publishing(alternative to RemoteApp)
Active Directory synchronization with AD groups
Configuring Integration with Active Directory
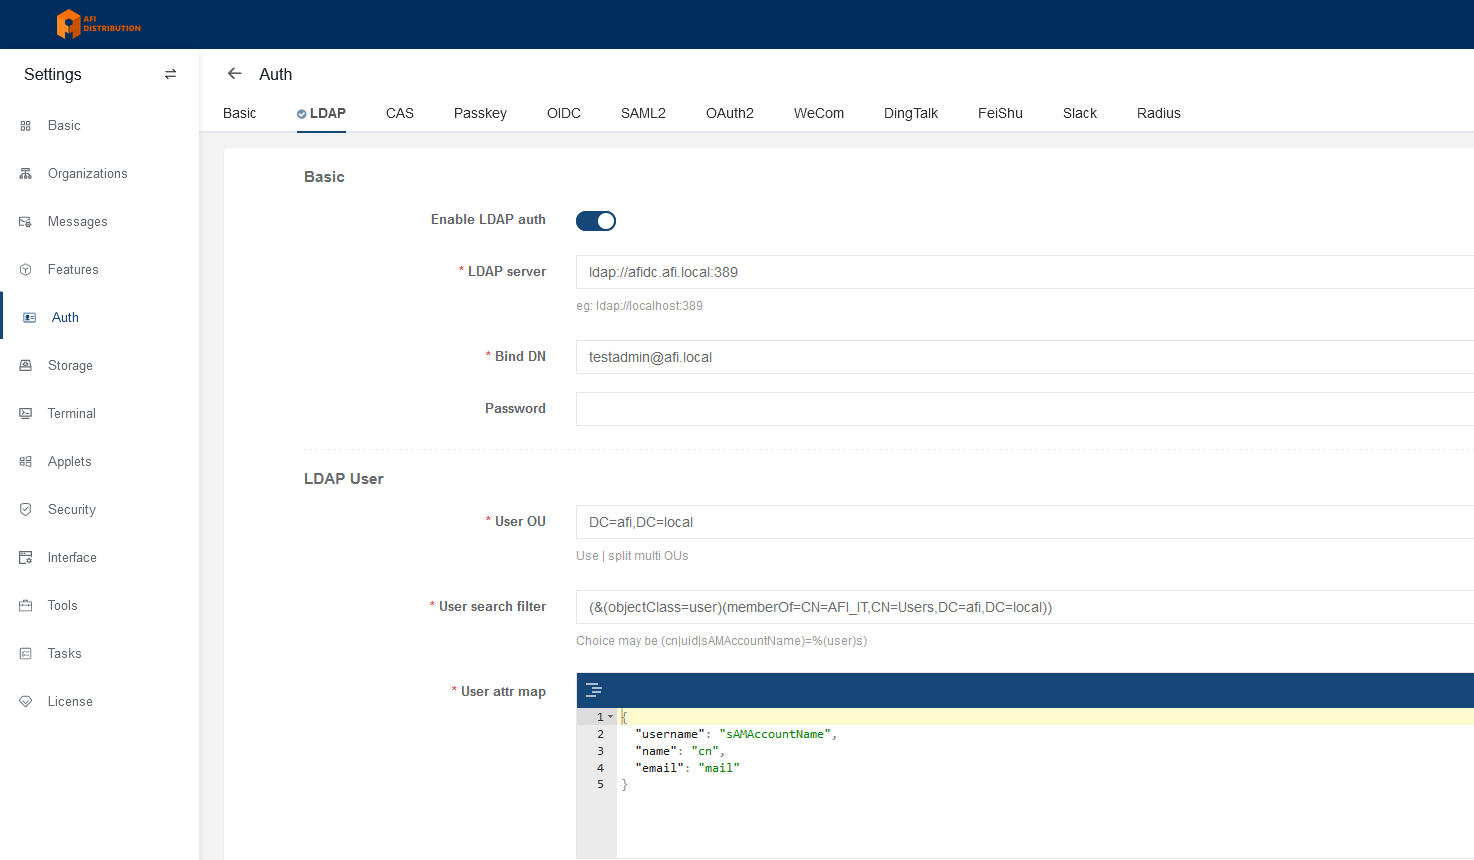
1. Go to "System settings" - "Auth" and select the LDAP tab.
2. Enter the LDAP server address, an account for connection, and its password.
3. Specify the OU and user search filter. See an example of a filter for a specific group in the screenshot below.
4. Click the "Submit" button to save the settings. Note: After changing parameters and settings, always click "Submit" to apply changes. Otherwise, the test will run with old parameters.
5. Click the "Test connection" button to verify the settings or "Test login" to check a specific user's authorization.
6. Click the "Bulk Import" button. You should see the users of the group that will be added for PAM authorization. You can select specific users and click "Import" or import all users by clicking "Import all".
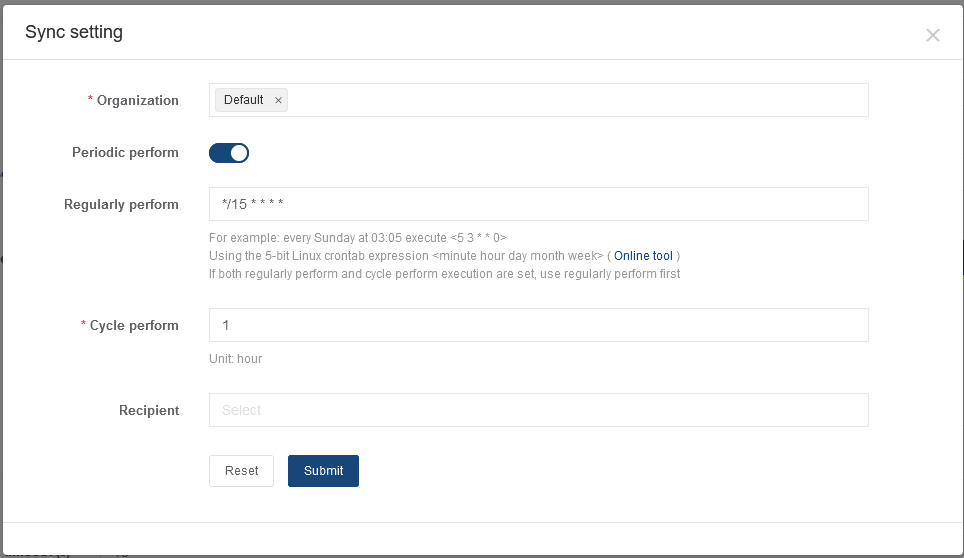
7. You can also configure automatic user synchronization by clicking the "Sync setting" button.
Synchronization with Active Directory Groups
Why synchronize with AD groups?
Managing access rights to target systems can be done using familiar Active Directory groups. Adding or removing a user from such groups will automatically synchronize with the permissions matrix in JumpServer, and the user will gain or lose access rights.
Configuring synchronization with AD groups.
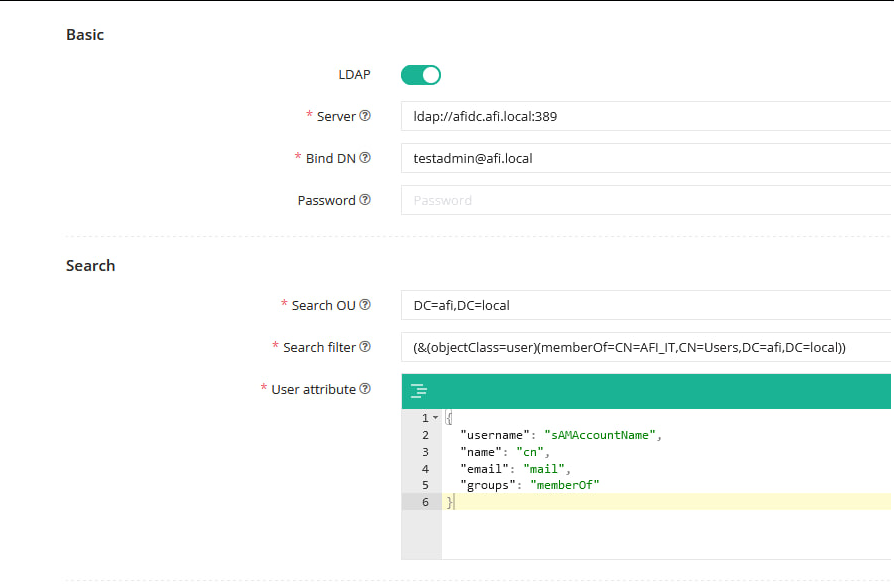
1. Go to System settings - Authentication - LDAP
2. In the User attribute field, add the parameter groups to look like this:
{
  "username": "sAMAccountName",
  "name": "cn",
  "email": "mail",
  "groups": "memberOf"
}
See screenshot:
3. Click the Submit button to save the settings.
4. Click the User Import button and then click Sync Users in the opened window.
If everything is correct, you will see a list of users and a column with AD group attributes:
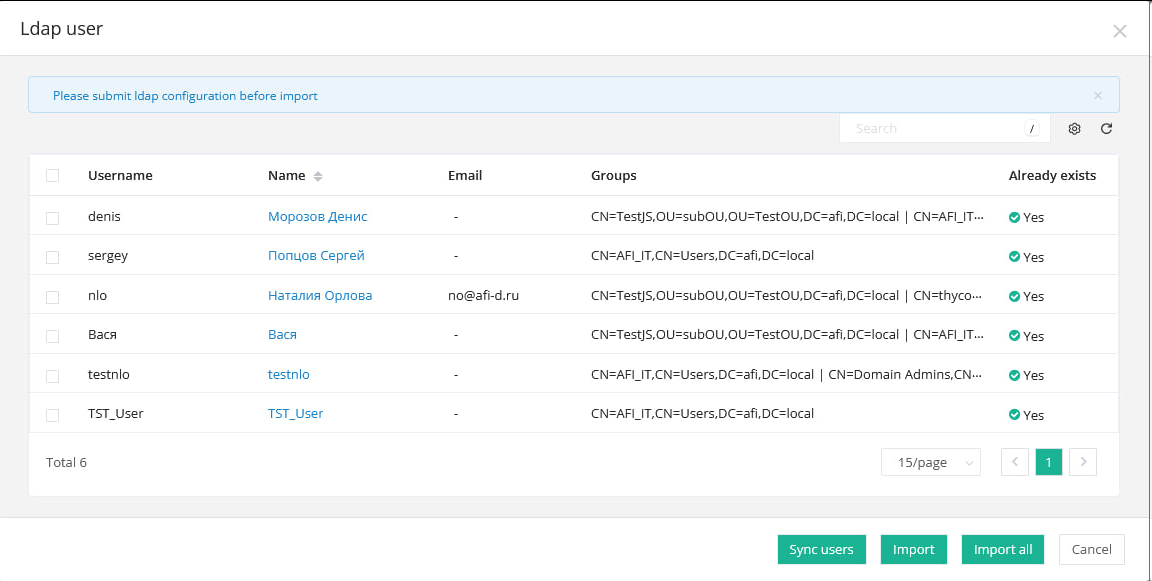
5. Click Import all to add users to the system.
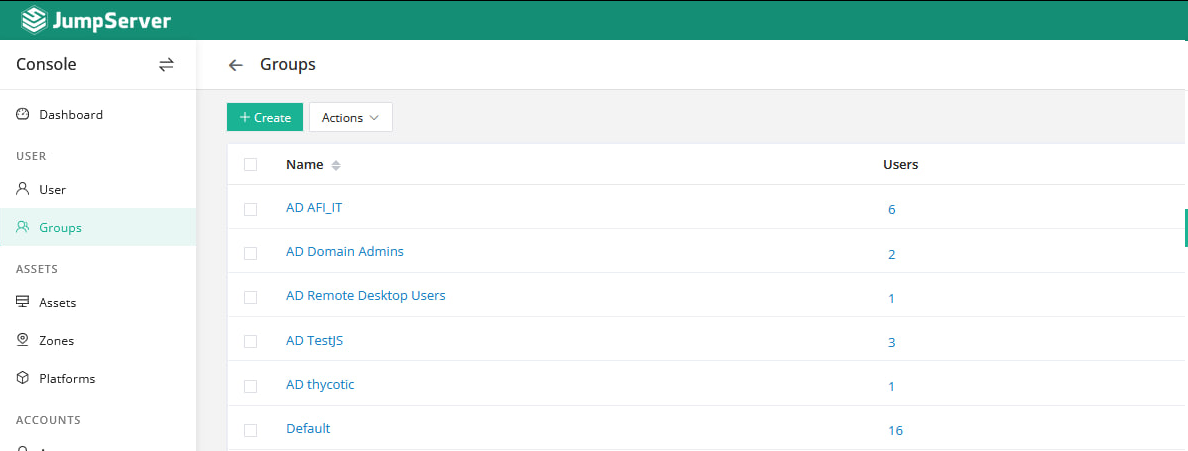
If you go to Console - User - Groups, you will see JS user groups with AD group names and the same users in them:
Command filter configuration for SSH and database queries
Command ACL Configuration
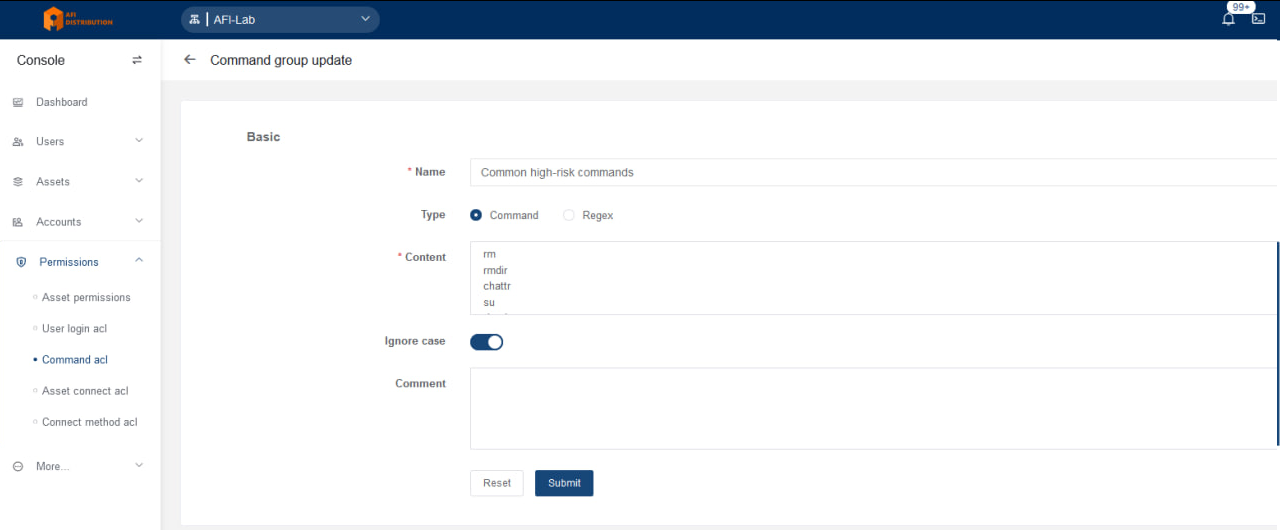
1. Go to the "Console - Policies - ACLs - Command filter" section and open the "Command Group" tab.
2. Click the "Create" button, enter a name for the list, such as "Common high-risk commands", and fill in the list with the required commands or regular expressions (see the screenshot). Save it by clicking the "Submit" button.
3. Open the "Command filter" tab and click "Create" to create a filter.
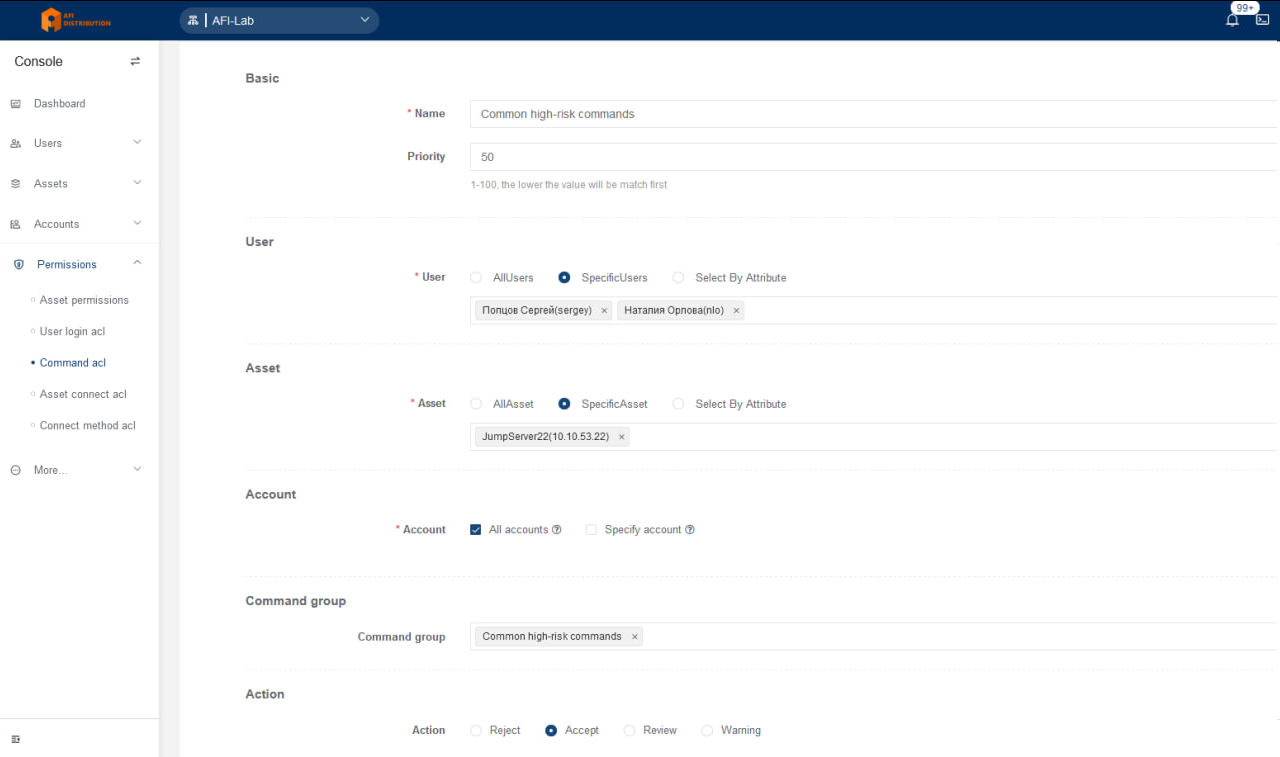
4. The filter configuration includes the following parameters:
- Priority: the filter priority. The action of the filter with the highest priority will always be executed.
- User: JumpServer users for whom the filter will apply.
- Asset: target systems where the filter will control connections.
- Account: accounts on target systems that will be controlled by the filter.
- Command Group: groups of commands that will be blocked.
- Action: the filter action: Reject - block the command, Accept - execute the command, Review - send the command for approval by a specified employee, Warning - warn the specified employee about executing the command.
5. Click "Submit" to save the settings.
How to enable 2FA(TOTP) auth
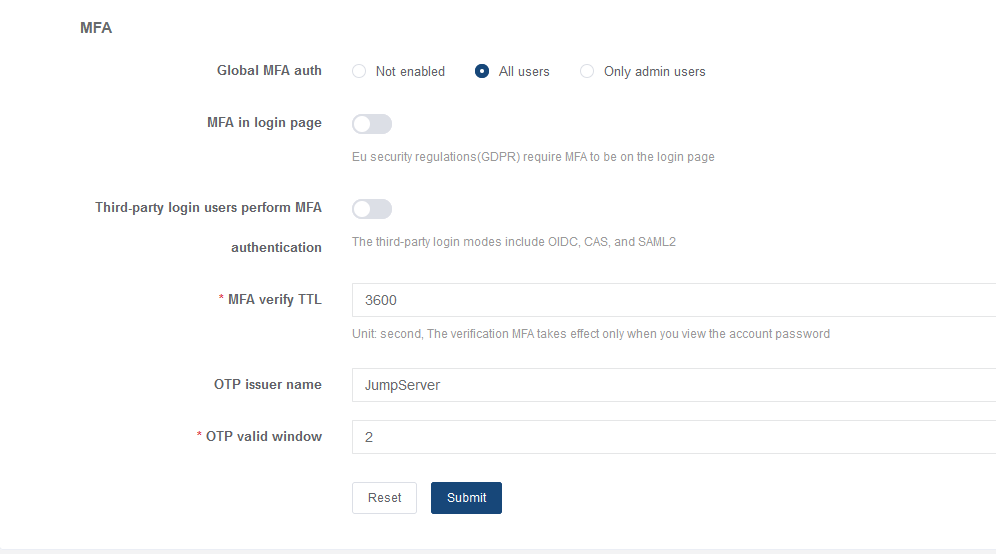
In the Community Edition, two-factor authentication via TOTP (Google Authenticator) is available.
To enable it, go to System setting - Security - Auth Security. The Global MFA auth parameter allows you to disable two-factor authentication or enable it for all users or only for administrators.
Note: For TOTP to work correctly, the JumpServer server must configure the NTP service to obtain the correct time.
In JumpServer Enterprise, other two-factor authentication options are also available, such as two-factor authentication via RADIUS.
Installing OpenSSH for account management for Windows
Why Install OpenSSH on Windows Devices?
OpenSSH on Windows is used for gathering system information, rotating passwords for local Windows accounts, and automatically creating local accounts.
If you only need to connect via RDP without managing accounts, OpenSSH is not required.
Installing OpenSSH
Simply run the installation distribution OpenSSH-Win64.msi with administrative rights. No configuration is needed.
For more secure connections, you can configure authentication using a private key.
Configuring Authentication with a Private Key
ssh-keygen.exe -t rsa
cp $env:USERPROFILE\.ssh\id_rsa.pub $env:USERPROFILE\.ssh\authorized_keys
notepad C:\ProgramData\ssh\sshd_config# This is the sshd server system-wide configuration file. See
# sshd_config(5) for more information.
# The strategy used for options in the default sshd_config shipped with
# OpenSSH is to specify options with their default value where
# possible, but leave them commented. Uncommented options override the
# default value.
#Port 22
#AddressFamily any
#ListenAddress 0.0.0.0
#ListenAddress ::
#HostKey __PROGRAMDATA__/ssh/ssh_host_rsa_key
#HostKey __PROGRAMDATA__/ssh/ssh_host_dsa_key
#HostKey __PROGRAMDATA__/ssh/ssh_host_ecdsa_key
#HostKey __PROGRAMDATA__/ssh/ssh_host_ed25519_key
# Ciphers and keying
#RekeyLimit default none
# Logging
#SyslogFacility AUTH
#LogLevel INFO
# Authentication:
#LoginGraceTime 2m
#PermitRootLogin prohibit-password
StrictModes no
#MaxAuthTries 6
#MaxSessions 10
PubkeyAuthentication yes
# The default is to check both .ssh/authorized_keys and .ssh/authorized_keys2
# but this is overridden so installations will only check .ssh/authorized_keys
AuthorizedKeysFile .ssh/authorized_keys
#AuthorizedPrincipalsFile none
# For this to work you will also need host keys in %programData%/ssh/ssh_known_hosts
#HostbasedAuthentication no
# Change to yes if you don't trust ~/.ssh/known_hosts for
# HostbasedAuthentication
#IgnoreUserKnownHosts no
# Don't read the user's ~/.rhosts and ~/.shosts files
#IgnoreRhosts yes
# To disable tunneled clear text passwords, change to no here!
#PasswordAuthentication yes
#PermitEmptyPasswords no
# GSSAPI options
#GSSAPIAuthentication no
#AllowAgentForwarding yes
#AllowTcpForwarding yes
#GatewayPorts no
#PermitTTY yes
#PrintMotd yes
#PrintLastLog yes
#TCPKeepAlive yes
#UseLogin no
#PermitUserEnvironment no
#ClientAliveInterval 0
#ClientAliveCountMax 3
#UseDNS no
#PidFile /var/run/sshd.pid
#MaxStartups 10:30:100
#PermitTunnel no
#ChrootDirectory none
#VersionAddendum none
# no default banner path
#Banner none
# override default of no subsystems
Subsystem sftp sftp-server.exe
# Example of overriding settings on a per-user basis
#Match User anoncvs
# AllowTcpForwarding no
# PermitTTY no
# ForceCommand cvs server
# Uncomment the following two lines:
#Match Group administrators
# AuthorizedKeysFile __PROGRAMDATA__/ssh/administrators_authorized_keysnet stop sshd
net start sshdUsing a Private Key
ssh user@ip -i <private_key_absolute_path>        (local users)
ssh user@domain@ip -i <private_key_absolute_path> (Domain users)
Syslog configuration
1. Modifying the JumpServer Configuration File
The configuration files for JumpServer are located at: /opt/jumpserver/config/config.txt
The following elements need to be added to the JumpServer configuration:
# Syslog Configuration
SYSLOG_ENABLE=true
SYSLOG_ADDR=10.1.12.116:514  # Syslog server IP and port
SYSLOG_FACILITY=local2  # Corresponds to the Syslog configuration file
2. Restarting JumpServer
After modifying the JumpServer configuration file, you need to restart the service to apply the changes.
Command:
jmsctl restart3. Verifying the Configuration
Log into the JumpServer service to generate a login event log and check for output on the Syslog server. Example login event log:

4. Analyzing Syslog Information
| Event Type | Syslog Record Example |
| Login | Apr 19 15:25:11 10.1.14.125 jumpserver: login_log - {"backend": "Password", "backend_display": "password", "city": "local", "datetime": "2023/04/19 15:18:36 +0800", "id": "cfc378e5-6337-4bf9-a8ac-15f33c2b0314", "ip": "10.1.10.35", "mfa": {"label": "disabled", "value": 0}, "reason": "", "reason_display": "", "status": {"label": "successful", "value": true}, "type": {"label": "Web", "value": "W"}, "user_agent": "Mozilla/5.0 (Windows NT 10.0; Win64; x64) AppleWebKit/537.36 (KHTML, Gecko) Chrome/112.0.0.0 Safari/537.36 Edg/112.0.1722.48", "username": "admin"} |
| File Upload | Apr 19 15:27:26 10.1.14.125 jumpserver: ftp_log - {"account": "root(root)", "asset": "10.1.12.182-root(10.1.12.182)", "date_start": "2023/04/19 15:20:51 +0800", "filename": "/tmp/vmware-root/file.pdf", "id": "6e7721c0-2091-49fb-8853-fc18e0a2e432", "is_success": true, "operate": {"label": "uploading", "value": "upload"}, "org_id": "00000000-0000-0000-0000-000000000002", "remote_addr": "10.1.10.35", "user": "Administrator(admin)"} |
| File Download | Apr 19 15:28:08 10.1.14.125 jumpserver: ftp_log - {"account": "root(root)", "asset": "10.1.12.182-root(10.1.12.182)", "date_start": "2023/04/19 15:21:33 +0800", "filename": "/tmp/vmware-root/file.pdf", "id": "113c0601-80c1-47d1-a053-5038fd89698c", "is_success": true, "operate": {"label": "downloading", "value": "download"}, "org_id": "00000000-0000-0000-0000-000000000002", "remote_addr": "10.1.10.35", "user": "Administrator(admin)"} |
RemoteApp configuration for application publishing
Note: The Community Edition supports only the HTTP application publishing mode.
RemoteApp is the publication of applications on Microsoft RDS. To use it, you need a Windows Server with configured RDS (RemoteApp). JumpServer can connect to applications published on the RDS server and authorize in them. This is mainly relevant for database management and web interface applications.
To support RemoteApp, you need to configure JumpServer and the RDS server.
Requirements:
- MS Windows Server 2016 or MS Windows Server 2019
- Installed RDS (Remote Desktop Services) role
- Installed OpenSSH ( you can install in from https://JS_IP/core/download/ )
Adding a Publishing Server to JumpServer
Go to "System settings - Applets", select the "Remote Hosts" tab, and click "Create".
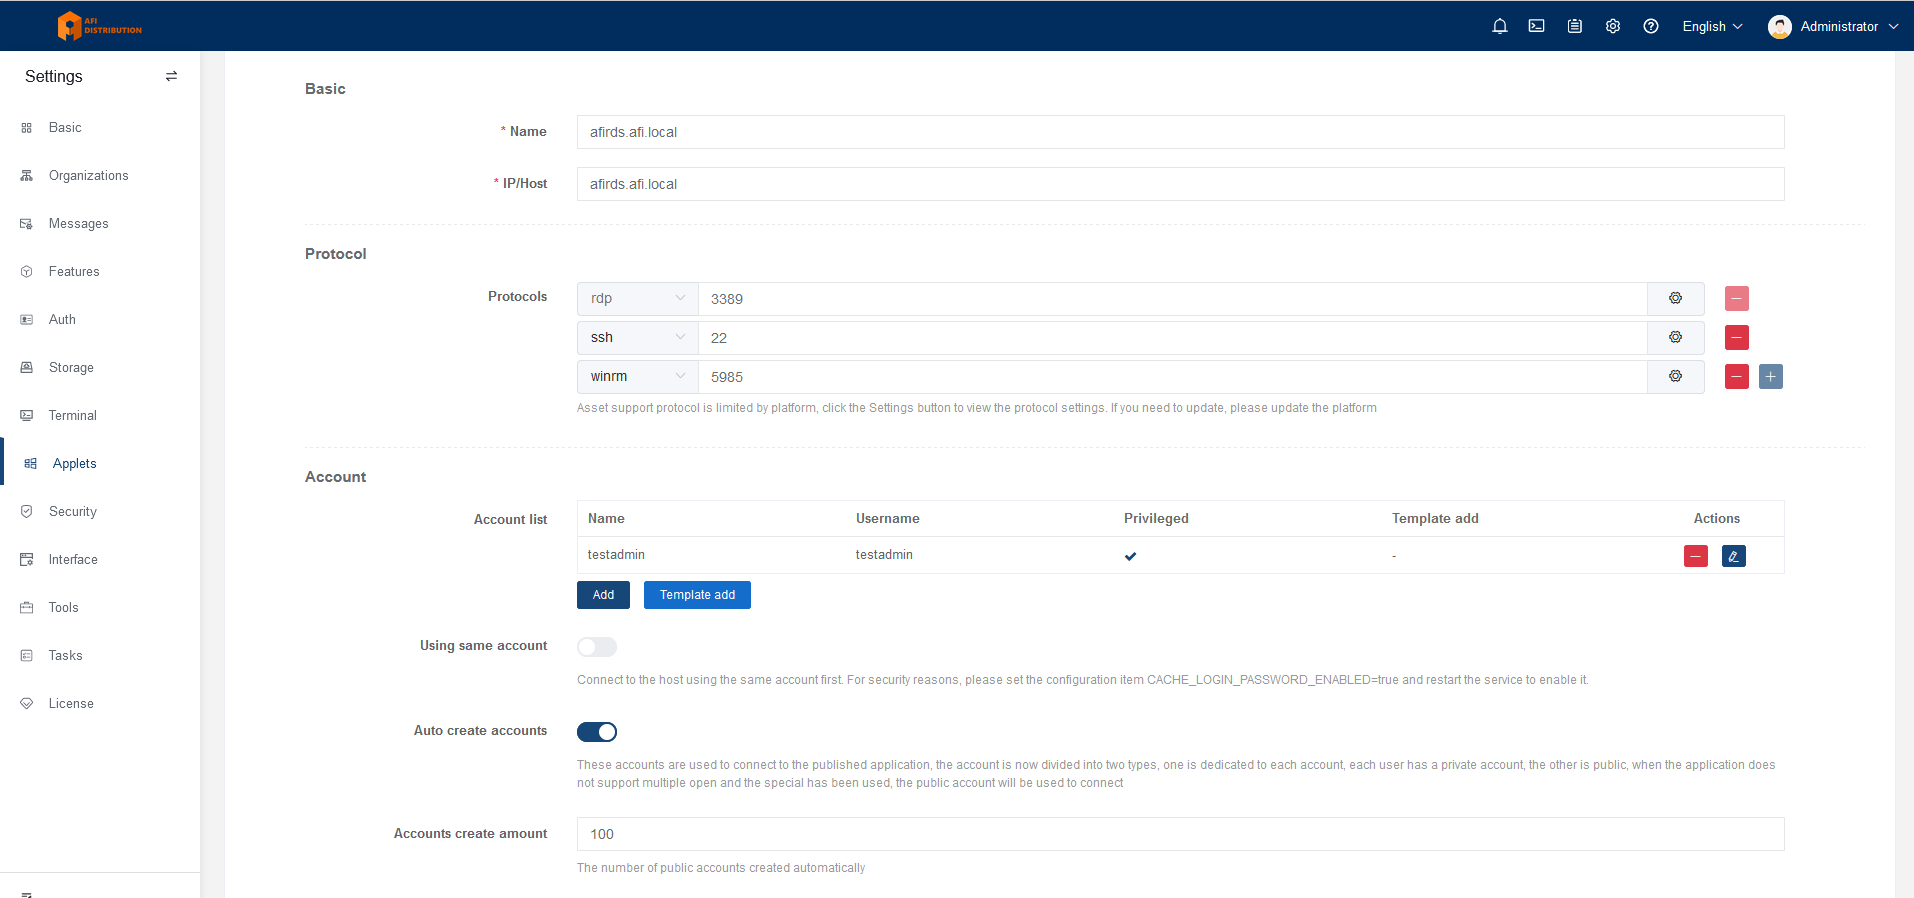
Parameter Descriptions:
| Parameter | Description |
|---|---|
| name | Device name |
| IP/Host | IP address or network name of the RDS server |
| protocol group | Protocols and port numbers. Specify WinRM or SSH if OpenSSH will be used |
| Account List | An administrator account for accessing the RDS server |
| Automatically create an account | Enable automatic account creation for connecting to published applications |
| Number of accounts created | Number of accounts to be created |
| Core service address | The communication address between the agent of the remote application publishing machine and JumpServer backend. Replace http:127.0.0.1 with your server's IP address |
| RDS license | Configure the RDS license server |
| RDS License Server | RDS license server parameters |
| RDS authorization mode | Choose "Device" or "User" to configure the authorization mode. |
| RDS single user single session | Choose "Disable" or "Enable" to configure the single session mode for one user. |
| RDS maximum disconnect time | When the session reaches this maximum time, the connection is terminated. |
| RDS remote application logout time limit | Time to log out after the remote application session is disconnected. |
Click "Submit" to save the settings.
Setting Up the Application Publishing Mechanism
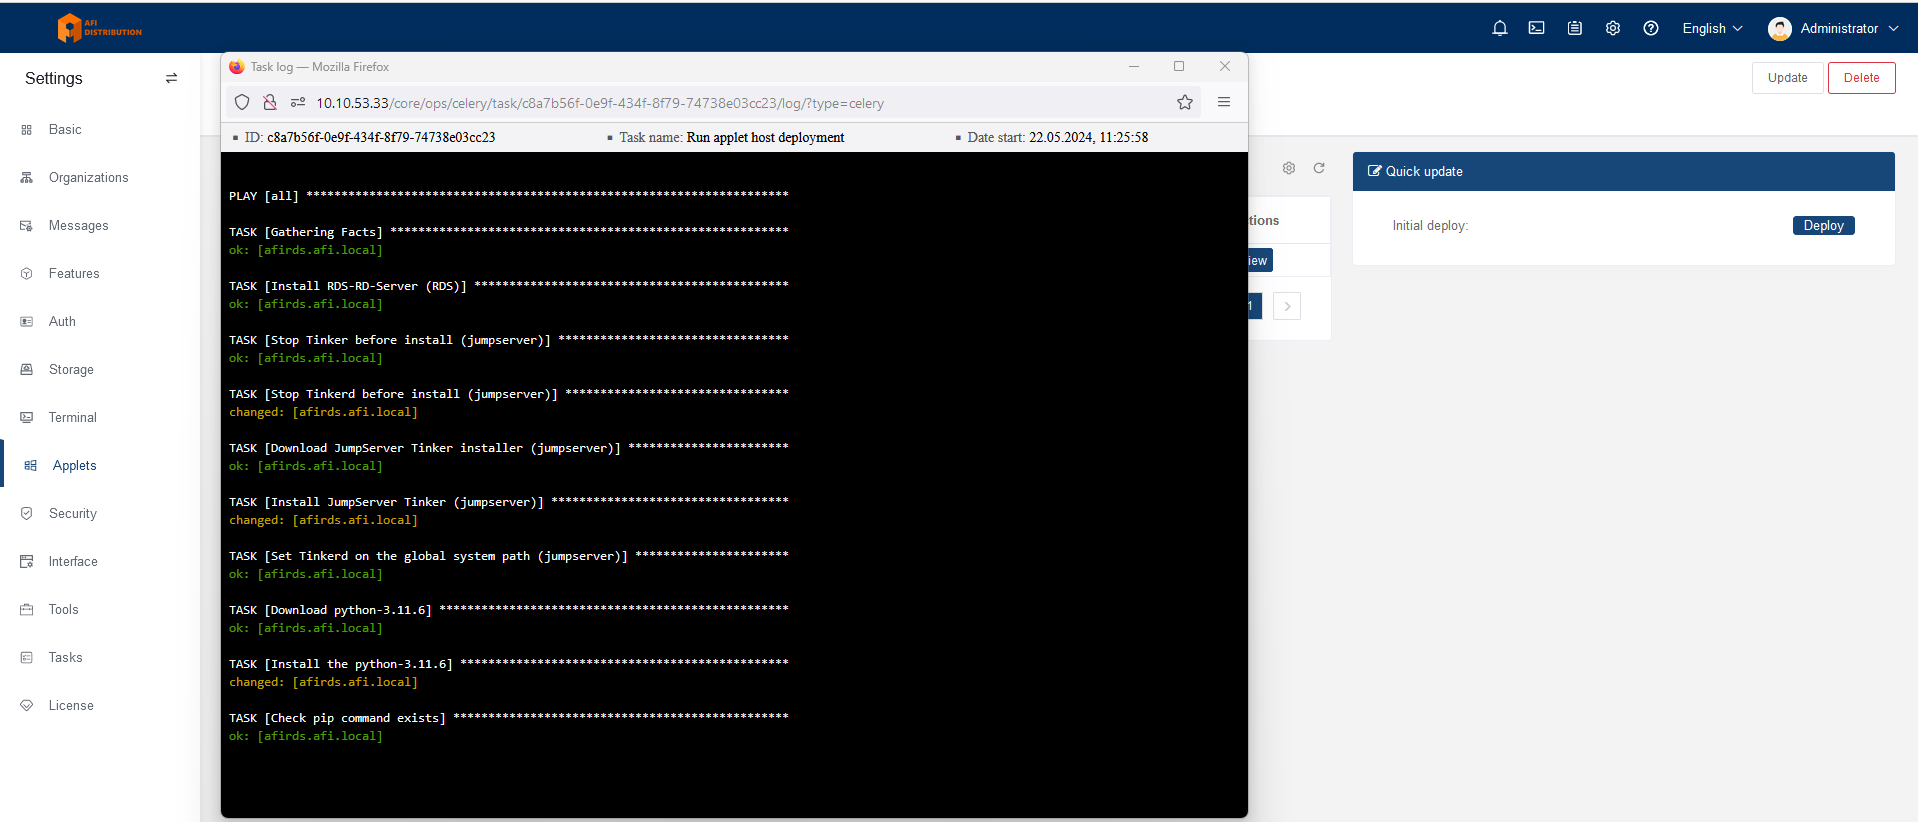
Click on the name of the added publishing server. Server information will open; go to the "Remote host deployment" tab and click the "Deploy" button on the right side of the screen.
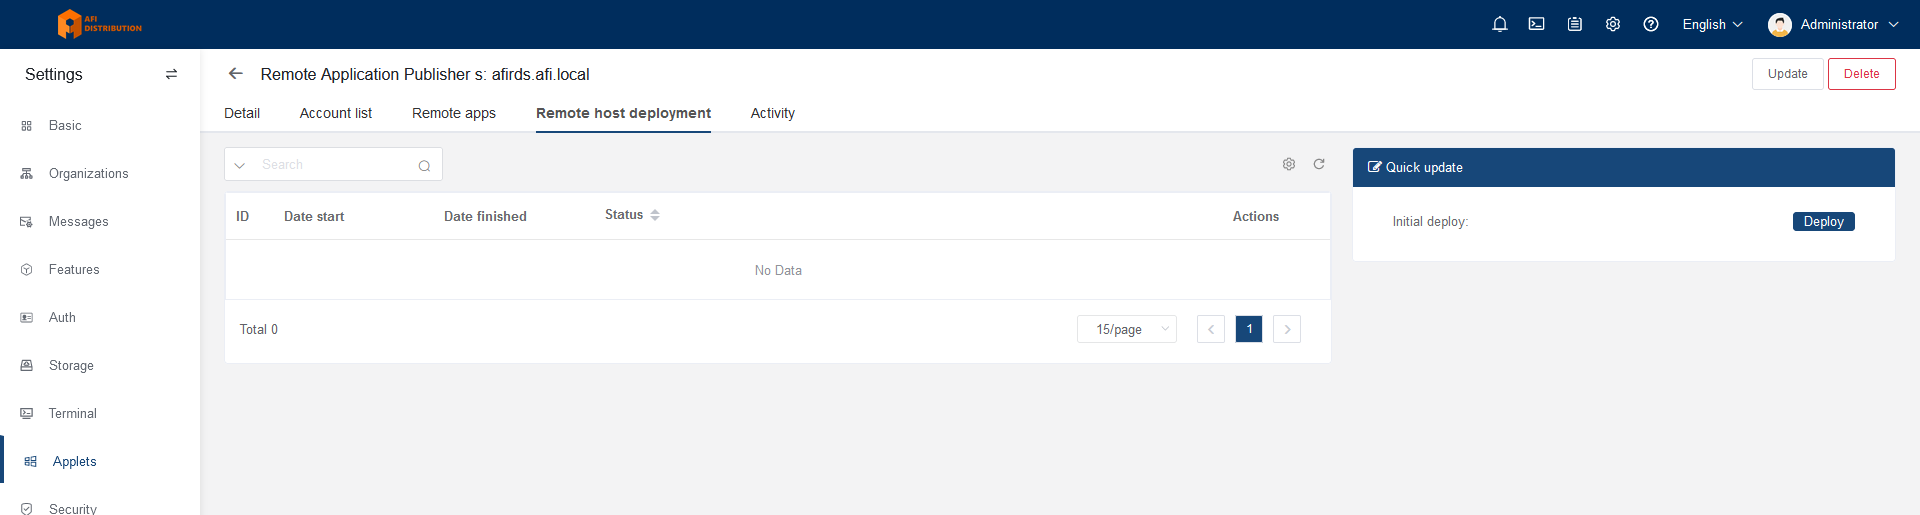
An installation window will appear, showing the installation process:
Application Publishing
You do not need to manually install applications on the RDS server; JumpServer provides ready-made applets that will automatically install and publish the required applications. Existing applets are available on the online portal, where you can download them.
To publish an application, go to the "Remote Apps" tab. Here you can see the list of added applets, their status, and the "Deploy" and "Uninstall" buttons for installing and removing applets from the publishing server.
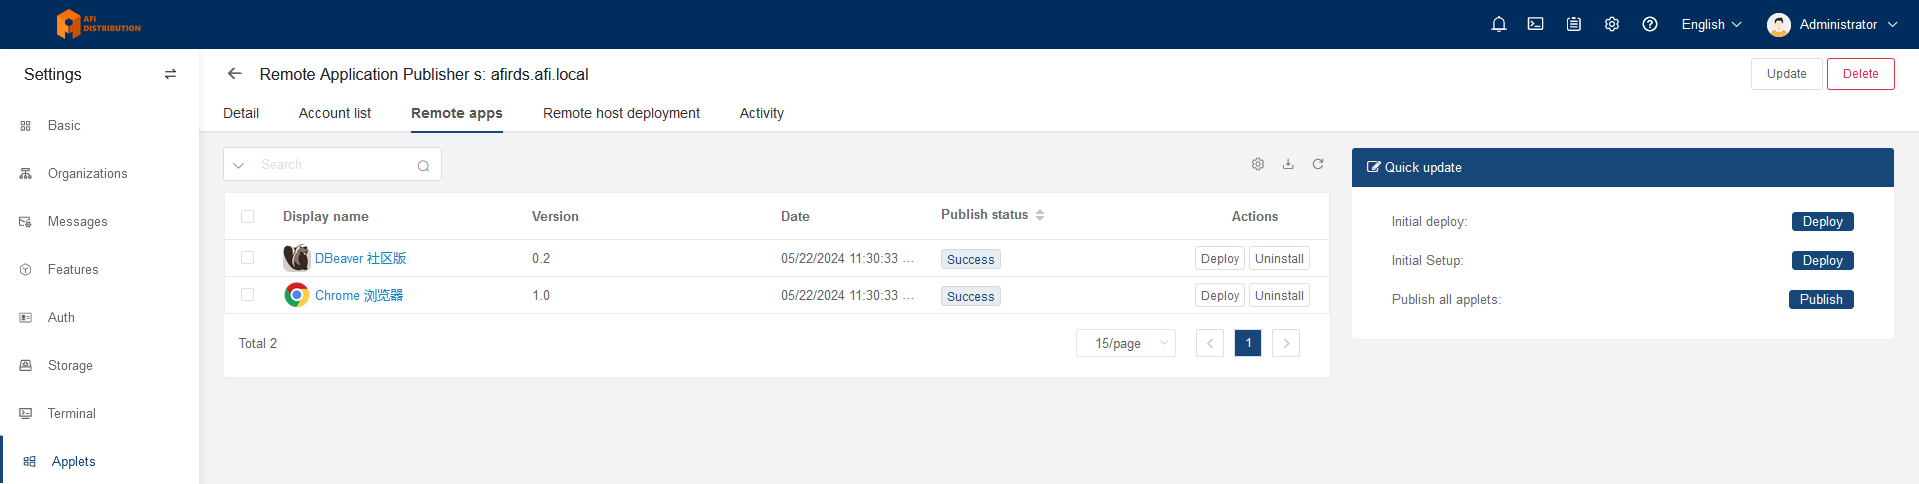
If the applet status is "Success", you can add devices and connect to them using the corresponding applications. For connecting to web interfaces (HTTP), you can use the Chrome or Firefox applets.
How to configure access to asset web-interface, HTTP session configuration
To connect to target systems via HTTP, you need to configure browser publishing via Panda (Linux-based application publishing server) or RDS (RemoteApp). RDS (RemoteApp) configuration instructions.
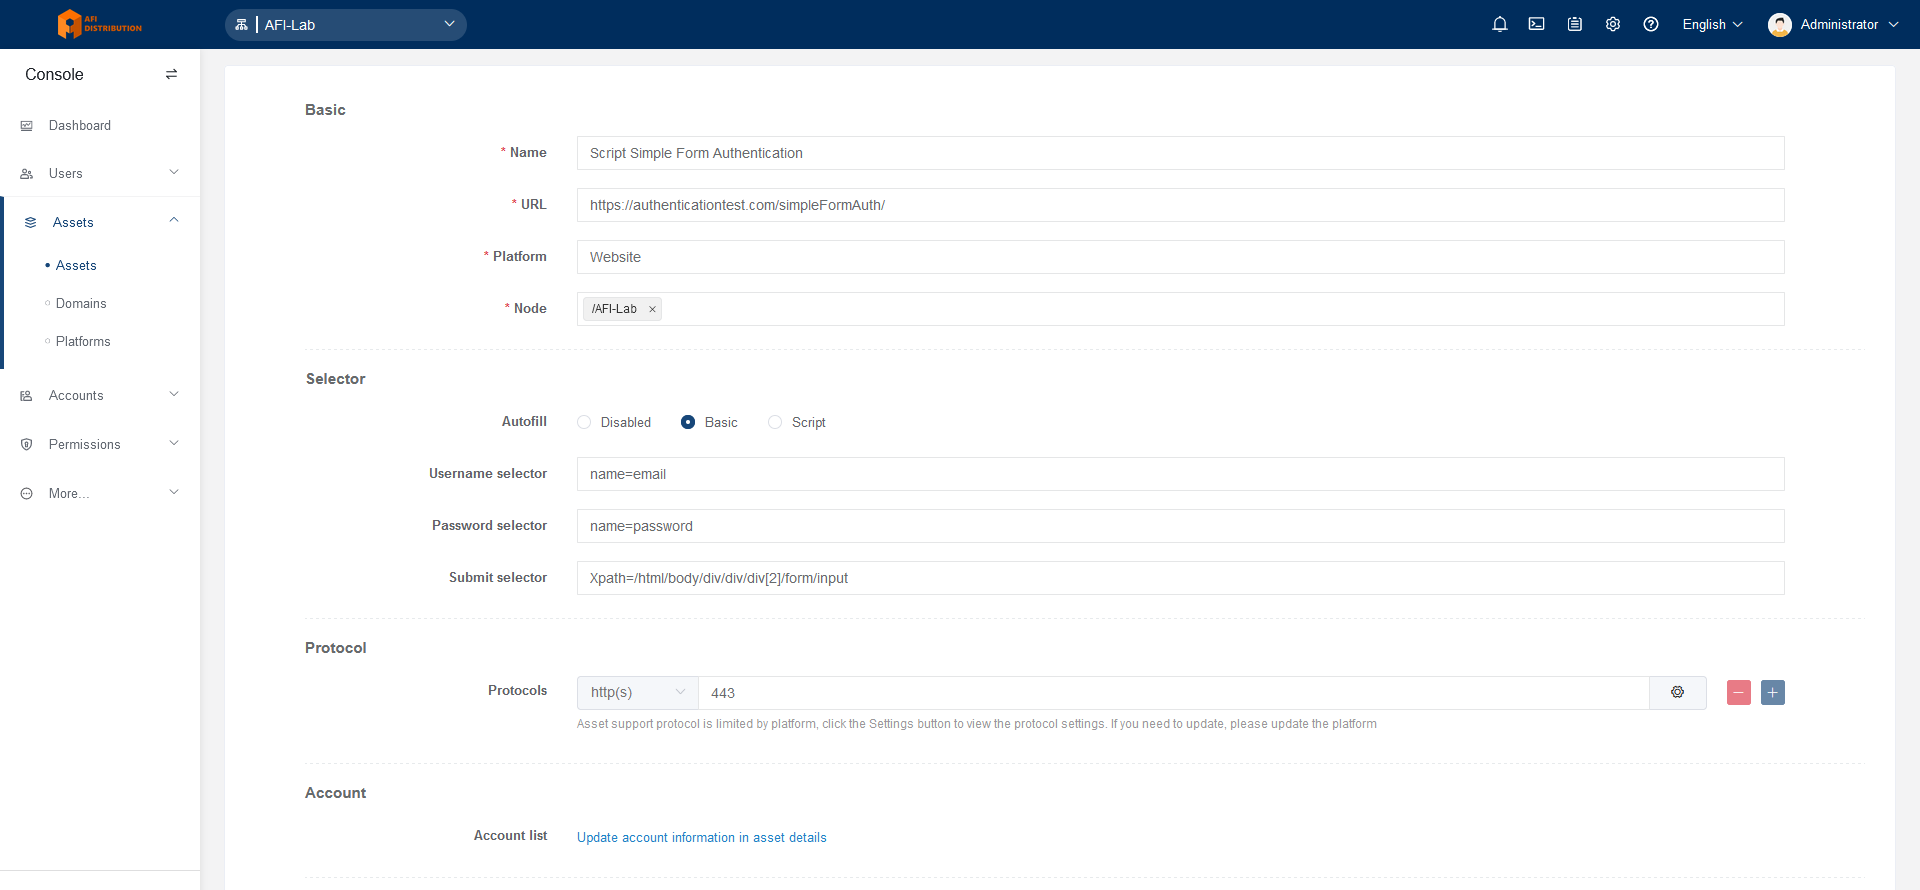
Creating a "Website" Type Device
- Go to the "Console - Assets" section, click the "Create" button, and select the target system type - Website.

- In the "Selector" section, specify the parameters of the form fields that JumpServer will fill automatically when starting a session.
For example:
With these settings, the username will be entered into the HTML element with name="email", the password will be entered into the HTML element with name="password", and then the button with Xpath=/html/body/div/div/div[2]/form/input will be clicked.
You can inspect the web form elements in the browser by right-clicking on the input field and selecting "Inspect" (in Firefox) or "View Page Source" (in Chrome).
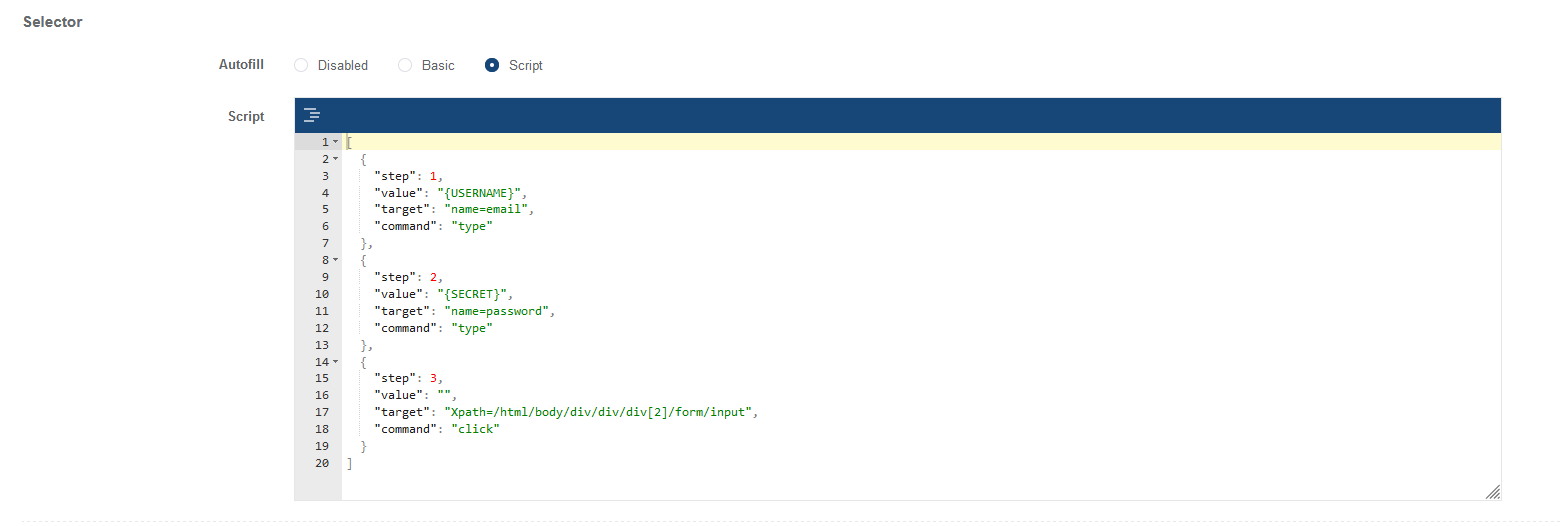
Additionally, you can use advanced settings and parameters of the login form elements by switching to Script mode:

- In the Account list section, add the username and password to be used for authorization, similar to other connection types.
- Save the settings by clicking the "Submit" button.

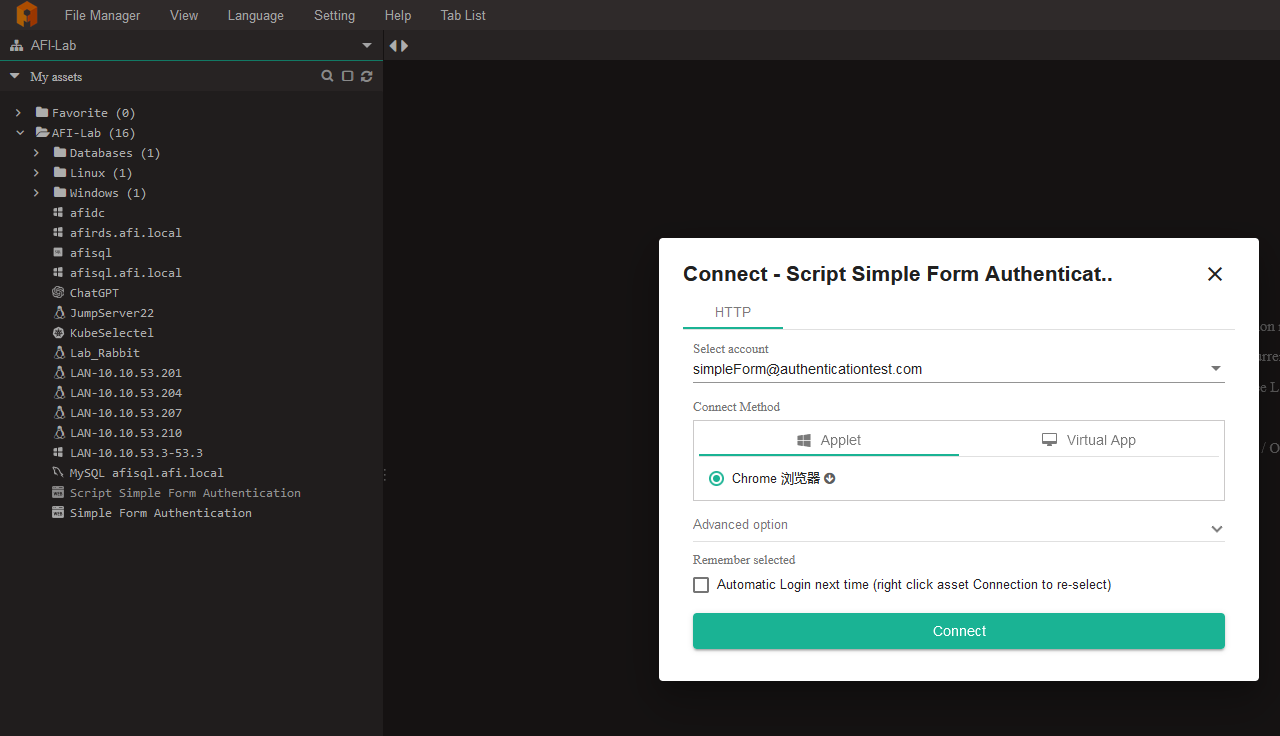
Connecting to Web Interfaces via Web Terminal
If everything is configured correctly, when selecting the desired device in the web terminal, you will see a session start option:
Setting up Panda for application publishing(alternative to RemoteApp)
JumpServer supports using both Windows Server and Linux as application publishing machines, such as for publishing Chrome and Firefox browsers for HTTP sessions and various database clients.
Types of Application Publishing:
Microsoft RemoteApp: A method of publishing applications based on Windows Server, providing maximum smoothness. Requires additional configuration of Windows Server and the purchase of Microsoft RDS CALs.
Panda (Virtual Application): A Linux-based application publishing method, characterized by medium smoothness, good compatibility, and support for operating systems like CentOS, RedHat, Kylin, and openEuler.
Setting Up Panda for Application Publishing
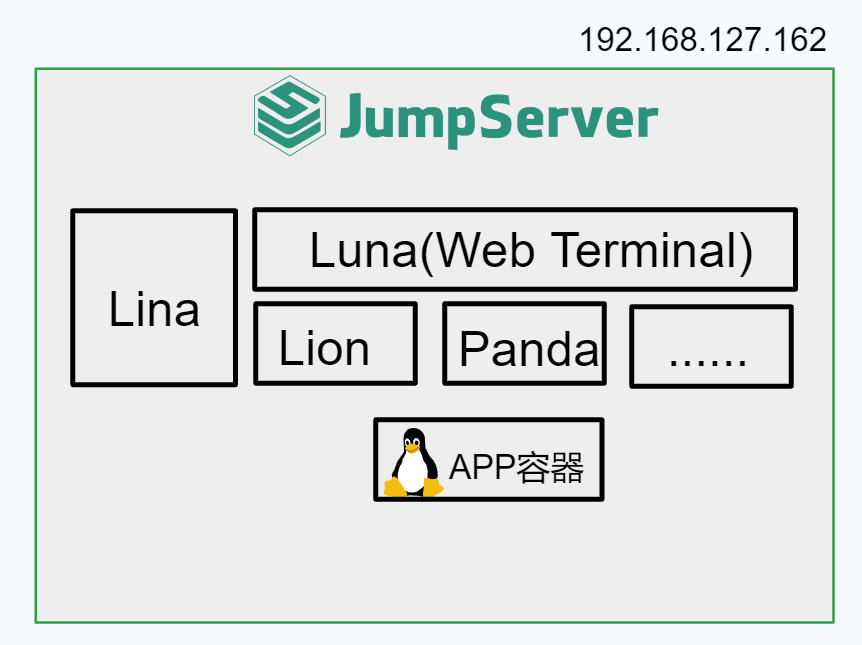
Principle of Operation:
The Linux-based application publishing machine uses container technology to isolate the application in an independent runtime environment. The Panda component provided by JumpServer manages virtual applications.
The process looks as follows:
1. The user accesses the JumpServer Web Terminal and connects to the selected virtual application.
2. The Panda component creates a GUI container based on VNC and forwards the VNC connection information to the Lion component.
3. The Lion component connects to the container.
Deployment Schemes
Scheme 1: All in One
Using the server where JumpServer is deployed as a machine for publishing virtual applications.
1. Configuring the Main Configuration File
Open the main JumpServer configuration file.
nano /opt/jumpserver/config/config.txtAdd the following parameters to it:
# Enable the Panda component
PANDA_ENABLED=1
# Enable virtual applications in the core
VIRTUAL_APP_ENABLED=1
# Panda host IP address (JumpServer IP)
PANDA_HOST_IP=192.168.127.162
# URL for Lion to connect to Panda
PANDA_HOST=http://panda:9001
Restart the JumpServer service to apply the changes.
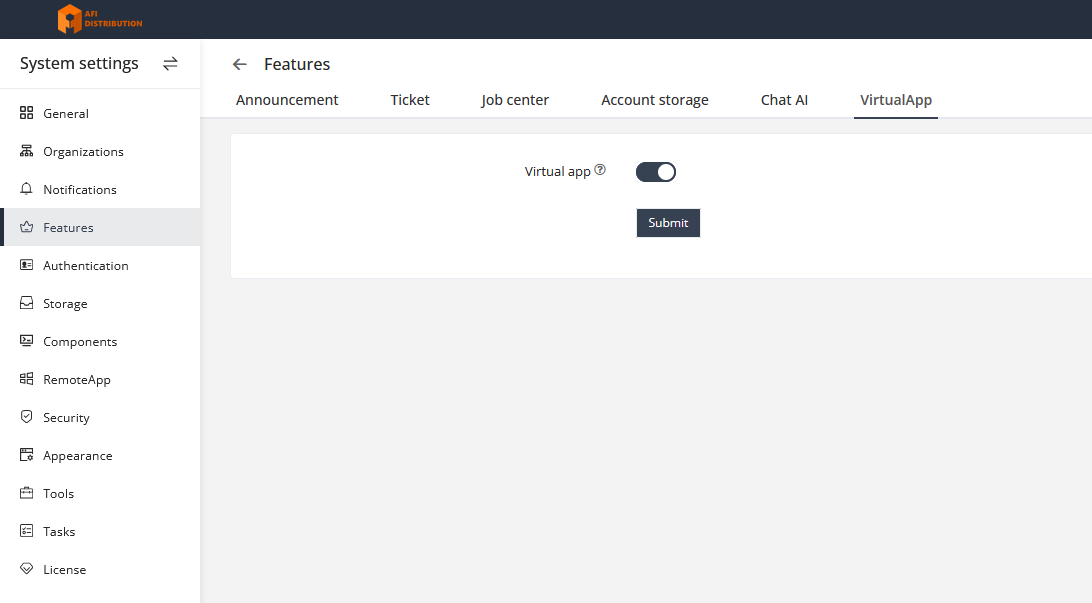
[root@localhost ~]# jmsctl restart2. Enabling the Virtual Applications Feature
In the JumpServer management console, go to System Settings → Features → VirtualApp and activate the virtual applications feature.
3. Loading Virtual Applications
Download virtual applications locally. Currently supported applications include:
Chrome, DBeaver. Distributions for these applications are available on the vendor portal. Applications for Panda are located in the Virtual App section, while others are only for RemoteApp (RDS).
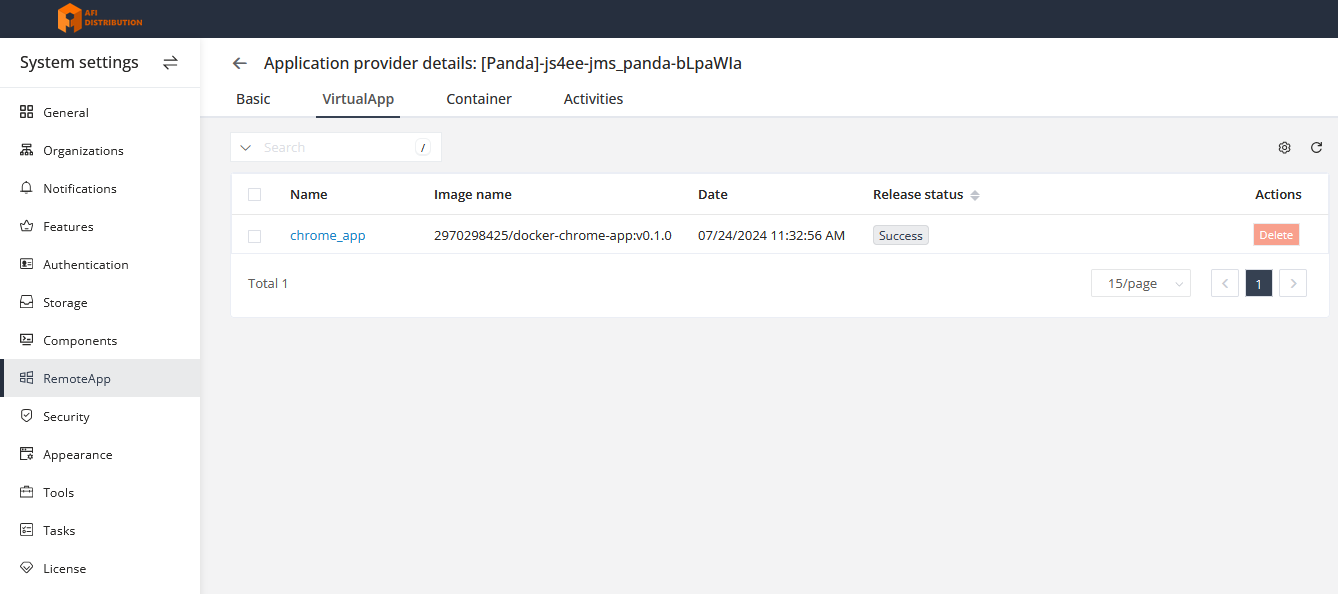
In the JumpServer management console, navigate to System Settings → RemoteApps and upload the virtual applications in the VirtualApp section.
After a short wait, the application will automatically be deployed on the application publishing machine. In the JumpServer management console, under System Settings → RemoteApps → Application Providers → VirtualApp, you can see the successful deployment of the application.
4. Using Virtual Applications
Connect to assets using virtual applications.
Note: At this point, the JumpServer service will launch the virtual application container: 2970298425/docker-chrome-app:v0.1.0 (Note: this container is approximately 1.3GB in size and requires downloading over the Internet. In a local network, it can be manually downloaded).
Scheme 2: Panda on a Separate Server

1. Configuring the Main Configuration File
Open the main JumpServer configuration file.
nano /opt/jumpserver/config/config.txtAdd the following parameters to it:
# Enable the Panda component
PANDA_ENABLED=0
# Panda IP for the Lion component
PANDA_HOST=http://192.168.127.163:9001
Restart the JumpServer service to apply the changes.
[root@localhost ~]# jmsctl restart2. Installing Panda on a Separate Machine
Unpack the JumpServer installation package on the publishing machine, install Docker and Docker Compose, and load the image.
[root@panda ~]# tar xzvf jumpserver-offline-release-v3.10.6-amd64.tar.gz -C /optInstall Docker and Docker Compose:
[root@panda ~]# cd /opt/jumpserver-offline-release-v3.10.6-amd64/scripts
[root@panda scripts]# ./2_install_docker.sh
Load the Panda image:
[root@panda scripts]# cd images
[root@panda images]# docker load -i panda:v3.10.6.tar
Create a docker-compose file for Panda:
[root@panda ~]# mkdir -p /data/jumpserver/panda/data
[root@panda ~]# mkdir -p panda
[root@panda ~]# cd panda
[root@panda panda]# cat docker-compose.yaml
version: '2.4'

services:
  panda:
    image: registry.fit2cloud.com/jumpserver/panda:v3.10.6
    container_name: jms_panda
    hostname: jms_panda
    ulimits:
      core: 0
    restart: always
    ports:
      - 9001:9001
    tty: true
    environment:
      - BOOTSTRAP_TOKEN=YmEyNTRkNTYtNDIyMi02OTJm
      - CORE_HOST=http://192.168.127.162
      - NAME=panda
      - PANDA_HOST_IP=192.168.127.163
    volumes:
      - /data/jumpserver/panda/data:/opt/panda/data
      - /var/run/docker.sock:/var/run/docker.sock:z
    healthcheck:
      test: "curl -fsL http://localhost:9001/panda/health/ > /dev/null"
      interval: 10s
      timeout: 5s
      retries: 3
      start_period: 10s
BOOTSTRAP_TOKEN is taken from the JumpServer configuration file: /opt/jumpserver/config/config.txt
CORE_HOST - The address of your JumpServer
PANDA_HOST_IP - The IP address of Panda
Start the Panda container:
docker-compose up -d3. Enabling the Virtual Applications Feature
Repeat the steps from the All in One section.
4. Loading Virtual Applications
Repeat the steps from the All in One section.
5. Using Virtual Applications
Repeat the steps from the All in One section.