JumpServer documentation (en)
- Getting Started Guide
- Installation
- Installation JumpServer Enterprise Edition
- Installation JumpServer Community Edition
- JumpServer HA-cluster configuration
- HAProxy configuration for JumpServer HA-cluster
- Operation and Maintenance with command line jmsctl
- JumpServer port discription
- Installing SSL Certificates and Configuring HTTPS
- Configuring Correct User IP Display When Using HAProxy Authentication
- How to Save Transferred Files in JumpServer
- Where Does JumpServer Store Copies of Files Transferred via SFTP and RDP?
- How to Remove Passwords Entered by Users Inside SSH Sessions from the Logs
- Syslog configuration
- Configuring External Storage for Session Recordings in JumpServer
- How to Set the Correct Date and Time in JumpServer?
- RDP Session Video Compression: Configuring Video-Worker
- System settings
- Active Directory synchronization with AD groups
- How to enable 2FA(TOTP) auth
- Installing OpenSSH for account management for Windows
- RemoteApp configuration for application publishing
- How to configure access to asset web-interface, HTTP session configuration
- Setting up Panda for application publishing(alternative to RemoteApp)
- Administration
- Troubleshooting
- Additional features
- User manual
Getting Started Guide
Getting Started Guide for JumpServer PoC
Adding Devices
1. Preparation
Prepare two devices (for SSH and RDP) and one database to test the product features.
For example:
| IP/Host Name | Port | Type | Account |
| afidc.afi.local | 3389 | Windows | testadmin |
| 10.10.53.210 | 22 | Linux | sergg |
| 10.10.53.3 | 3306 | MySQL | user |
If you need to gather information about the Windows device, change local account passwords, create new accounts, or perform other tasks, you must configure SSH for Windows.
For RDP connections, this is not required.
2. Editing the Asset Tree
Go to the Console - Assets - Assets section and open the Asset Tree tab. Right-click in this section to open the asset tree editing menu.
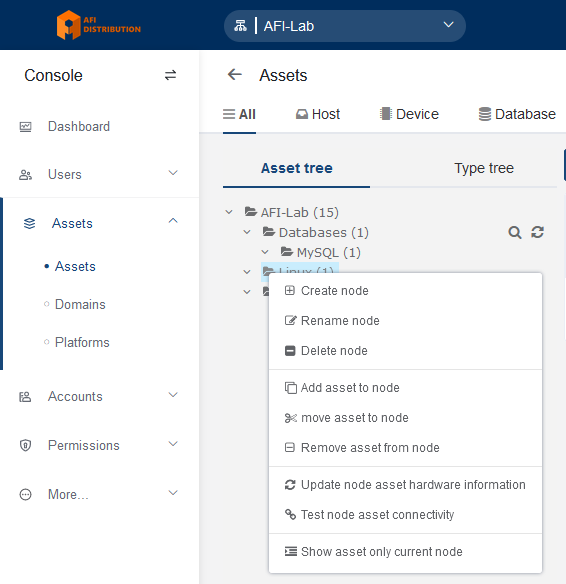
You can create folders (Nodes) and subfolders for your devices (use the Create node option). Devices can be sorted into these folders.
- A device can belong to multiple folders simultaneously.
- These folders can be used to manage access policies, for example, granting access to all devices in a specific folder.
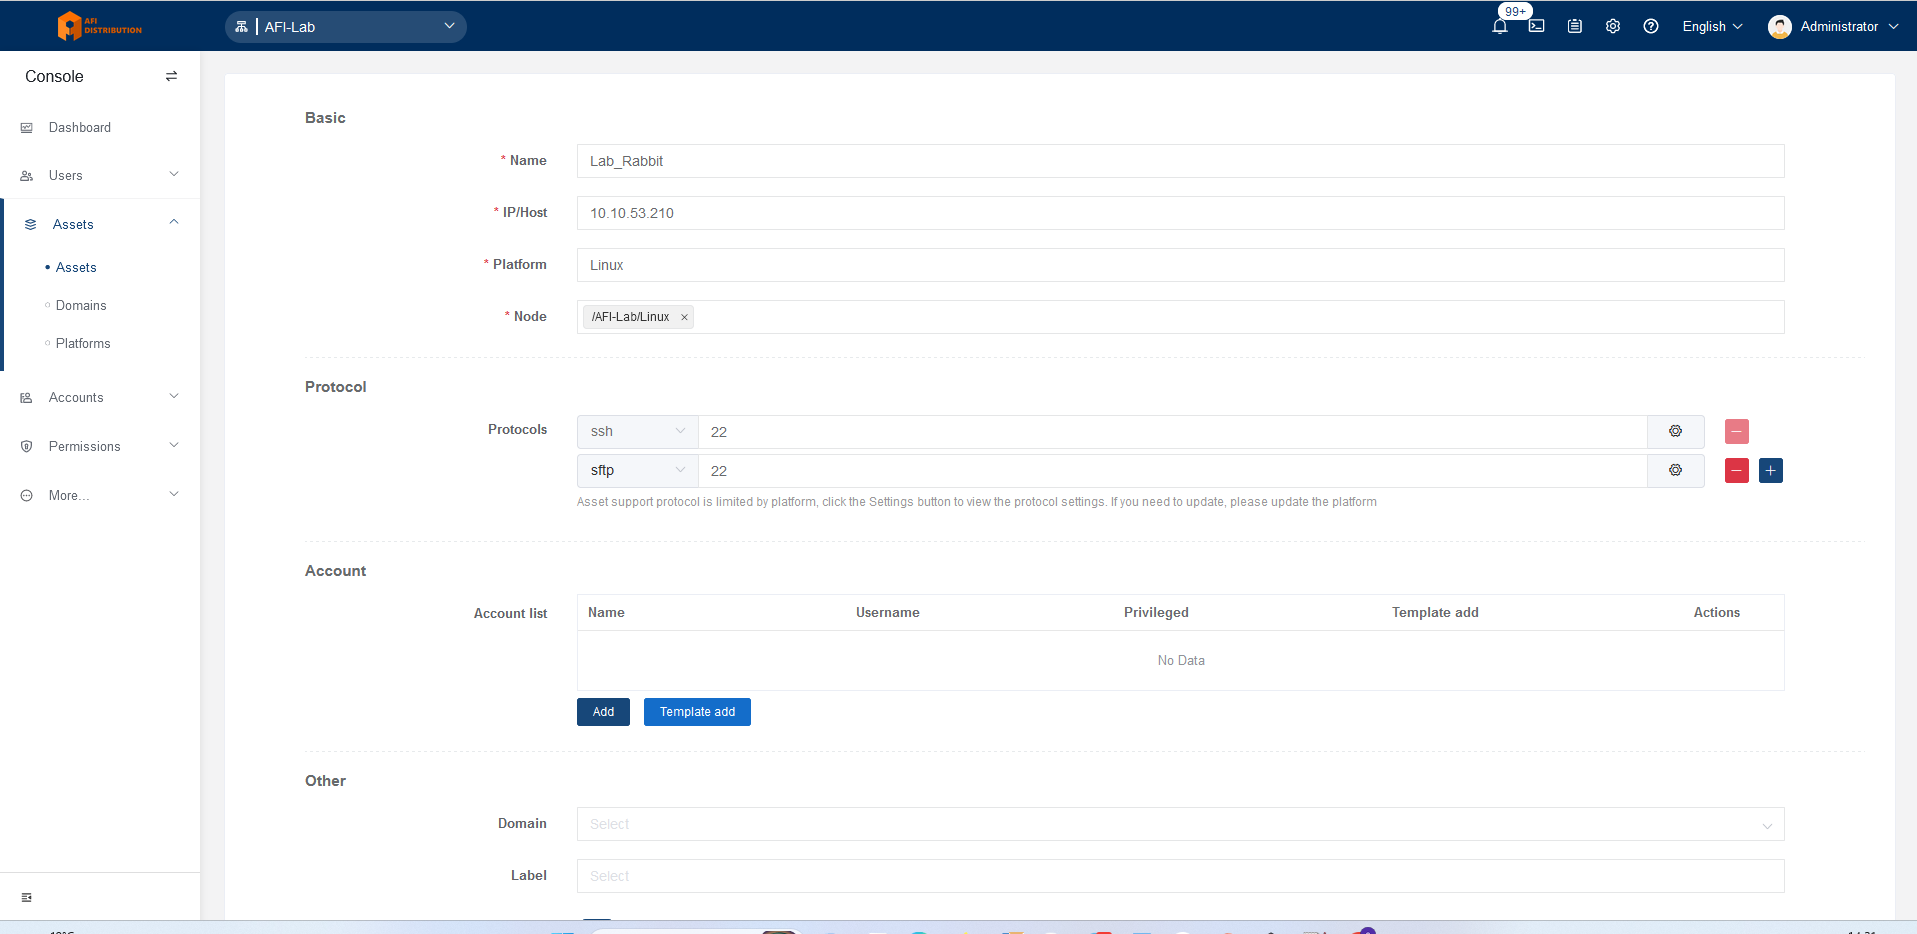
3. Adding Assets to the System
Add a Linux-based device. Windows, MySQL, and other devices are added similarly.
Click the Create button, select the device type Linux (under Host), and fill in the fields:
- Name: Any meaningful name
- IP/Host: The IP address or DNS name of the device
- Platform: Linux
- Node: Folder(s) where the device will be placed
Adjust port numbers if non-standard ports are used.
4. Configuring Device Access Permissions
Go to Console - Policies - Authorization and click the Create button. Fill in the required access parameters:
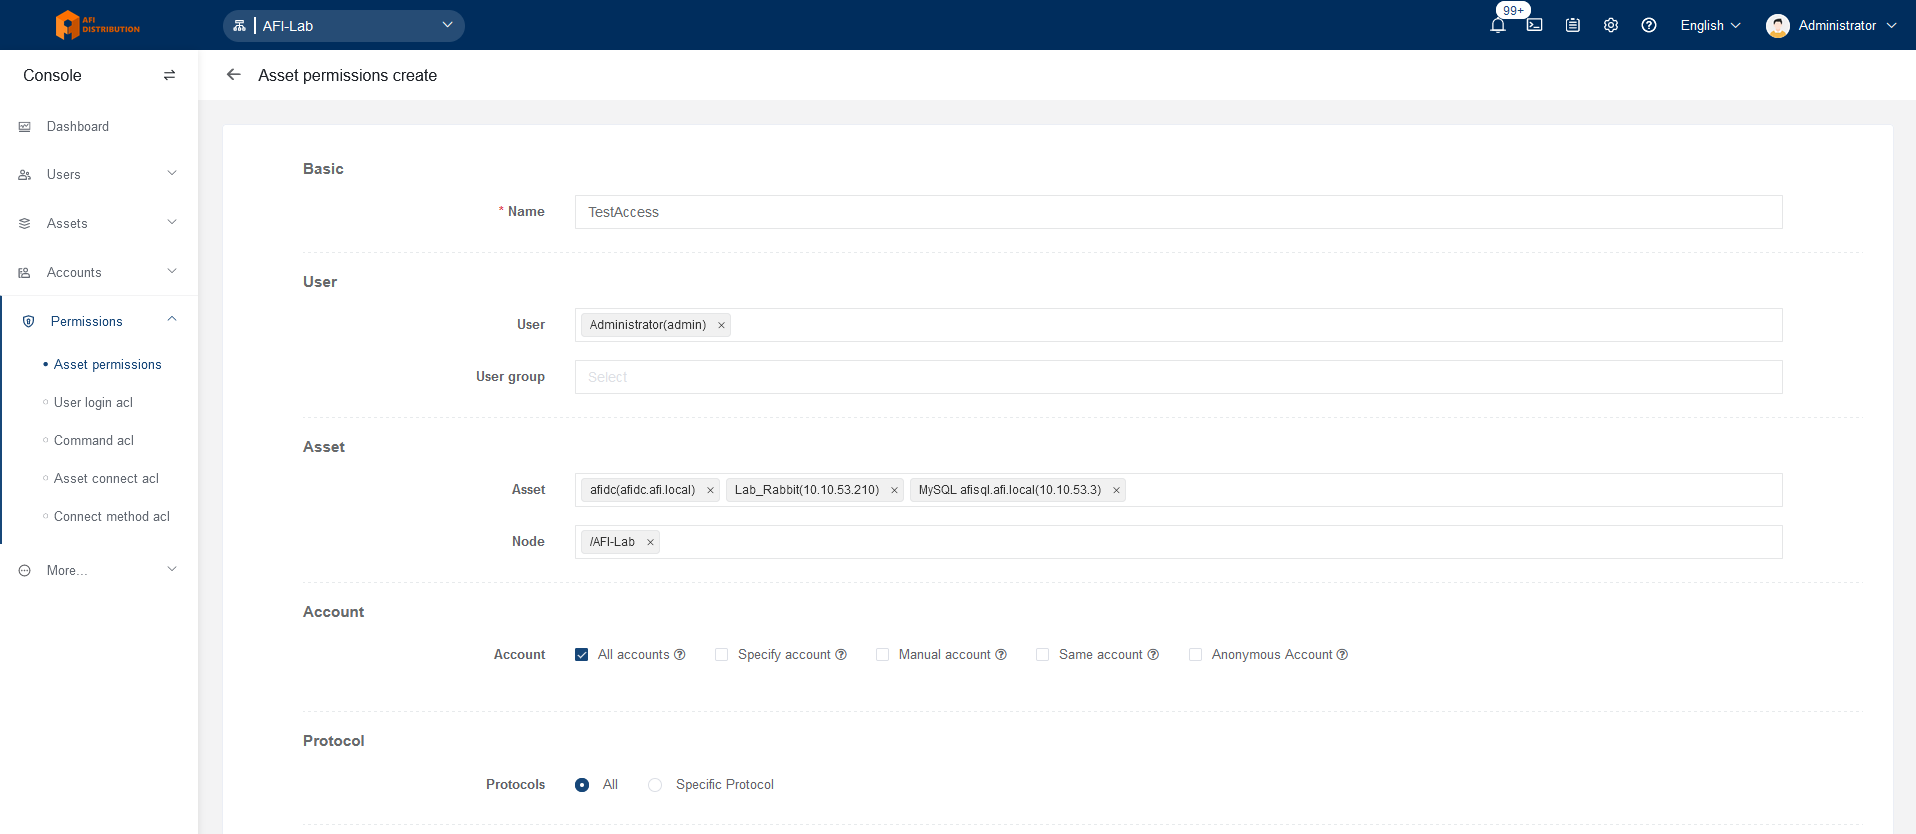
Name: A meaningful name for the access group
Users: The PAM user(s) who will gain access to the devices
Groups: User group(s) that will gain access
Assets: The device(s) to which access is granted
Nodes: Folder(s) containing the devices to which access is granted
Account:
- All accounts: Allow connections with any existing account for each device
- Specified accounts: Specify particular accounts for connection
- Virtual accounts: enable additional auth options
- Manual account: Allow manual login credentials without adding the account to the system
- Same account: Use the same account as the user's PAM login (LDAP authorization only)
- Anonymous account: Connect without credentials, typically for web interfaces where users input their login credentials manually
Protocol: Limit the protocol used for connections
Actions: Enable or disable file transfers, clipboard sharing, or session sharing permissions if supported by the connection type.
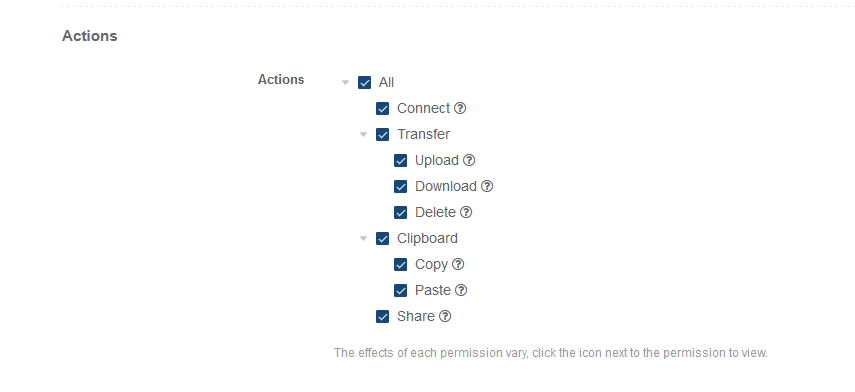
You can enable or disable the policy and set its start and end time:

Click Submit to save the settings.
5. Connecting to Devices
Go to the Web Terminal by clicking the button in the top-right corner:

In the terminal, users see only the devices they are permitted to access. Click on the desired device in the list to select the account and connection type:
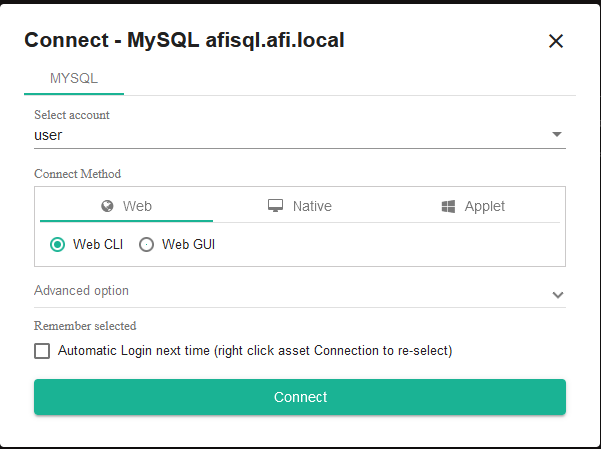
Without additional configuration, you can connect via the web interface using SSH, RDP, and SFTP, as well as to MySQL via Web CLI or Web GUI. Other connection types, such as Kubernetes, web interfaces, RemoteApp applications, and databases using dedicated clients, will be covered in other articles.
Installation
Installation JumpServer Enterprise Edition
To begin, you need to request the latest distribution file from us via email at info@afi-d.com or on Telegram: @mapceaheh.
1.System Requirements:
-
OS: Linux/AMD64 (arm64) x86_64(aarch64) kernel version 4.0 or higher (preferably Redhat, Debian, Ubuntu families)
-
CPU: 4 cores
-
RAM: 8 GB
-
HDD: 60 GB
2. Installation
Place the downloaded file in the directory /opt
Execute the following commands (file names may vary with new versions):
$ cd /opt
$ tar -xf jumpserver-offline-installer-v3.10.3-amd64.tar.gz
$ cd jumpserver-offline-installer-v3.10.3-amd64
Next, you can edit the configuration file to change installation parameters, for example, to use an external MySQL database or change the installation folder.
# nano /opt/jumpserver-offline-installer-v3.10.3-amd64/config-example.txt
Start the installation:
# cd jumpserver-offline-installer-v3.10.3-amd64
# ./jmsctl.sh install
During installation, you will need to confirm the data entered in the configuration file or provide other data if you did not fill in the configuration file in advance.
Start the application:
# ./jmsctl.sh start
3. Start application
# cd /opt/jumpserver-installer-v3.10.3
# ./jmsctl.sh start
After this, you can access the web interface at:
http://IP/ Login: admin
Password: ChangeMe
and begin configuring the system.
Installation JumpServer Community Edition
Attention: You will not be able to install a license to activate Enterprise (x-pack) features in the Community Edition. If you plan to do PoC of Enterprise version, follow the installation instructions for JumpServer Enterprise Edition.
1. Server preparation
System Requirements:
-
OS: Linux/AMD64 (arm64) x86_64(aarch64) kernel version 4.0 or higher
-
CPU: 4 cores
-
RAM: 8 GB
-
HDD: 60 GB
Installation of additional components on Debian\Ubuntu as an example:
# apt-get update
# apt-get install -y wget curl tar gettext iptables
2. JumpServer Installation
Quick Online JumpServer Installation:
In this case, JumpServer will be installed with default parameters, and MySQL and Redis databases will be installed in containers on the same server.
$ curl -sSL https://github.com/jumpserver/jumpserver/releases/latest/download/quick_start.sh | bash
Wait for the script execution to complete.
Standard Online Installation:
Download the latest installer from GitHub: https://github.com/jumpserver/installer/releases/ Below are example commands for version 3.10.3:
# cd /opt/
# wget https://github.com/jumpserver/installer/releases/download/v3.10.3/jumpserver-installer-v3.10.3.tar.gz
# tar -xf jumpserver-installer-v3.10.3.tar.gz
Next, you can edit the configuration file to change installation parameters, for example, to use an external MySQL database or change the installation folder for cluster installation etc.
# nano /opt/jumpserver-installer-v3.10.3/config-example.txt
Start the installation:
# cd ./jumpserver-installer-v3.10.3
# ./jmsctl.sh install
During installation, you will need to confirm the data entered in the configuration file or provide other data if you did not fill in the configuration file in advance.
3. Starting the Application
After the installation is complete, navigate to the product folder (the folder name may change with new versions) and start the application:
$ cd /opt/jumpserver-installer-v3.10.3
# ./jmsctl.sh start
After that, you can access the web interface at:
http://IP/ Login: admin
Password: ChangeMe
and begin configuring the system.
JumpServer HA-cluster configuration
JumpServer (including Community Edition) fully supports HA clustering without any restrictions. In this article, I will show how it works.
Why is an HA cluster needed for JumpServer
An HA (High Availability) cluster for JumpServer is necessary to ensure high system availability and minimize downtime. It enables:
- Avoiding downtime: If one cluster node fails, another continues to handle user requests.
- Ensuring fault tolerance: Clustering allows the system to automatically switch to available nodes in case of errors.
- Improving performance: Load is distributed across multiple nodes, enhancing system responsiveness under high user demand.
- Increasing data storage reliability: Using shared resources like MySQL and Redis with clustering support minimizes the risk of data loss.
- Scalability: The cluster can be easily expanded by adding more nodes to handle more users and tasks.
This architecture is particularly important for organizations where JumpServer is used as a critical access and control system.
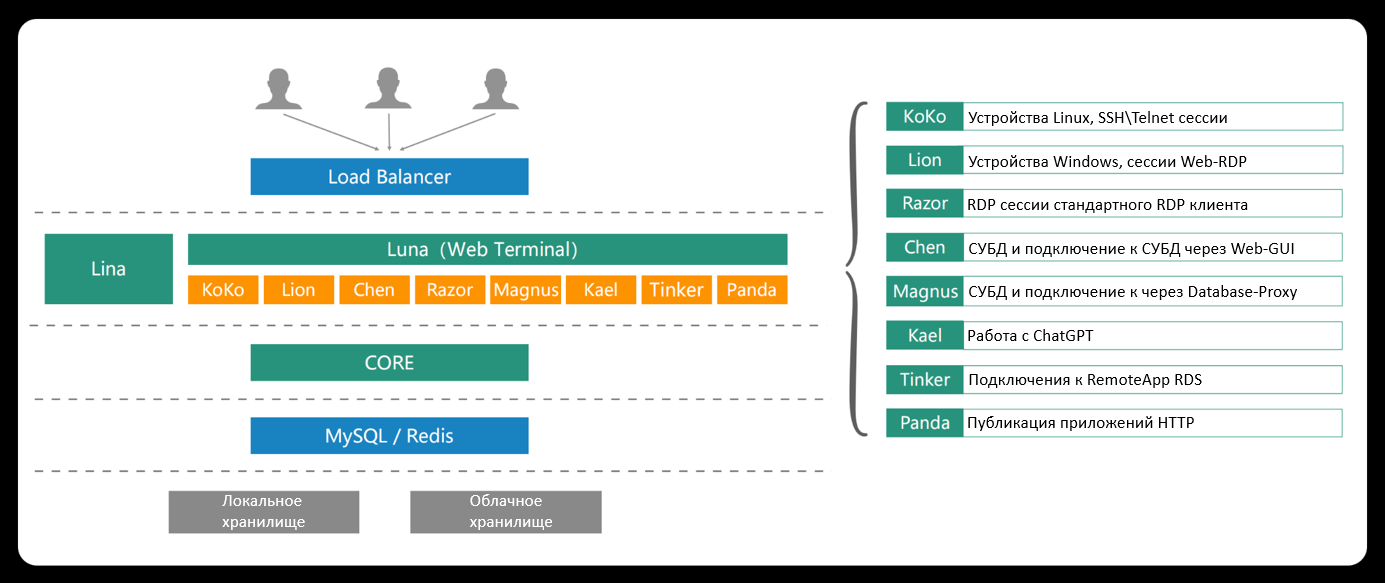
Components of the JumpServer Cluster
Nodes/JumpServer Nodes - Core cluster nodes with JumpServer installed. Each server does not store "useful" data, making it possible to clone, copy, delete, or add nodes as needed.
Database MySQL/PostgreSQL - The main DBMS for storing all JumpServer data, including system settings, device parameters, user accounts, and passwords for target systems. By default, it also stores session text logs such as SSH commands, SQL queries, and keyboard input in RDP sessions.
By default, JumpServer creates and uses PostgreSQL within a container on the same server where JumpServer is installed.
Redis Database - An auxiliary database for caching. It can be a shared database for the entire cluster or separate databases for each cluster node.
By default, JumpServer creates and uses Redis within a container on the same server where JumpServer is installed.
Video Recordings Storage - By default, it stores session recordings in the folder $folder/core/data/media, where $folder is specified in the main configuration file (default: VOLUME_DIR=/data/jumpserver). The product's web interface allows setting up external video storage: SFTP, S3, Ceph, MinIo, and others.
Command Logs Storage - Logs are stored in the main database by default. The web interface allows configuring log storage in Elasticsearch.
Load Balancer - Usually based on HAProxy, but other options can be used.
Cluster Architecture
Typically, a JumpServer cluster consists of two or more cluster nodes that:
- Are connected to a shared MySQL/PostgreSQL database (or cluster).
- Are connected to a shared Redis database (or each has its own).
- Share a common storage for video recordings:
- A common folder $folder/core/data/ (usually implemented via an NFS server).
OR
- External storage for session recordings (e.g., SFTP, S3, Ceph, MinIo). - Share a common storage for command logs:
- Based on a shared database (default).
OR
- Based on Elasticsearch. - Use a load balancer (optional).
Example of creating a JumpServer HA Cluster with two nodes
Example of creating a JumpServer cluster
- With a shared MySQL database
- With a shared Redis database
- With a shared folder for storing video recordings $folder/core/data/ using an NFS server.
For this, we need:
-
Server with NFS, MySQL, Redis:
- 4 CPUs, 8 GB of RAM.
-
JumpServer Node1:
- 4 CPUs, 8 GB of RAM, 100 GB of free disk space.
- 4 CPUs, 8 GB of RAM, 100 GB of free disk space.
-
JumpServer Node2:
- 4 CPUs, 8 GB of RAM, 100 GB of free disk space.
- 4 CPUs, 8 GB of RAM, 100 GB of free disk space.
-
HAProxy Server (or another load balancer).
1. Preparing the server with NFS, MySQL, and Redis
- Server: Ubuntu 22.04, IP:
10.10.50.10
Installing and configuring NFS
Commands may vary for different Linux versions, but generally, you need to create a shared folder:
sudo apt install nfs-kernel-server
sudo mkdir -p /data
sudo chown -R nobody:nogroup /data/
sudo chmod 777 /data/
sudo nano /etc/exports
Add the following line to the /etc/exports file:
/data 10.10.50.10/24(rw,sync,no_subtree_check)Apply the settings and restart the NFS service:
sudo exportfs -a
sudo systemctl restart nfs-kernel-server
Installing and configuring MySQL
Instructions depend on the OS version. To create a database and user, run the following commands:
mysql -uroot
mysql> create database jumpserver default charset 'utf8';
mysql> set global validate_password_policy=LOW;
mysql> create user 'jumpserver'@'%' identified by 'KXOeyNgDeTdpeu9q';
mysql> grant all on jumpserver.* to 'jumpserver'@'%';
mysql> flush privileges;
mysql> exit;
Don’t forget to configure the firewall to open the MySQL port (3306).
Installing and configuring Redis
Instructions depend on the OS version. After installing Redis, run the following commands:
sed -i "s/bind 127.0.0.1/bind 0.0.0.0/g" /etc/redis.conf
sed -i "561i maxmemory-policy allkeys-lru" /etc/redis.conf
sed -i "481i requirepass KXOeyNgDeTdpeu9q" /etc/redis.conf
This will allow access to Redis with the password KXOeyNgDeTdpeu9q. Make sure to use a unique password for your server. Open the port 6379 in the firewall.
2. Installing JumpServer
Installing the first JumpServer node
Mounting the NFS Directory
Install the NFS client, mount the folder, and configure automatic mounting at startup:
sudo apt install nfs-common
mkdir -p /opt/jumpserver/core/data
mount -t nfs 10.10.50.10:/data /opt/jumpserver/core/data
echo "10.10.50.10:/data /opt/jumpserver/core/data nfs defaults 0 0" >> /etc/fstab
Configuring JumpServer
Edit the config-example.txt file in the installer directory:
# Modify the following parameters, leave others as default.
# IMPORTANT: SECRET_KEY must match on all JumpServer nodes, or the data will not decrypt.

VOLUME_DIR=/opt/jumpserver

SECRET_KEY=
BOOTSTRAP_TOKEN=
LOG_LEVEL=ERROR
SESSION_EXPIRE_AT_BROWSER_CLOSE=True

# MySQL

DB_HOST=10.10.50.10
DB_PORT=3306
DB_USER=jumpserver
DB_PASSWORD=KXOeyNgDeTdpeu9q
DB_NAME=jumpserver

# Redis

REDIS_HOST=10.10.50.10
REDIS_PORT=6379
REDIS_PASSWORD=KXOeyNgDeTdpeu9q

# KoKo Lion
SHARE_ROOM_TYPE=redis
REUSE_CONNECTION=False
Run the installation:
./jmsctl.sh installAfter the installation is complete, you will receive the following values:
SECRET_KEY=kWQdmdCQKjaWlHYpPhkNQDkfaRulM6YnHctsHLlSPs8287o2kW
BOOTSTRAP_TOKEN=KXOeyNgDeTdpeu9q
Installing the Second JumpServer Node
Install the NFS client and mount the folder just as on the first node.
When editing the JumpServer configuration file, fill in the values for SECRET_KEY and BOOTSTRAP_TOKEN obtained after installing the first node:
VOLUME_DIR=/opt/jumpserver

SECRET_KEY=kWQdmdCQKjaWlHYpPhkNQDkfaRulM6YnHctsHLlSPs8287o2kW
BOOTSTRAP_TOKEN=KXOeyNgDeTdpeu9q
LOG_LEVEL=ERROR
SESSION_EXPIRE_AT_BROWSER_CLOSE=True

# MySQL

DB_HOST=10.10.50.10
DB_PORT=3306
DB_USER=jumpserver
DB_PASSWORD=KXOeyNgDeTdpeu9q
DB_NAME=jumpserver

# Redis

REDIS_HOST=10.10.50.10
REDIS_PORT=6379
REDIS_PASSWORD=KXOeyNgDeTdpeu9q

# KoKo Lion
SHARE_ROOM_TYPE=redis
REUSE_CONNECTION=False
And run the installation:
./jmsctl.sh installResult
After completing the setup, you will have two JumpServer nodes sharing one MySQL/Redis server and NFS storage. You can use any of the nodes to access target devices or configure HAProxy to automatically redirect users to an active node.
HAProxy configuration for JumpServer HA-cluster
HAProxy (High Availability Proxy) — is an open-source software tool used for load balancing and traffic proxying at the network protocol level, typically employed to distribute traffic across multiple servers. It is one of the most popular solutions for enhancing the availability and performance of web applications and services.
To install HAProxy on Ubuntu:
sudo apt install haproxy -yAfter installation, you need to edit the configuration file, which is the main aspect of setting up HAProxy. The configuration file is typically located at /etc/haproxy/haproxy.cfg.
Example Configuration File from the Vendor's Documentation:
global
    log         127.0.0.1 local2
    chroot      /var/lib/haproxy
    pidfile     /var/run/haproxy.pid
    maxconn     4000
    user        haproxy
    group       haproxy
    daemon
    stats socket /var/lib/haproxy/stats

defaults
    log                     global
    option                  dontlognull
    option                  redispatch
    retries                 3
    timeout http-request    10s
    timeout queue           1m
    timeout connect         10s
    timeout client          1m
    timeout server          1m
    timeout http-keep-alive 10s
    timeout check           10s
    maxconn                 3000

listen stats
    bind *:8080
    mode http
    stats enable
    stats uri /haproxy
    stats refresh 5s
    stats realm haproxy-status
    stats auth admin:password

listen jms-web
    bind *:80
    mode http
    option httpchk GET /api/health/
    stick-table type ip size 200k expire 30m
    stick on src
    balance leastconn
    server 192.168.100.21 192.168.100.21:80 weight 1 cookie web01 check inter 2s rise 2 fall 3
    server 192.168.100.22 192.168.100.22:80 weight 1 cookie web02 check inter 2s rise 2 fall 3
After modifying the configuration file, restart and enable HAProxy:
systemctl enable haproxy
systemctl start haproxyOperation and Maintenance with command line jmsctl
Operation and Maintenance - jmsctl
JumpServer includes a built-in command-line tool for operation and maintenance by default - jmsctl. To view the help documentation, run the command:
jmsctl helpJumpServer Application Management:
  ./jmsctl.sh [COMMAND] [ARGS...]
  ./jmsctl.sh --help
Installation Commands:
- install - Install the JumpServer service
Management Commands:
- config - Configure the tool, run jmsctl config --help to view help
- start - Start the JumpServer service
- stop - Stop the JumpServer service
- restart - Restart the JumpServer service
- status - Check the status of the JumpServer service
- down - Stop the JumpServer service
- uninstall - Uninstall the JumpServer service
Additional Commands:
- load_image - Load a Docker image
- backup_db - Backup the JumpServer database
- restore_db [file] - Restore data from a database backup file
- raw - Execute a docker compose command
- tail [service] - View service logs
JumpServer port discription
List of Network Ports
JumpServer requires the following network ports to be open for proper operation. Administrators can open the appropriate ports in the network and on the host depending on the deployment scheme of JumpServer components.
| Port | Purpose | Description |
|---|---|---|
| 22 | SSH | Installation, updates, and management |
| 80 | Web HTTP Service | Access to the JumpServer web interface via HTTP |
| 443 | Web HTTPS Service | Access to the JumpServer web interface via HTTPS |
| 3306 | Database Service | Used by MySQL |
| 6379 | Database Service | Used by Redis |
| 3389 | Razor Service Port | Connection to Windows assets via RDP Client |
| 2222 | SSH Client | Connection to JumpServer via terminal tools (Xshell, PuTTY, etc.) |
| 33061 | Magnus MySQL Service Port | Connection to MySQL via DB Client |
| 33062 | Magnus MariaDB Service Port | Connection to MariaDB via DB Client |
| 54320 | Magnus PostgreSQL Port | Connection to PostgreSQL via DB Client |
| 63790 | Magnus Redis Port | Connection to Redis via DB Client |
| 30000-30100 | Magnus Oracle Ports | Connection to Oracle via DB Client, port range can be configured |
Installing SSL Certificates and Configuring HTTPS
What is the Purpose of JumpServer Reverse Proxy?
Nginx supports secure WebSockets (wss://), managing connections and securing the channel with an SSL certificate. To enable the copy-paste functionality in the RDP protocol, a trusted SSL certificate must be deployed. Copy-paste in RDP assets is only possible when accessed via the HTTPS protocol.
Installing SSL Certificates and Configuring HTTPS for the Web Interface
Prepare an SSL certificate (note that the certificate must be in PEM format). Certificates should be placed in the directory /opt/jumpserver/config/nginx/cert
Stop the JumpServer service:
./jmsctl.sh stopOpen the JumpServer configuration file:
vi /opt/jumpserver/config/config.txtFind and update the Nginx configuration parameters:
## Nginx Configuration
HTTP_PORT=80
SSH_PORT=2222
RDP_PORT=3389

## HTTPS Configuration
HTTPS_PORT=443               # External port for HTTPS, default is 443
SERVER_NAME=www.domain.com   # Your domain for HTTPS
SSL_CERTIFICATE=xxx.pem      # Your certificate name in /opt/jumpserver/config/nginx/cert
SSL_CERTIFICATE_KEY=xxx.key  # Your key file name in /opt/jumpserver/config/nginx/cert
Save the configuration changes and start JumpServer:
./jmsctl.sh startIf you need to further edit the Nginx configuration file:
vi /opt/jumpserver/config/nginx/lb_http_server.confMulti-Level Reverse Proxy on Nginx
Hint:
This configuration is suitable when there is a shared external proxy server at the top level. It is an example of multi-level reverse proxying on Nginx. Each proxy section must be configured to support long WebSocket connections.
Editing the Configuration File:
vi /etc/nginx/conf.d/jumpserver.confExample Configuration without SSL:
server {

    listen 80;
    server_name demo.jumpserver.org;  # Replace with your domain

    client_max_body_size 4096m;  # Limit for maximum file upload size

    location / {
            # Specify the IP address of the JumpServer Nginx server
            proxy_pass http://192.168.244.144;
            proxy_http_version 1.1;
            proxy_buffering off;
            proxy_request_buffering off;
            proxy_set_header Upgrade $http_upgrade;
            proxy_set_header Connection "upgrade";
            proxy_set_header Host $host;
            proxy_set_header X-Forwarded-For $remote_addr;
    }
}
Recommendation:
For more secure access, it is recommended to configure SSL and use the HTTPS protocol, following the guidelines from Mozilla SSL Configuration Generator.
Example Configuration with SSL:
Redirecting HTTP to HTTPS:
server {
    listen 80;
    server_name demo.jumpserver.org;  # Replace with your domain
    return 301 https://$server_name$request_uri;  # Redirect all HTTP requests to HTTPS
}
Configuring HTTPS:
server {
    listen 443 ssl http2;
    server_name demo.jumpserver.org;  # Replace with your domain
    ssl_certificate sslkey/1_jumpserver.org_bundle.crt;  # Path to your SSL certificate
    ssl_certificate_key sslkey/2_jumpserver.org_bundle.key;  # Path to your certificate key
    ssl_session_timeout 1d;
    ssl_session_cache shared:MozSSL:10m;
    ssl_ciphers ECDHE-ECDSA-AES128-GCM-SHA256:ECDHE-RSA-AES128-GCM-SHA256:ECDHE-ECDSA-AES256-GCM-SHA384:ECDHE-RSA-AES256-GCM-SHA384:ECDHE-ECDSA-CHACHA20-POLY1305:ECDHE-RSA-CHACHA20-POLY1305:DHE-RSA-AES128-GCM-SHA256:DHE-RSA-AES256-GCM-SHA384;
    ssl_prefer_server_ciphers off;
    ssl_protocols TLSv1.1 TLSv1.2;
    add_header Strict-Transport-Security "max-age=63072000" always;

    client_max_body_size 4096m;  # Limit for maximum file upload size

    location / {
        # Specify the IP address of the JumpServer Nginx server
        proxy_pass http://192.168.244.144;
        proxy_http_version 1.1;
        proxy_buffering off;
        proxy_request_buffering off;
        proxy_set_header Upgrade $http_upgrade;
        proxy_set_header Connection "upgrade";
        proxy_set_header Host $host;
        proxy_set_header X-Forwarded-For $remote_addr;
    }
}
3. Other Load Balancers (SLB)
Hint:
- Correctly configure long WebSocket connection support.
- Consider session management issues.
Configuring Correct User IP Display When Using HAProxy Authentication
When using a load balancer such as HAProxy, all users in the system see the HAProxy address instead of the actual IP address of the user's workstation.
Solution:
-
Add the following line to the HAProxy configuration file in the
backend jms-websection:
backend jms-web
  mode http
  option forwardfor except 127.0.0.1
http-request set-header X-Forwarded-For %[src]-
On each JS server, open the Nginx configuration file:
nano /opt/jumpserver/config/nginx/lb_http_server.confserver {
listen 443 ssl http2;
set_real_ip_from 10.10.53.210; # IP вашего HAProxy
real_ip_header X-Forwarded-For;
real_ip_recursive on;
server_tokens off;-
Restart HAProxy and Jumpserver.
systemctl restart haproxy
jmsctl restart
How to Save Transferred Files in JumpServer

JumpServer can save a copy of every file transferred during sessions using the RDP and SFTP protocols.
-
Open the configuration file:
vi /opt/jumpserver/config/config.txt-
At the end of the file, add the parameter
FTP_FILE_MAX_STOREon a new line, specifying the maximum file size in megabytes. JumpServer will ignore files larger than this limit.
For example, to allow files up to 100 MB:
FTP_FILE_MAX_STORE=100Or, to save all files without practical limits, you can set a deliberately large value, such as 16 GB:
FTP_FILE_MAX_STORE=16384-
Restart JumpServer:
jmsctl restart-
If JumpServer is installed in a cluster, repeat the same configuration on all other JumpServer nodes in the cluster.
Where Does JumpServer Store Copies of Files Transferred via SFTP and RDP?
JumpServer logs file transfers over SFTP and RDP and can also save a copy of these files on the server for further analysis.
If your configuration file contains the following path:
VOLUME_DIR=/data/jumpserver/data/jumpserver/core/data/media/FTP_FILES/After configuring external storage in JumpServer, session recordings and transferred files will be saved to that external storage instead of the local disk.
How to Remove Passwords Entered by Users Inside SSH Sessions from the Logs
If users know account passwords and enter them inside SSH sessions, these passwords appear in the logs in plain text — this is JumpServer's default behavior for any user input.
To change this behavior:
-
Open the configuration file:
vi /opt/jumpserver/config/config.txt-
Add the following line at the end of the file:
DISABLE_INPUT_AS_COMMAND=true-
Restart the application:
jmsctl restartAfter this, passwords will no longer be saved in the logs.
Note: Only passwords entered in response to a password prompt (for example, after running the sudo command) will not be logged.
If a user types their password somewhere else — for example, into a text file — the password will still appear in the command logs.
Syslog configuration
1. Modifying the JumpServer Configuration File
The configuration files for JumpServer are located at: /opt/jumpserver/config/config.txt
The following elements need to be added to the JumpServer configuration:
# Syslog Configuration
SYSLOG_ENABLE=true
SYSLOG_ADDR=10.1.12.116:514  # Syslog server IP and port
SYSLOG_FACILITY=local2  # Corresponds to the Syslog configuration file
2. Restarting JumpServer
After modifying the JumpServer configuration file, you need to restart the service to apply the changes.
Command:
jmsctl restart3. Verifying the Configuration
Log into the JumpServer service to generate a login event log and check for output on the Syslog server. Example login event log:

4. Analyzing Syslog Information
| Event Type | Syslog Record Example |
| Login | Apr 19 15:25:11 10.1.14.125 jumpserver: login_log - {"backend": "Password", "backend_display": "password", "city": "local", "datetime": "2023/04/19 15:18:36 +0800", "id": "cfc378e5-6337-4bf9-a8ac-15f33c2b0314", "ip": "10.1.10.35", "mfa": {"label": "disabled", "value": 0}, "reason": "", "reason_display": "", "status": {"label": "successful", "value": true}, "type": {"label": "Web", "value": "W"}, "user_agent": "Mozilla/5.0 (Windows NT 10.0; Win64; x64) AppleWebKit/537.36 (KHTML, Gecko) Chrome/112.0.0.0 Safari/537.36 Edg/112.0.1722.48", "username": "admin"} |
| File Upload | Apr 19 15:27:26 10.1.14.125 jumpserver: ftp_log - {"account": "root(root)", "asset": "10.1.12.182-root(10.1.12.182)", "date_start": "2023/04/19 15:20:51 +0800", "filename": "/tmp/vmware-root/file.pdf", "id": "6e7721c0-2091-49fb-8853-fc18e0a2e432", "is_success": true, "operate": {"label": "uploading", "value": "upload"}, "org_id": "00000000-0000-0000-0000-000000000002", "remote_addr": "10.1.10.35", "user": "Administrator(admin)"} |
| File Download | Apr 19 15:28:08 10.1.14.125 jumpserver: ftp_log - {"account": "root(root)", "asset": "10.1.12.182-root(10.1.12.182)", "date_start": "2023/04/19 15:21:33 +0800", "filename": "/tmp/vmware-root/file.pdf", "id": "113c0601-80c1-47d1-a053-5038fd89698c", "is_success": true, "operate": {"label": "downloading", "value": "download"}, "org_id": "00000000-0000-0000-0000-000000000002", "remote_addr": "10.1.10.35", "user": "Administrator(admin)"} |
Configuring External Storage for Session Recordings in JumpServer
Storing a large volume of session recordings is a significant challenge, especially when there are many users or when JumpServer is deployed in a distributed environment. In such cases, local storage is insufficient, and an external unified storage system is required.
Supported storage systems:
-
S3 (any S3-compatible storage)
-
Ceph
-
Swift
-
OSS
-
Azure
-
OBS
-
COS
-
SFTP
Connecting External Storage
-
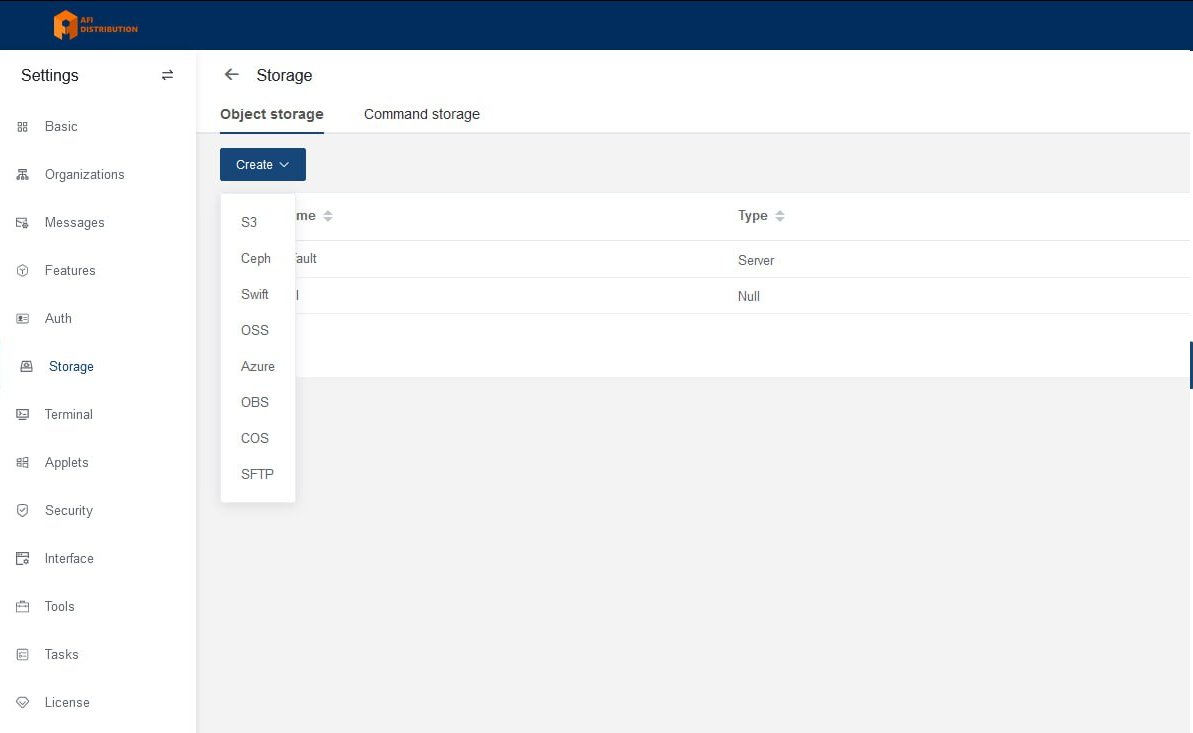
Go to System settings → Storage.
-
In the Object storage tab, click Create and choose the type of storage you want to configure.
-
Enter the required parameters and click Submit to save the configuration. You will see the newly added storage in the list.
-
On the right, click More → Test to verify the configuration.
-
Click Set to default to make this storage the primary storage.
-
Apply the same settings on all JumpServer nodes.
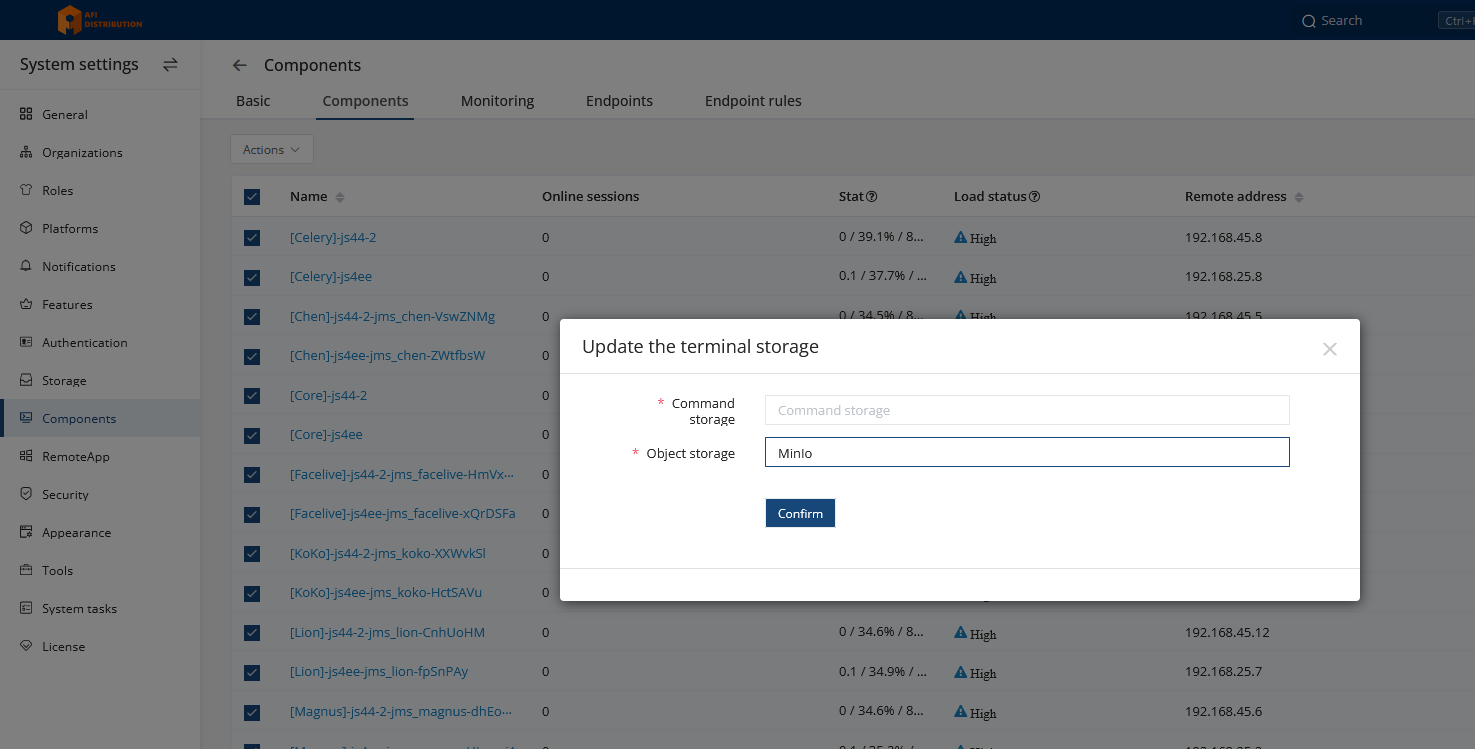
Important Note
Sometimes the Default setting does not apply correctly. Therefore, it is recommended to explicitly assign the storage in the component settings:
Go to System settings → Components, open the Components tab, select all components, click Actions → Edit, and choose your storage in the Object storage field:
How to Set the Correct Date and Time in JumpServer?
By default, JumpServer uses the Asia/Shanghai time zone, which may cause incorrect timestamps in system logs.
Solution:
1. Set the Correct Date, Time, and Time Zone on the Operating System
Ensure that both the date, time, and time zone are correct on the OS where JumpServer is installed.
Example for Moscow at 18:11 on Ubuntu Linux:
root@js4ee:/home/serg# date
Wed Dec  4 06:11:33 PM MSK 2024
If the output shows something like Wed Dec 4 06:11:33 PM UTC 2024, the time zone is incorrect.
Use Linux administration skills or consult an administrator to:
- Set the correct time and time zone.
- Enable automatic time synchronization with an NTP (Network Time Protocol) service.
This is critical for secure connections and certificates.
2. Edit the JumpServer Configuration File
Open the configuration file:
nano /opt/jumpserver/config/config.txt3. Specify the Time Zone
At the end of the file, add or modify the following lines:
# The current running version number of JumpServer, automatically generated after installation and upgrade
#
TZ=Europe/Moscow
TIME_ZONE=Europe/Moscow
Note: If only TZ is present and TIME_ZONE is missing, add the TIME_ZONE parameter as shown above.
4. Restart JumpServer
Save the changes and restart JumpServer:
jmsctl restartThis will apply the correct time and time zone settings across the system.
RDP Session Video Compression: Configuring Video-Worker
NOTE: This feature is available only in the Enterprise Edition
1. Introduction
Starting from JumpServer v3.0.0, the Video-Worker component was introduced. Its main purpose is to process recordings created by Razor (RDP Client) and Lion (Web RDP) and convert them into MP4 format for more convenient auditing and reduced disk space usage.
1.1. How It Works
-
After startup, Video-Worker registers itself as a component (similar to Koko) to obtain the recording storage settings where the converted MP4 files will be uploaded.
-
If Video-Worker is enabled in the Lion and Razor configuration, they upload their recordings directly to this component for transcoding.
-
After successful transcoding, the MP4 file is uploaded to the configured storage.
If Lion or Razor cannot upload a recording to Video-Worker, they fall back to uploading it to their own storage.
When default storage is used, recordings are saved in
core/data/media/replayImportant Notes
-
Video transcoding relies on ffmpeg, which heavily loads the CPU.
-
CPU usage can reach 100%, which is why Video-Worker should NOT be deployed on the same machine as JumpServer.
-
Razor: the recording is first converted into a series of images, and then ffmpeg compiles them into video — this consumes all available CPU cores.
-
Lion (Web RDP): uses the official CLI tool
guacenc, which fully loads a single CPU core during the entire process.
1.2. File Size Before and After Transcoding
| Test | Duration | Original Size | MP4 Size | Space Reduction |
|---|---|---|---|---|
| Test 1 | 8 hours | 4.1 GB | 0.80 GB | 80.5% |
| Test 2 | 1 hour | 2.4 GB | 0.37 GB | 84.6% |
1.3. Parameters
| Parameter | Default | Description | Notes |
|---|---|---|---|
| NAME | hostname | Hostname by default | |
| CORE_HOST | http://127.0.0.1:8080 |
| JumpServer URL used for API registration | Video-worker registers in core just like koko | ||
| BOOTSTRAP_TOKEN | none | Pre-generated secret key; must match JumpServer config | |
| BIND_HOST | 0.0.0.0 | Bind IP | |
| HTTPD_PORT | 9000 | HTTP/WS port | |
| LOG_LEVEL | INFO | DEBUG / INFO / WARN / ERROR | |
| VIDEO_WORKER_COUNT | 0 | Number of parallel workers; 0 = CPU cores + 1 | If >0, the specified value is used |
| VIDEO_WORKER_SECRET_KEY | '' | Random 32-character key for encryption/decryption | Must be the same for multiple workers |
| VIDEO_WORKER_CLEAN_PERIOD | 7 | Log retention period in days | Cleanup every 24 hours |
| IGNORE_VERIFY_CERTS | False | Ignore HTTPS certificate validation for CORE_HOST | Supported since v3.10.8+ |
2. Enabling Video-Worker on the Main JumpServer (Not Recommended)
JumpServer configuration file:
/opt/jumpserver/config/config.txtAdd the following parameters to enable Windows recording transcoding to MP4:
USE_VIDEO=1
ENABLE_VIDEO_WORKER=True
VIDEO_WORKER_HOST=http://jms_video:9000
Restart JumpServer:
jmsctl restartNote:
Since ffmpeg heavily loads the CPU, running Video-Worker on the same node as JumpServer is not recommended. Consult JumpServer support for planning recommendations.
3. Deploying a Separate Transcoding Server
JumpServer version on the transcoding server must match the core environment version.
3.1. Deployment Using Docker Compose
Example Environment
| Service | IP |
|---|---|
| JumpServer | 192.168.10.10 |
| Video-Worker | 192.168.10.11 |
Server Preparation
Unpack the JumpServer offline package and prepare the environment:
tar -zxvf jumpserver-offline-release-v3.10.9-amd64.tar.gz
cd /opt/jumpserver-offline-release-v3.10.9-amd64/scripts
./2_install_docker.sh      # установка Docker
docker load -i images/video-worker:v3.10.9.tar
Video-Worker Configuration
Edit:
vim /data/config.txtExample config:
CORE_HOST=http://192.168.10.10:8080
BOOTSTRAP_TOKEN=YTc1NjNmNDItZjNlYS00NTMw   # должен совпадать с конфигом JumpServer

IGNORE_VERIFY_CERTS=true  # игнорировать сертификат HTTPS при подключении к CORE_HOST

VIDEO_WORKER_COUNT=6       # количество параллельных задач
VIDEO_WORKER_CLEAN_PERIOD=7  # период очистки логов (в днях)

HTTPD_PORT=9000
LOG_LEVEL=ERROR
Docker Compose file
vim /data/docker-compose-video.yml(Full content preserved from original)
version: '2.4'

services:
  video:
    image: registry.fit2cloud.com/jumpserver/video-worker:v3.10.9
    container_name: jms_video
    hostname: jms_video
    cpus: 2
    ulimits:
      core: 0
    restart: always
    tty: true
    ports:
      - 9000:9000
    env_file:
      - /data/config.txt
    volumes:
      - /data/video/data:/opt/video/data
    healthcheck:
      test: "curl -fsL http://localhost:9000/video-worker/health/ > /dev/null"
      interval: 10s
      timeout: 5s
      retries: 3
      start_period: 10s
    networks:
      - video_net
JumpServer Configuration
vim /opt/jumpserver/config/config.txt

ENABLE_VIDEO_WORKER=true
VIDEO_WORKER_HOST=http://192.168.10.11:9000
Managing Video-Worker
docker-compose -f docker-compose-video.yml up -d   # запуск
docker-compose -f docker-compose-video.yml down    # остановка
3.2. Deployment Using Original JumpServer Files
Configure the Transcoding Server
Edit:
vim /opt/jumpserver/config/config.txtDisable unnecessary components:
CORE_ENABLED=0
CELERY_ENABLED=0
KOKO_ENABLED=0
LION_ENABLED=0
MAGNUS_ENABLED=0
CHEN_ENABLED=0
KAEL_ENABLED=0
PANDA_ENABLED=0
WEB_ENABLED=0
XRDP_ENABLED=0

USE_VIDEO=1
ENABLE_VIDEO_WORKER=True
CORE_HOST=http://192.168.10.10:8080
BOOTSTRAP_TOKEN=YTc1NjNmNDItZjNlYS00NTMw
Then update the corresponding YAML files and restart:
cd /opt/jumpserver-offline-release-v3.10.9-amd64/compose/
jmsctl restart
JumpServer Side Configuration
vim /opt/jumpserver/config/config.txt

ENABLE_VIDEO_WORKER=true
VIDEO_WORKER_HOST=http://192.168.10.11:9000
Update YAML files:
cd /opt/jumpserver-offline-release-v3.10.9-amd64/compose/And restart:
jmsctl restartDiagnostics
If transcoding fails, check two possible areas:
1. Transcoding logs
Find the session log by session ID:
video/data/tasks/{id}2. Lion and Razor logs
If there is no corresponding task entry, the issue may be related to file upload to Video-Worker.
System settings
Active Directory synchronization with AD groups
Configuring Integration with Active Directory
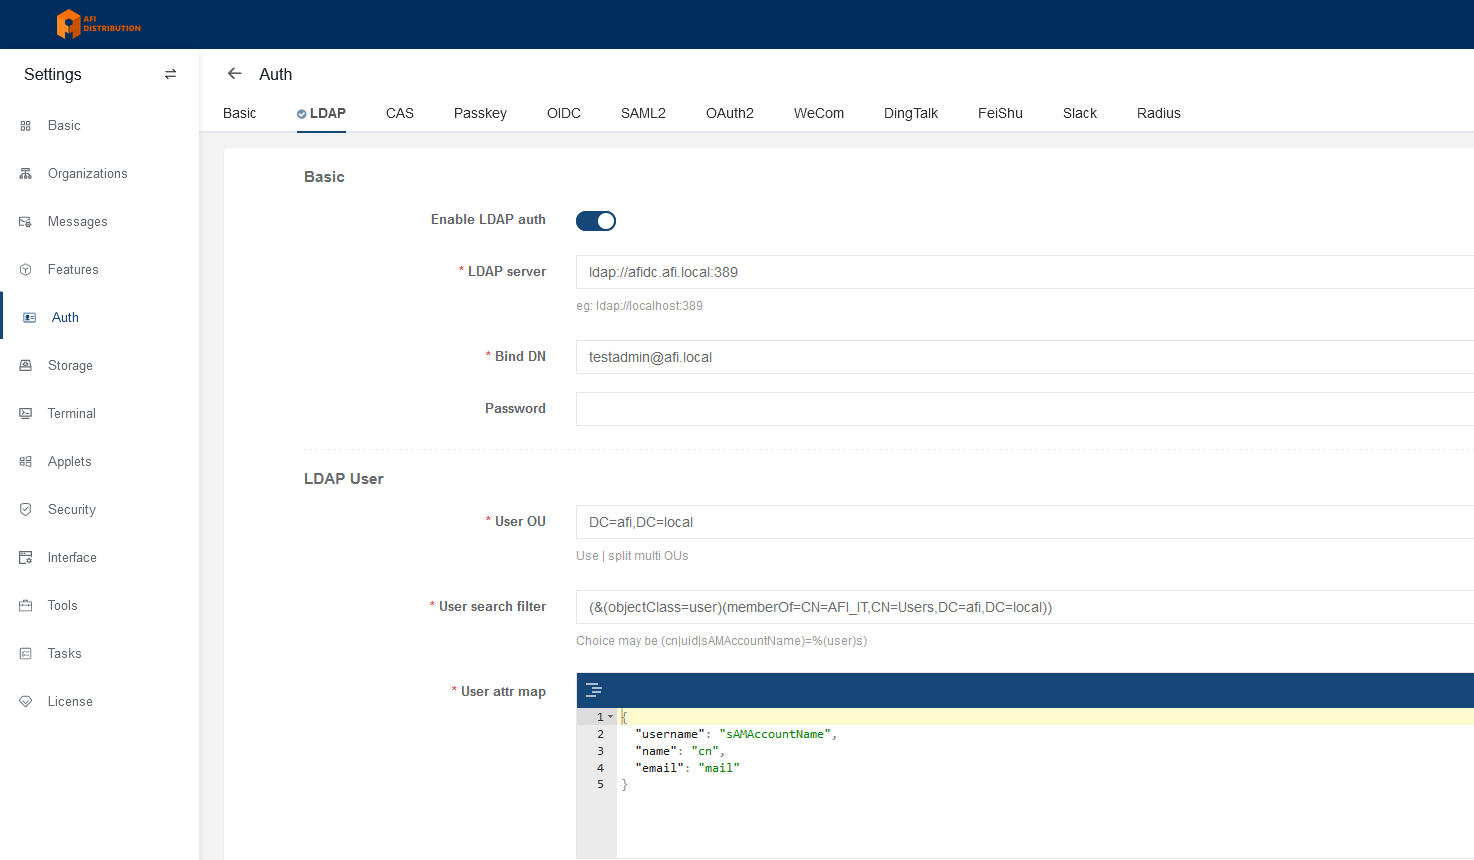
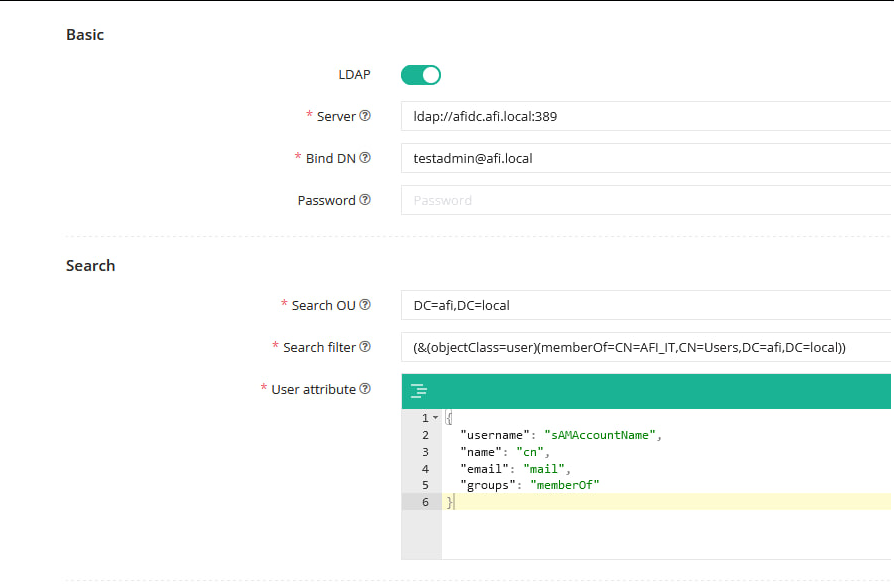
1. Go to "System settings" - "Auth" and select the LDAP tab.
2. Enter the LDAP server address, an account for connection, and its password.
3. Specify the OU and user search filter. See an example of a filter for a specific group in the screenshot below.
4. Click the "Submit" button to save the settings. Note: After changing parameters and settings, always click "Submit" to apply changes. Otherwise, the test will run with old parameters.
5. Click the "Test connection" button to verify the settings or "Test login" to check a specific user's authorization.
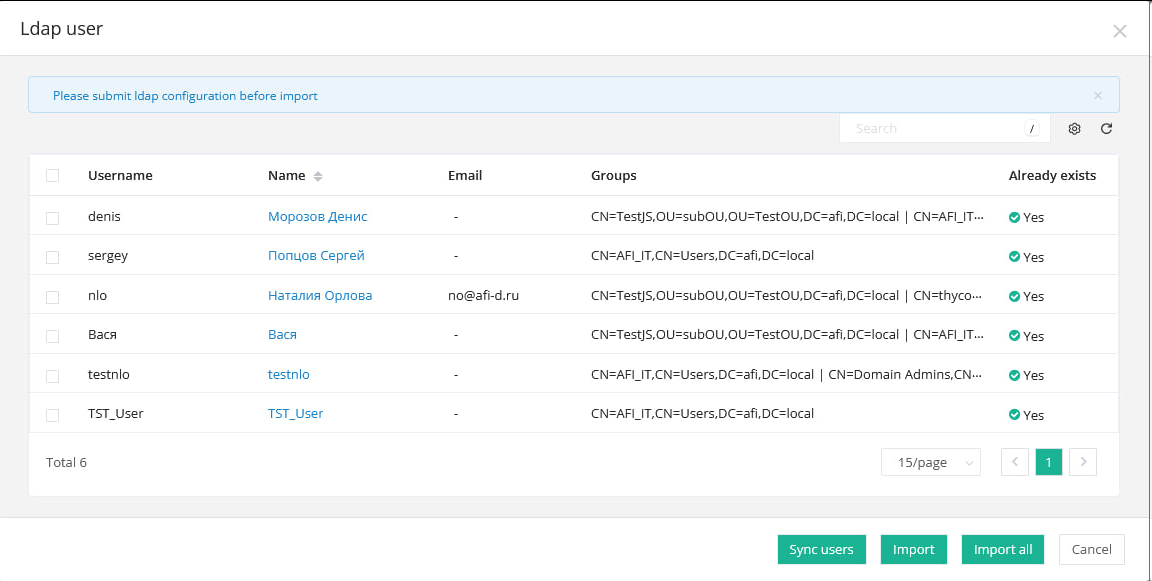
6. Click the "Bulk Import" button. You should see the users of the group that will be added for PAM authorization. You can select specific users and click "Import" or import all users by clicking "Import all".
7. You can also configure automatic user synchronization by clicking the "Sync setting" button.
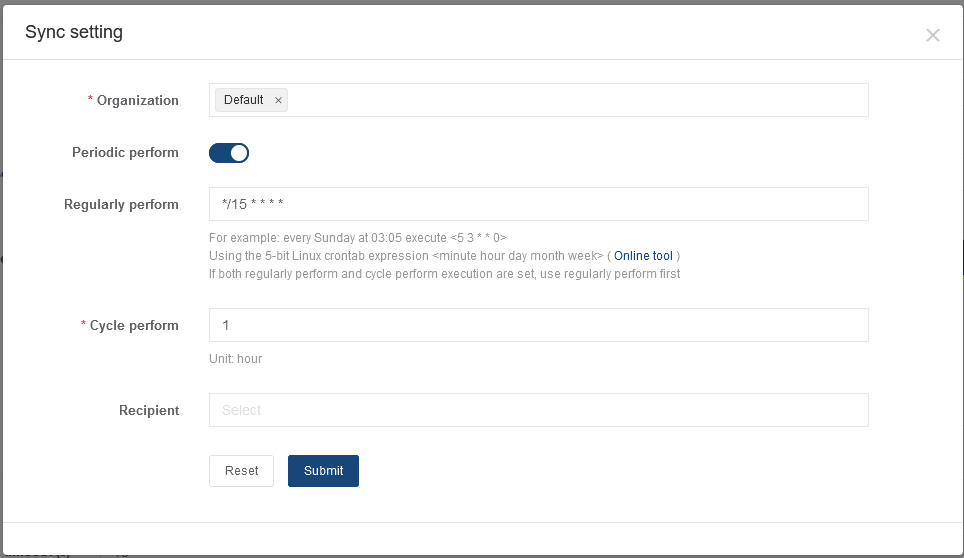
Synchronization with Active Directory Groups
Why synchronize with AD groups?
Managing access rights to target systems can be done using familiar Active Directory groups. Adding or removing a user from such groups will automatically synchronize with the permissions matrix in JumpServer, and the user will gain or lose access rights.
Configuring synchronization with AD groups.
1. Go to System settings - Authentication - LDAP
2. In the User attribute field, add the parameter groups to look like this:
{
  "username": "sAMAccountName",
  "name": "cn",
  "email": "mail",
  "groups": "memberOf"
}
See screenshot:
3. Click the Submit button to save the settings.
4. Click the User Import button and then click Sync Users in the opened window.
If everything is correct, you will see a list of users and a column with AD group attributes:
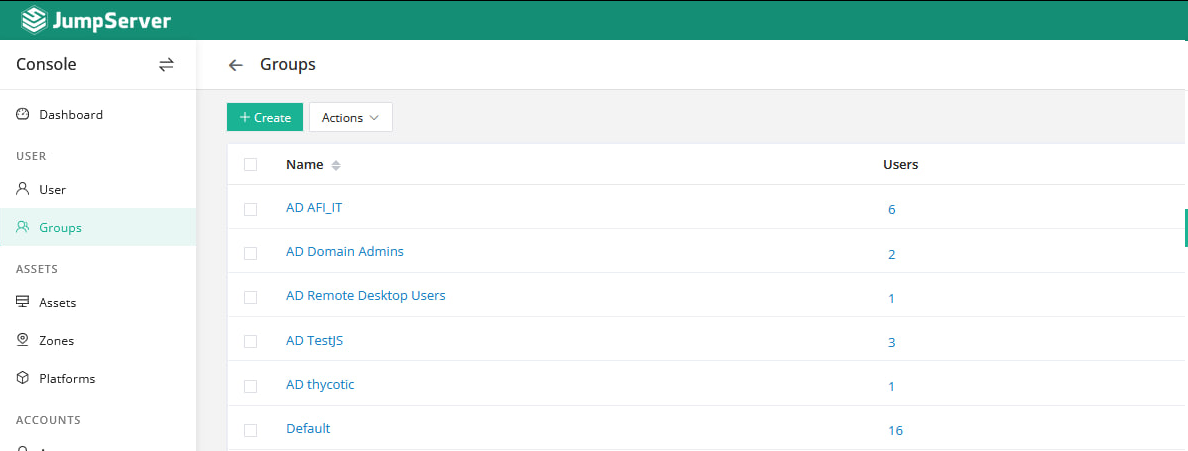
5. Click Import all to add users to the system.
If you go to Console - User - Groups, you will see JS user groups with AD group names and the same users in them:
How to enable 2FA(TOTP) auth
In the Community Edition, two-factor authentication via TOTP (Google Authenticator) is available.
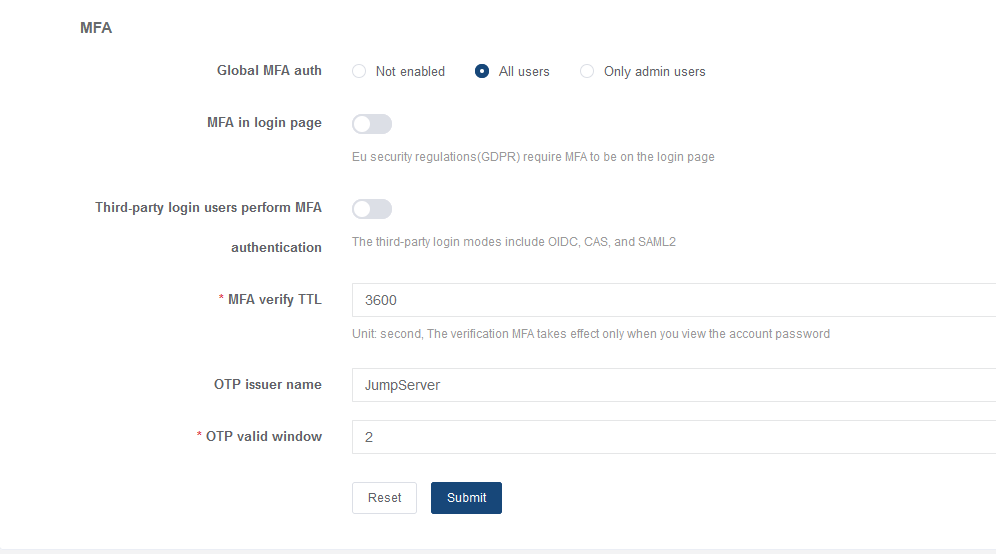
To enable it, go to System setting - Security - Auth Security. The Global MFA auth parameter allows you to disable two-factor authentication or enable it for all users or only for administrators.
Note: For TOTP to work correctly, the JumpServer server must configure the NTP service to obtain the correct time.
In JumpServer Enterprise, other two-factor authentication options are also available, such as two-factor authentication via RADIUS.
Installing OpenSSH for account management for Windows
Why Install OpenSSH on Windows Devices?
OpenSSH on Windows is used for gathering system information, rotating passwords for local Windows accounts, and automatically creating local accounts.
If you only need to connect via RDP without managing accounts, OpenSSH is not required.
Installing OpenSSH
Simply run the installation distribution OpenSSH-Win64.msi with administrative rights. No configuration is needed.
For more secure connections, you can configure authentication using a private key.
Configuring Authentication with a Private Key
ssh-keygen.exe -t rsa
cp $env:USERPROFILE\.ssh\id_rsa.pub $env:USERPROFILE\.ssh\authorized_keys
notepad C:\ProgramData\ssh\sshd_config# This is the sshd server system-wide configuration file. See
# sshd_config(5) for more information.
# The strategy used for options in the default sshd_config shipped with
# OpenSSH is to specify options with their default value where
# possible, but leave them commented. Uncommented options override the
# default value.
#Port 22
#AddressFamily any
#ListenAddress 0.0.0.0
#ListenAddress ::
#HostKey __PROGRAMDATA__/ssh/ssh_host_rsa_key
#HostKey __PROGRAMDATA__/ssh/ssh_host_dsa_key
#HostKey __PROGRAMDATA__/ssh/ssh_host_ecdsa_key
#HostKey __PROGRAMDATA__/ssh/ssh_host_ed25519_key
# Ciphers and keying
#RekeyLimit default none
# Logging
#SyslogFacility AUTH
#LogLevel INFO
# Authentication:
#LoginGraceTime 2m
#PermitRootLogin prohibit-password
StrictModes no
#MaxAuthTries 6
#MaxSessions 10
PubkeyAuthentication yes
# The default is to check both .ssh/authorized_keys and .ssh/authorized_keys2
# but this is overridden so installations will only check .ssh/authorized_keys
AuthorizedKeysFile .ssh/authorized_keys
#AuthorizedPrincipalsFile none
# For this to work you will also need host keys in %programData%/ssh/ssh_known_hosts
#HostbasedAuthentication no
# Change to yes if you don't trust ~/.ssh/known_hosts for
# HostbasedAuthentication
#IgnoreUserKnownHosts no
# Don't read the user's ~/.rhosts and ~/.shosts files
#IgnoreRhosts yes
# To disable tunneled clear text passwords, change to no here!
#PasswordAuthentication yes
#PermitEmptyPasswords no
# GSSAPI options
#GSSAPIAuthentication no
#AllowAgentForwarding yes
#AllowTcpForwarding yes
#GatewayPorts no
#PermitTTY yes
#PrintMotd yes
#PrintLastLog yes
#TCPKeepAlive yes
#UseLogin no
#PermitUserEnvironment no
#ClientAliveInterval 0
#ClientAliveCountMax 3
#UseDNS no
#PidFile /var/run/sshd.pid
#MaxStartups 10:30:100
#PermitTunnel no
#ChrootDirectory none
#VersionAddendum none
# no default banner path
#Banner none
# override default of no subsystems
Subsystem sftp sftp-server.exe
# Example of overriding settings on a per-user basis
#Match User anoncvs
# AllowTcpForwarding no
# PermitTTY no
# ForceCommand cvs server
# Uncomment the following two lines:
#Match Group administrators
# AuthorizedKeysFile __PROGRAMDATA__/ssh/administrators_authorized_keysnet stop sshd
net start sshdUsing a Private Key
ssh user@ip -i <private_key_absolute_path>        (local users)
ssh user@domain@ip -i <private_key_absolute_path> (Domain users)RemoteApp configuration for application publishing
Note: The Community Edition supports only the HTTP application publishing mode.
RemoteApp is the publication of applications on Microsoft RDS. To use it, you need a Windows Server with configured RDS (RemoteApp). JumpServer can connect to applications published on the RDS server and authorize in them. This is mainly relevant for database management and web interface applications.
To support RemoteApp, you need to configure JumpServer and the RDS server.
Requirements:
- MS Windows Server 2016 or MS Windows Server 2019
- Installed RDS (Remote Desktop Services) role
- Installed OpenSSH ( you can install in from https://JS_IP/core/download/ )
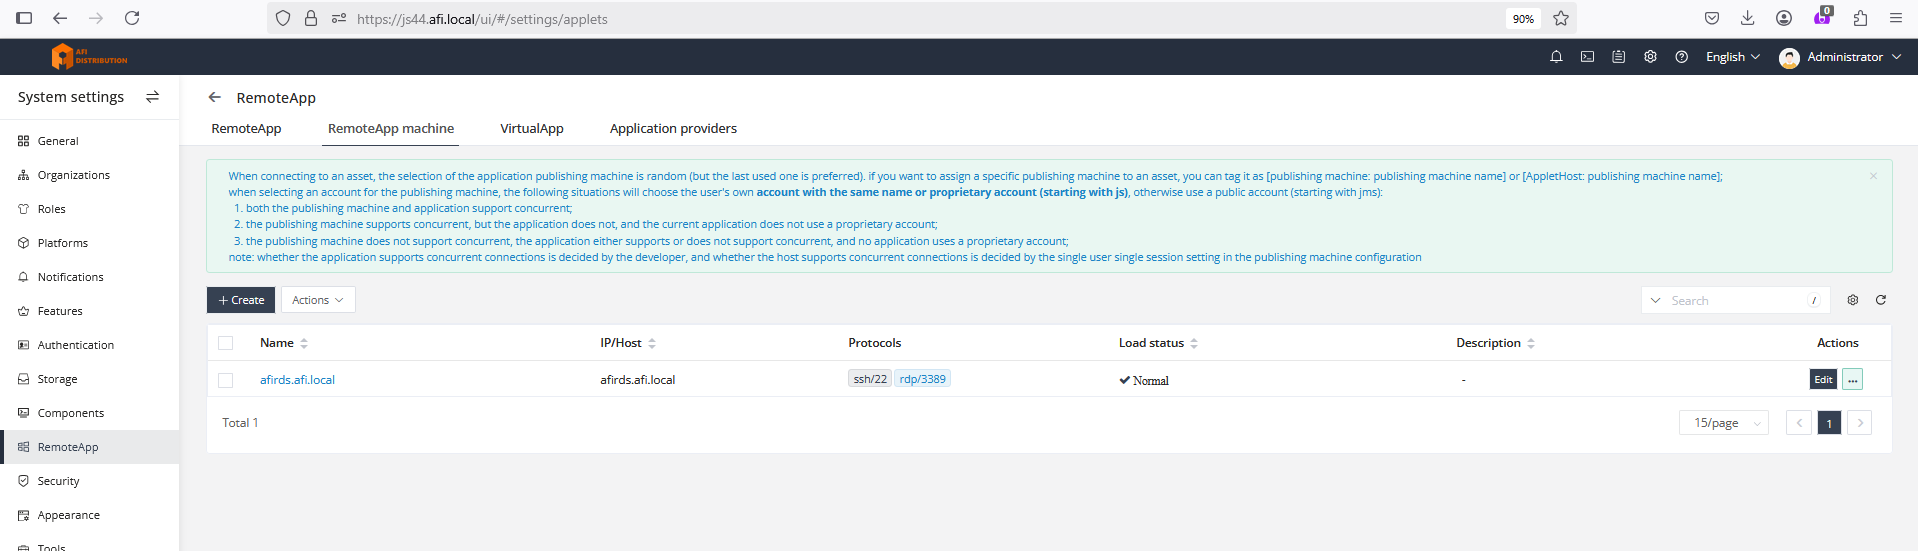
Adding a Publishing Server to JumpServer
Go to "System settings - RemoteApp", select the "RemoteApp machine" tab, and click "Create".

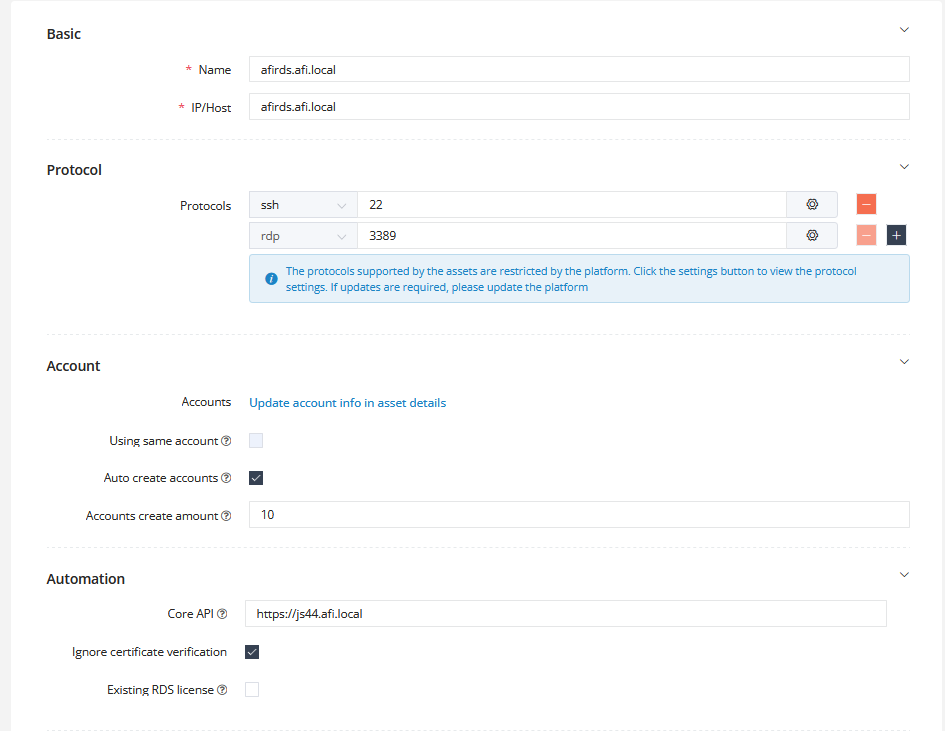
Parameter Descriptions:
| Parameter | Description |
|---|---|
| Name | Device name |
| IP/Host | IP address or network name of the RDS server |
| Protocol | Protocols and port numbers. Specify WinRM or SSH if OpenSSH will be used |
| Accounts | An administrator account for accessing the RDS server |
| Auto create accounts | Enable automatic account creation for connecting to published applications |
| Accounts create amount | Number of accounts to be created |
| Core service address | The communication address between the agent of the remote application publishing machine and JumpServer backend. Replace http:127.0.0.1 with your server's IP address |
| RDS license | Configure the RDS license server |
| RDS License Server | RDS license server parameters |
| RDS authorization mode | Choose "Device" or "User" to configure the authorization mode. |
| RDS single user single session | Choose "Disable" or "Enable" to configure the single session mode for one user. |
| RDS maximum disconnect time | When the session reaches this maximum time, the connection is terminated. |
| RDS remote application logout time limit | Time to log out after the remote application session is disconnected. |
Click "Submit" to save the settings.
Setting Up the Application Publishing Mechanism
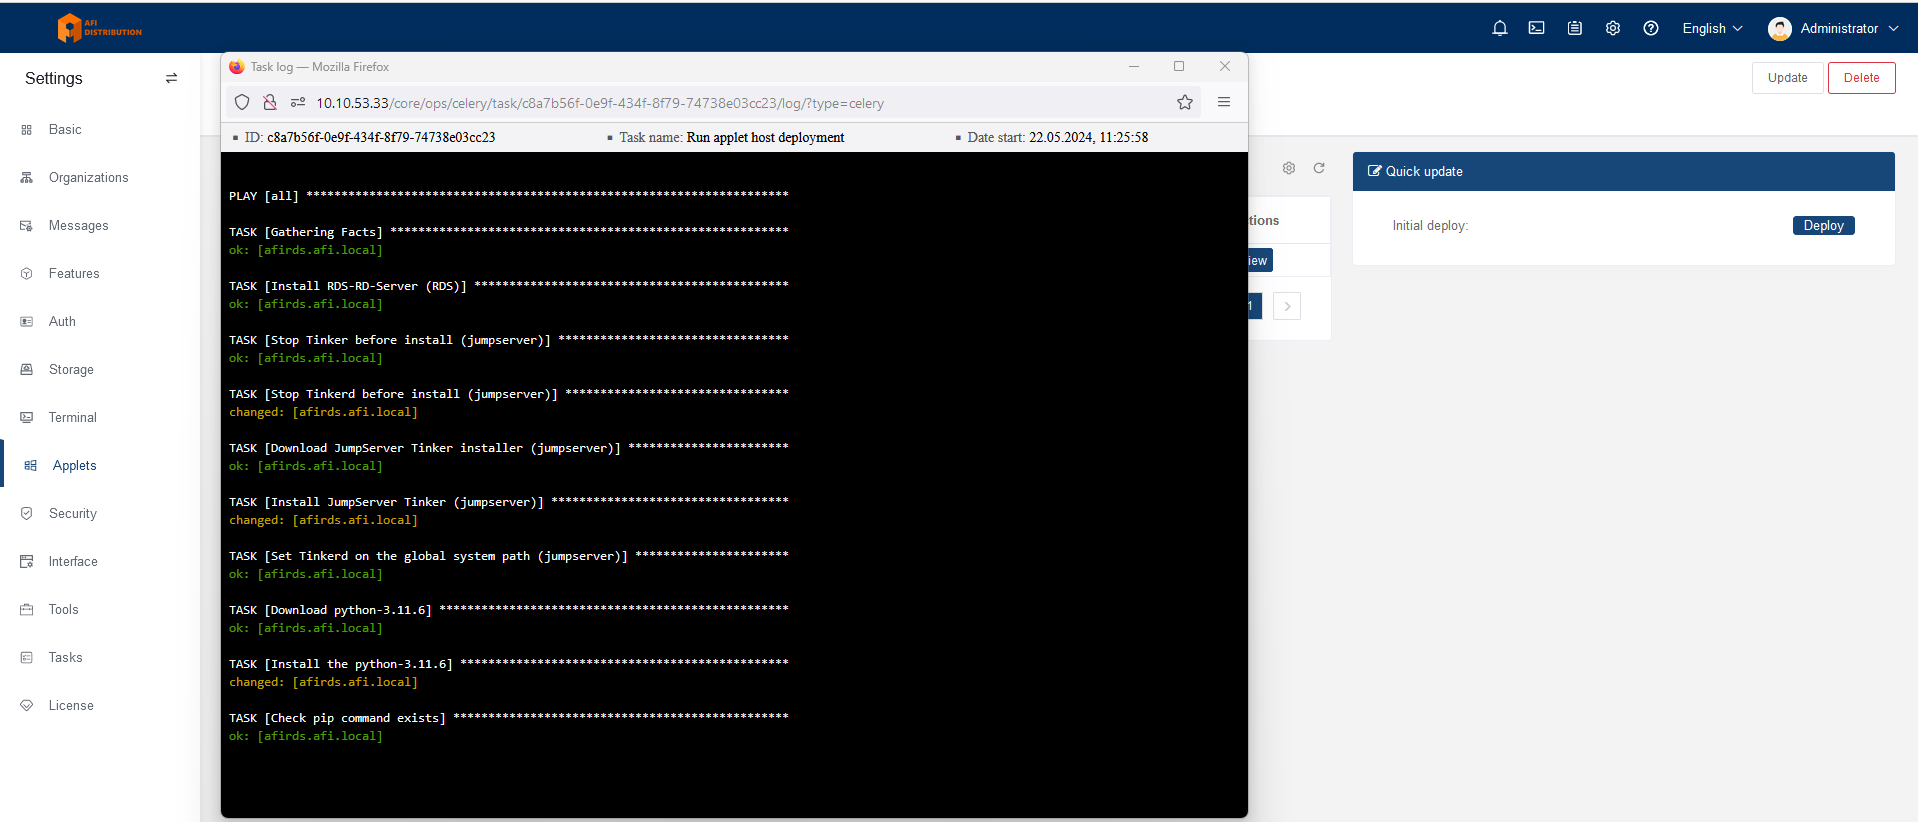
Click on the name of the added publishing server. Server information will open; go to the "Deploy RemoteApp machine" tab and click the "Deploy" button on the right side of the screen.
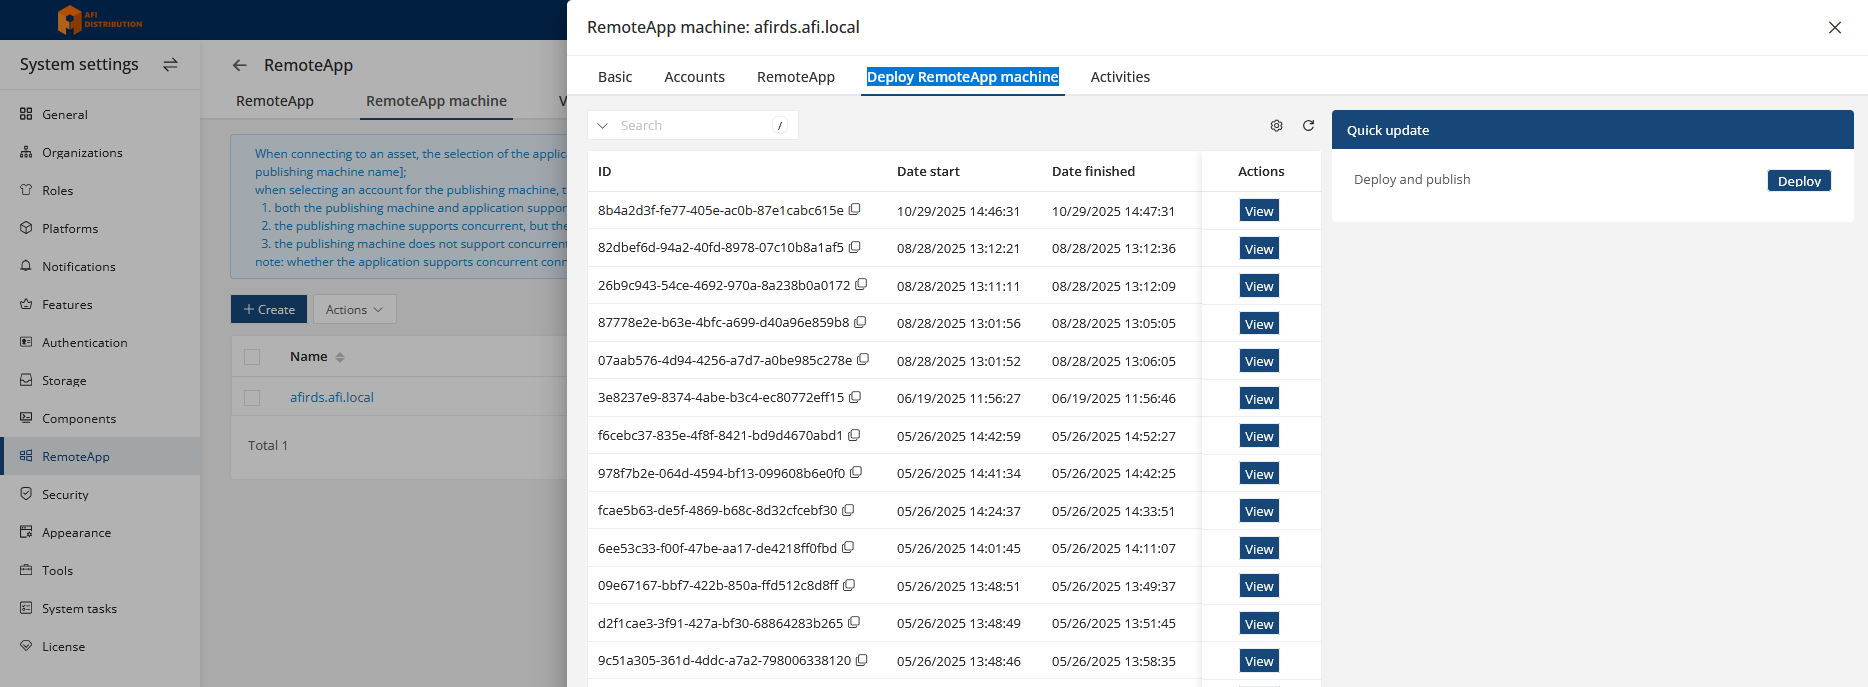
An installation window will appear, showing the installation process:
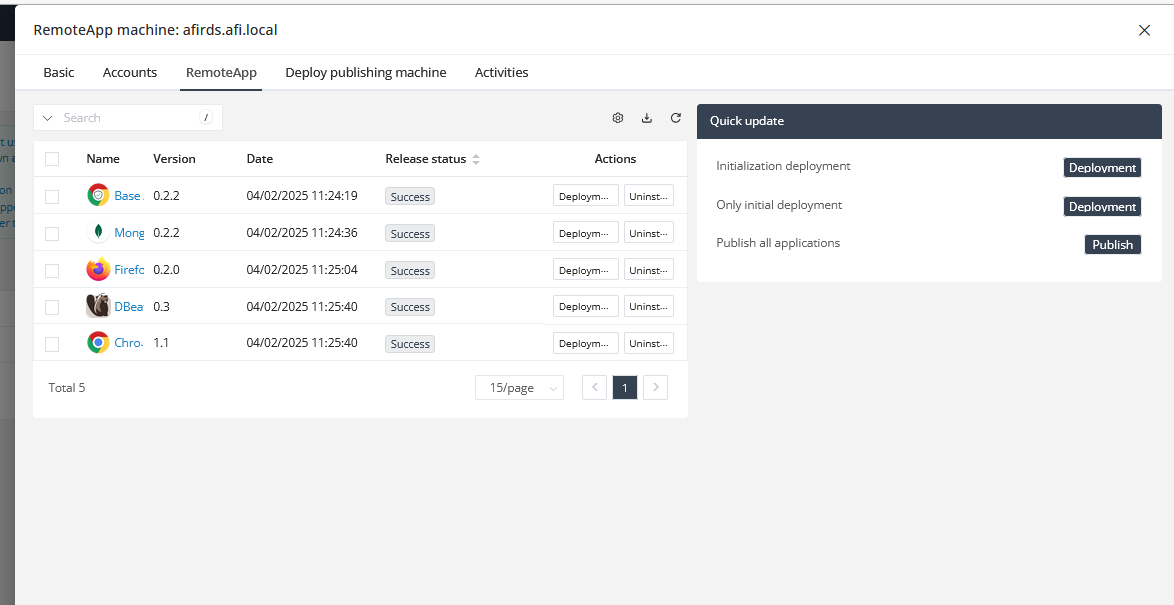
Application Publishing
You do not need to manually install applications on the RDS server; JumpServer provides ready-made applets that will automatically install and publish the required applications. Existing applets are available on the online portal, where you can download them.
To publish an application, open "System settings - RemoteApp and go to RemoteApp machine tab. Here you can see the list of added applets, their status, and the "Deploy" and "Uninstall" buttons for installing and removing applets from the publishing server.
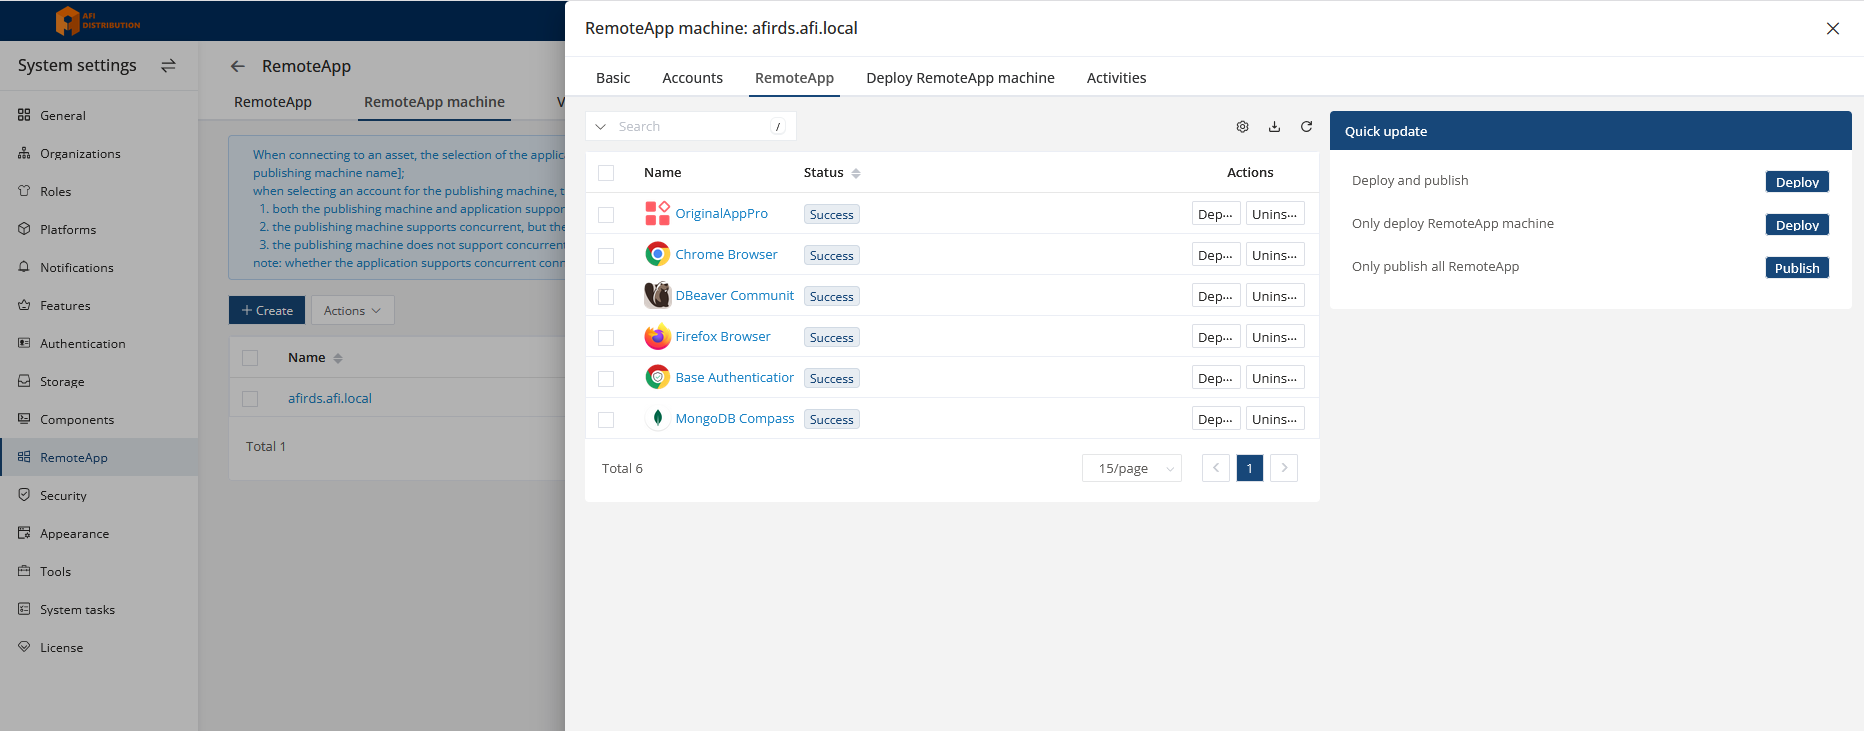
If the applet status is "Success", you can add devices and connect to them using the corresponding applications. For connecting to web interfaces (HTTP), you can use the Chrome or Firefox applets.
How to configure access to asset web-interface, HTTP session configuration
To connect to target systems via HTTP, you need to configure browser publishing via Panda (Linux-based application publishing server) or RDS (RemoteApp). RDS (RemoteApp) configuration instructions.
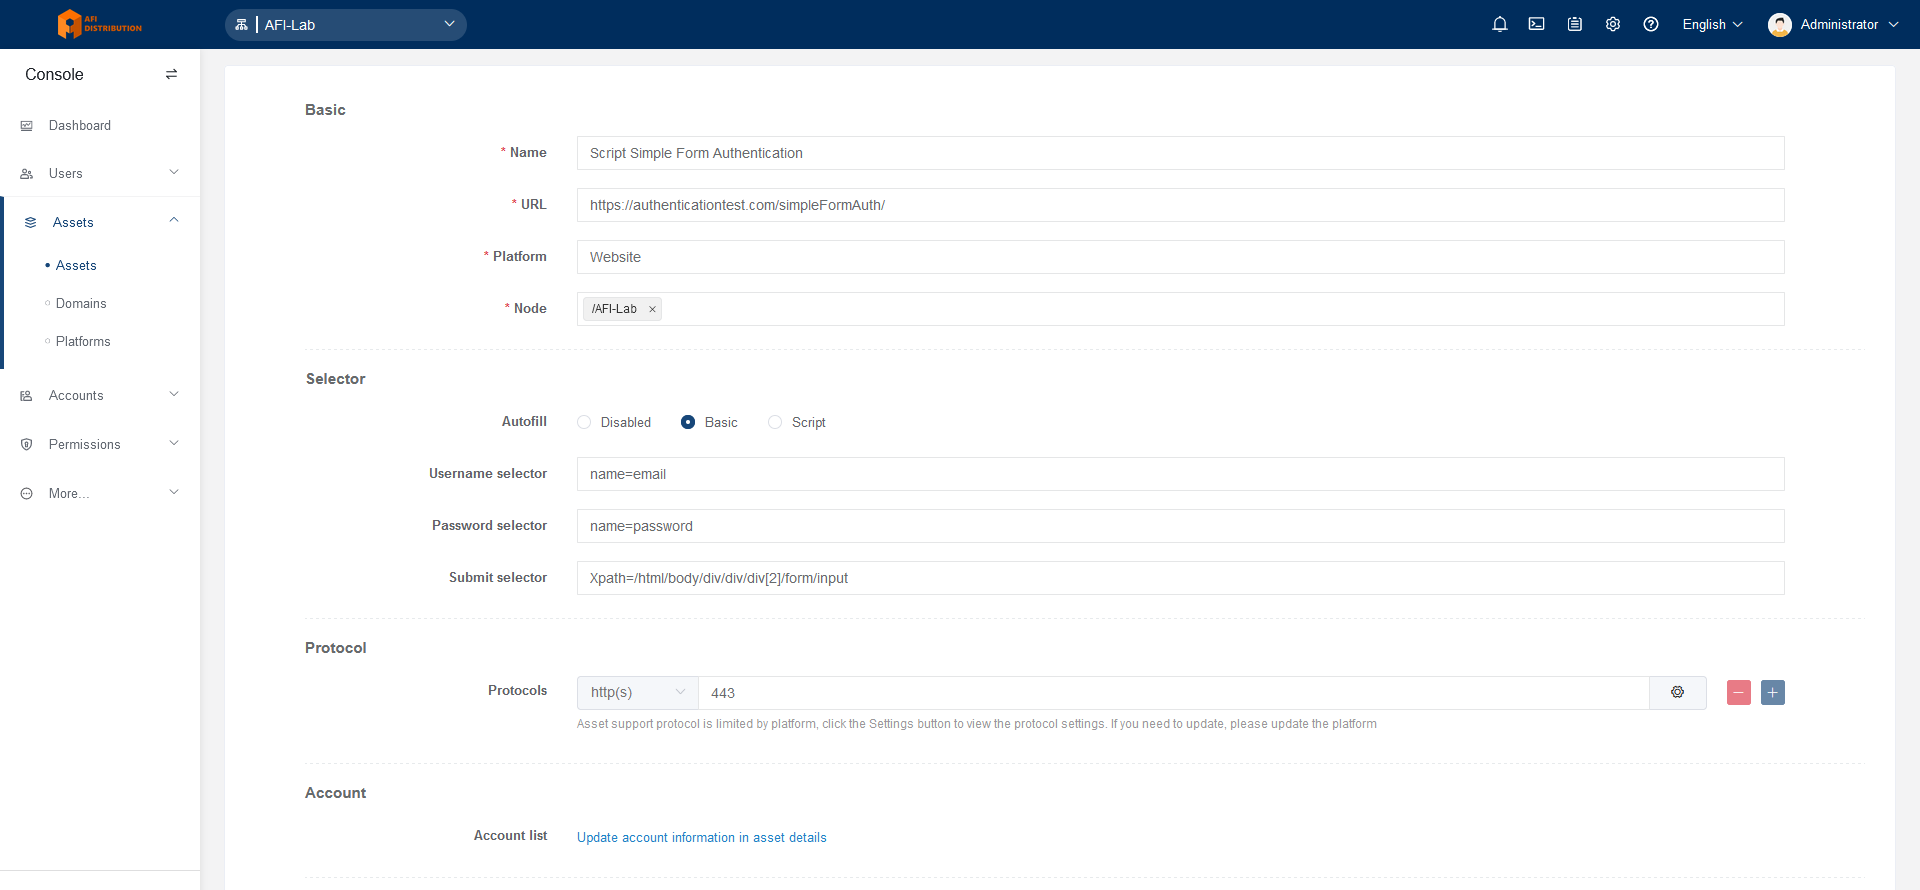
Creating a "Website" Type Device
- Go to the "Console - Assets" section, click the "Create" button, and select the target system type - Website.

- In the "Selector" section, specify the parameters of the form fields that JumpServer will fill automatically when starting a session.
For example:
With these settings, the username will be entered into the HTML element with name="email", the password will be entered into the HTML element with name="password", and then the button with Xpath=/html/body/div/div/div[2]/form/input will be clicked.
You can inspect the web form elements in the browser by right-clicking on the input field and selecting "Inspect" (in Firefox) or "View Page Source" (in Chrome).
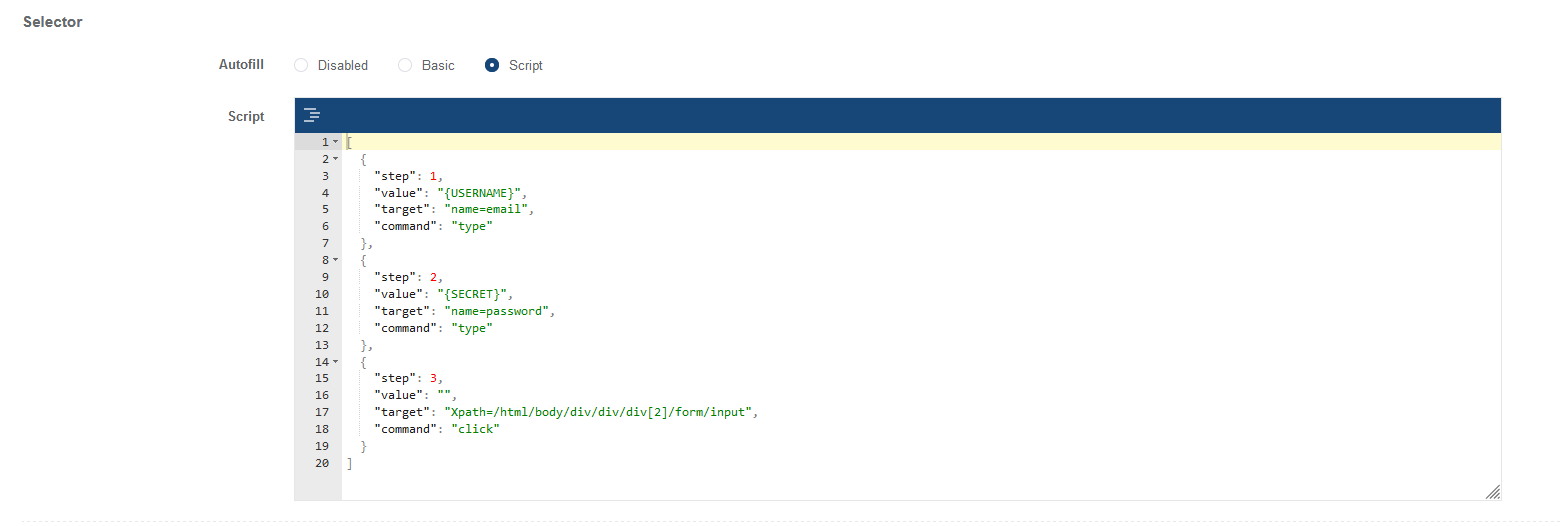
Additionally, you can use advanced settings and parameters of the login form elements by switching to Script mode:

- In the Account list section, add the username and password to be used for authorization, similar to other connection types.
- Save the settings by clicking the "Submit" button.

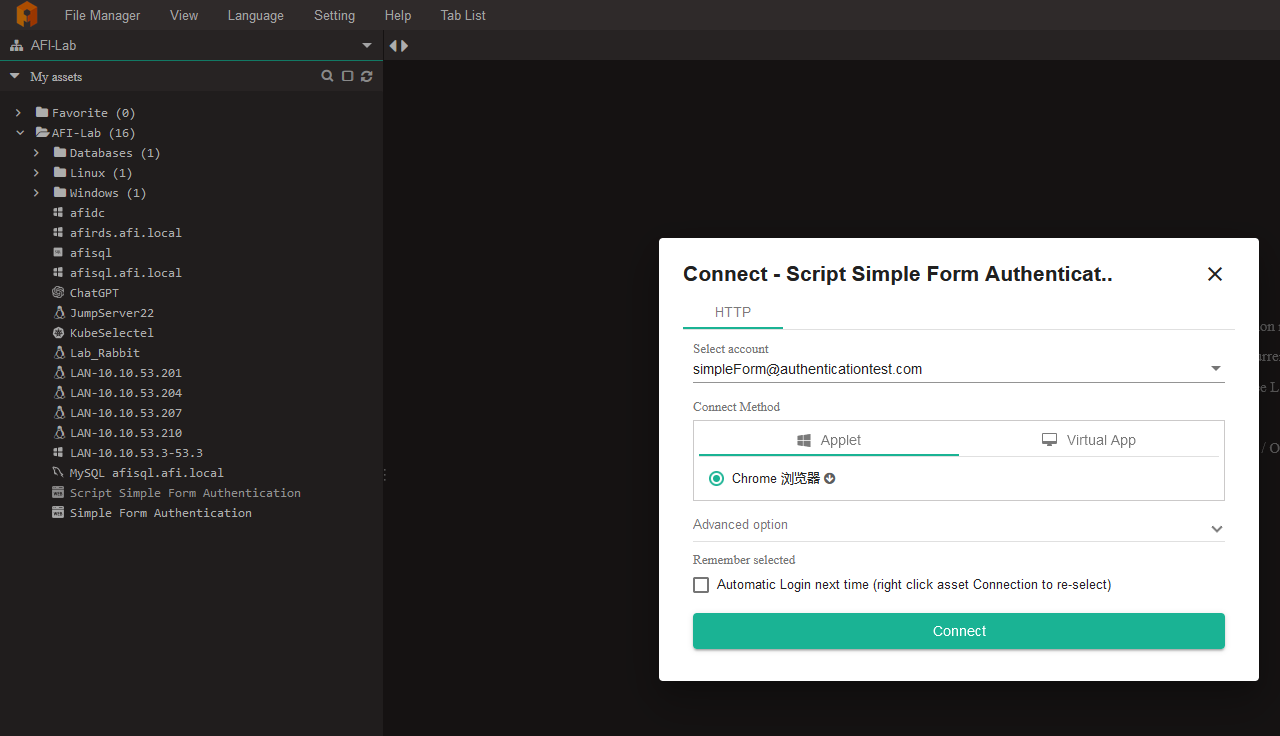
Connecting to Web Interfaces via Web Terminal
If everything is configured correctly, when selecting the desired device in the web terminal, you will see a session start option:
Setting up Panda for application publishing(alternative to RemoteApp)
JumpServer supports using both Windows Server and Linux as application publishing machines, such as for publishing Chrome and Firefox browsers for HTTP sessions and various database clients.
Types of Application Publishing:
Microsoft RemoteApp: A method of publishing applications based on Windows Server, providing maximum smoothness. Requires additional configuration of Windows Server and the purchase of Microsoft RDS CALs.
Panda (Virtual Application): A Linux-based application publishing method, characterized by medium smoothness, good compatibility, and support for operating systems like CentOS, RedHat, Kylin, and openEuler.
Setting Up Panda for Application Publishing
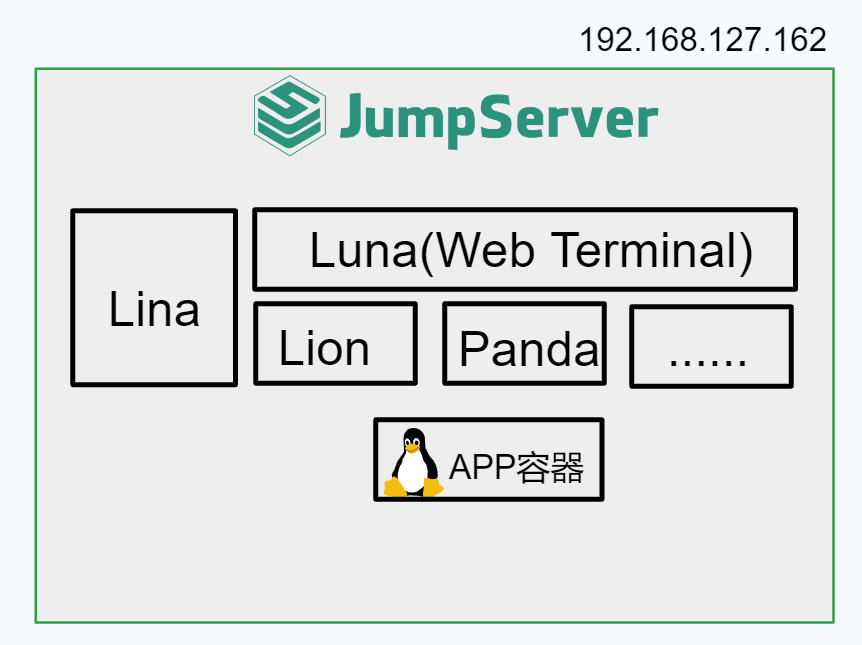
Principle of Operation:
The Linux-based application publishing machine uses container technology to isolate the application in an independent runtime environment. The Panda component provided by JumpServer manages virtual applications.
The process looks as follows:
1. The user accesses the JumpServer Web Terminal and connects to the selected virtual application.
2. The Panda component creates a GUI container based on VNC and forwards the VNC connection information to the Lion component.
3. The Lion component connects to the container.
Deployment Schemes
Scheme 1: All in One
Using the server where JumpServer is deployed as a machine for publishing virtual applications.
1. Configuring the Main Configuration File
Open the main JumpServer configuration file.
nano /opt/jumpserver/config/config.txtAdd the following parameters to it:
# Enable the Panda component
PANDA_ENABLED=1
# Enable virtual applications in the core
VIRTUAL_APP_ENABLED=1
# Panda host IP address (JumpServer IP)
PANDA_HOST_IP=192.168.127.162
# URL for Lion to connect to Panda
PANDA_HOST=http://panda:9001
Restart the JumpServer service to apply the changes.
[root@localhost ~]# jmsctl restart2. Enabling the Virtual Applications Feature
In the JumpServer management console, go to System Settings → Features → VirtualApp and activate the virtual applications feature.
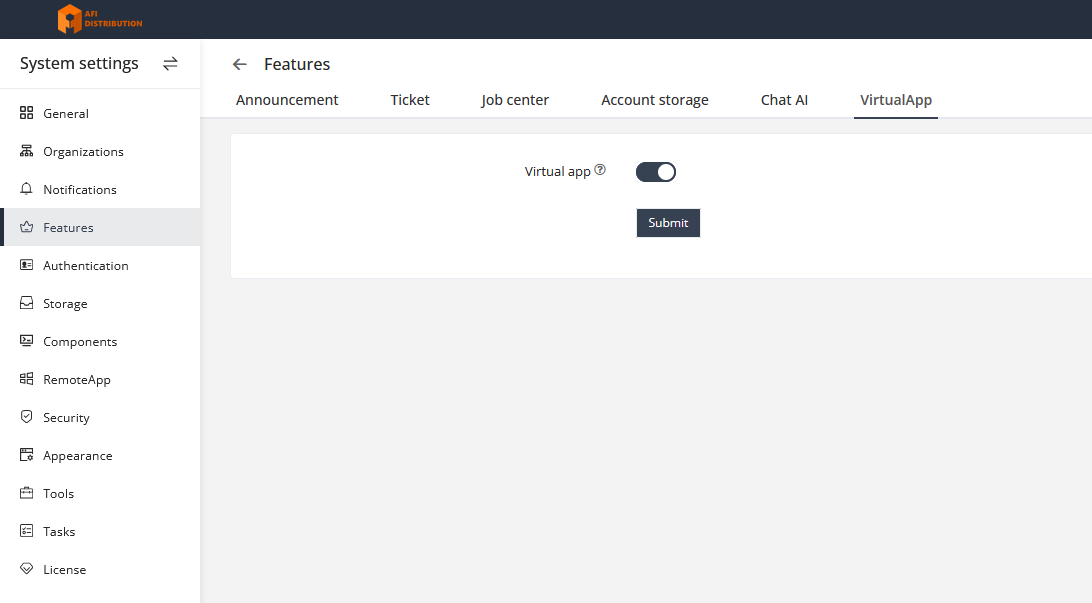
3. Loading Virtual Applications
Download virtual applications locally. Currently supported applications include:
Chrome, DBeaver. Distributions for these applications are available on the vendor portal. Applications for Panda are located in the Virtual App section, while others are only for RemoteApp (RDS).
In the JumpServer management console, navigate to System Settings → RemoteApps and upload the virtual applications in the VirtualApp section.
After a short wait, the application will automatically be deployed on the application publishing machine. In the JumpServer management console, under System Settings → RemoteApps → Application Providers → VirtualApp, you can see the successful deployment of the application.
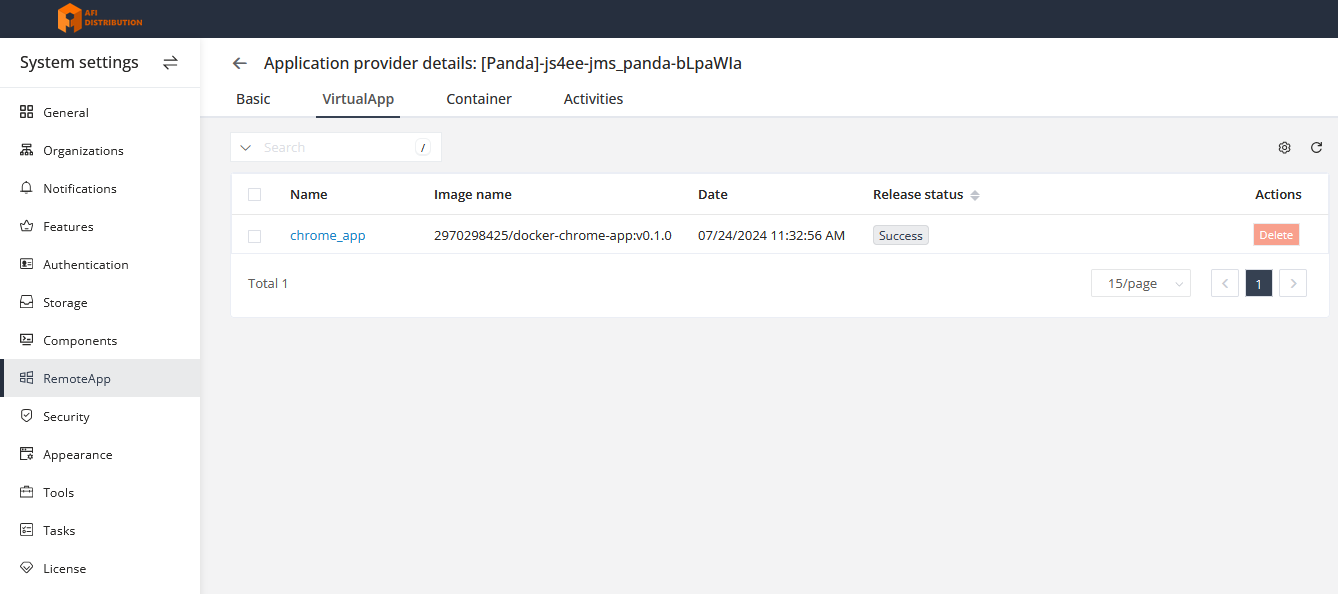
4. Using Virtual Applications
Connect to assets using virtual applications.
Note: At this point, the JumpServer service will launch the virtual application container: 2970298425/docker-chrome-app:v0.1.0 (Note: this container is approximately 1.3GB in size and requires downloading over the Internet. In a local network, it can be manually downloaded).
Scheme 2: Panda on a Separate Server

1. Configuring the Main Configuration File
Open the main JumpServer configuration file.
nano /opt/jumpserver/config/config.txtAdd the following parameters to it:
# Enable the Panda component
PANDA_ENABLED=0
# Panda IP for the Lion component
PANDA_HOST=http://192.168.127.163:9001
Restart the JumpServer service to apply the changes.
[root@localhost ~]# jmsctl restart2. Installing Panda on a Separate Machine
Unpack the JumpServer installation package on the publishing machine, install Docker and Docker Compose, and load the image.
[root@panda ~]# tar xzvf jumpserver-offline-release-v3.10.6-amd64.tar.gz -C /optInstall Docker and Docker Compose:
[root@panda ~]# cd /opt/jumpserver-offline-release-v3.10.6-amd64/scripts
[root@panda scripts]# ./2_install_docker.sh
Load the Panda image:
[root@panda scripts]# cd images
[root@panda images]# docker load -i panda:v3.10.6.tar
Create a docker-compose file for Panda:
[root@panda ~]# mkdir -p /data/jumpserver/panda/data
[root@panda ~]# mkdir -p panda
[root@panda ~]# cd panda
[root@panda panda]# cat docker-compose.yaml
version: '2.4'

services:
  panda:
    image: registry.fit2cloud.com/jumpserver/panda:v3.10.6
    container_name: jms_panda
    hostname: jms_panda
    ulimits:
      core: 0
    restart: always
    ports:
      - 9001:9001
    tty: true
    environment:
      - BOOTSTRAP_TOKEN=YmEyNTRkNTYtNDIyMi02OTJm
      - CORE_HOST=http://192.168.127.162
      - NAME=panda
      - PANDA_HOST_IP=192.168.127.163
    volumes:
      - /data/jumpserver/panda/data:/opt/panda/data
      - /var/run/docker.sock:/var/run/docker.sock:z
    healthcheck:
      test: "curl -fsL http://localhost:9001/panda/health/ > /dev/null"
      interval: 10s
      timeout: 5s
      retries: 3
      start_period: 10s
BOOTSTRAP_TOKEN is taken from the JumpServer configuration file: /opt/jumpserver/config/config.txt
CORE_HOST - The address of your JumpServer
PANDA_HOST_IP - The IP address of Panda
Start the Panda container:
docker-compose up -d3. Enabling the Virtual Applications Feature
Repeat the steps from the All in One section.
4. Loading Virtual Applications
Repeat the steps from the All in One section.
5. Using Virtual Applications
Repeat the steps from the All in One section.
Administration
Command filter configuration for SSH and database queries
Command ACL Configuration
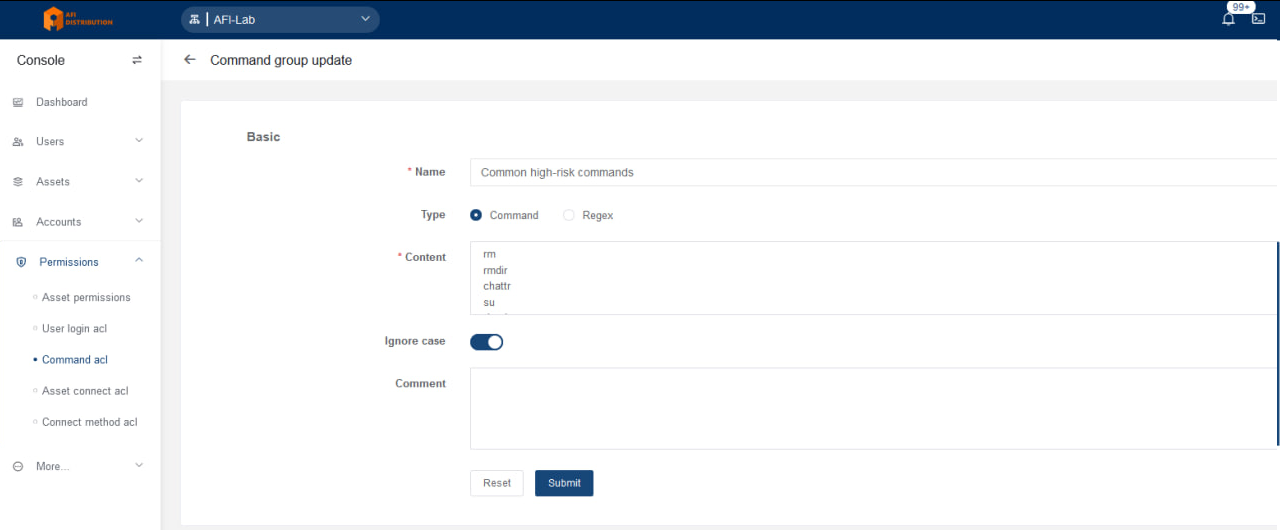
1. Go to the "Console - Policies - ACLs - Command filter" section and open the "Command Group" tab.
2. Click the "Create" button, enter a name for the list, such as "Common high-risk commands", and fill in the list with the required commands or regular expressions (see the screenshot). Save it by clicking the "Submit" button.
3. Open the "Command filter" tab and click "Create" to create a filter.
4. The filter configuration includes the following parameters:
- Priority: the filter priority. The action of the filter with the highest priority will always be executed.
- User: JumpServer users for whom the filter will apply.
- Asset: target systems where the filter will control connections.
- Account: accounts on target systems that will be controlled by the filter.
- Command Group: groups of commands that will be blocked.
- Action: the filter action: Reject - block the command, Accept - execute the command, Review - send the command for approval by a specified employee, Warning - warn the specified employee about executing the command.
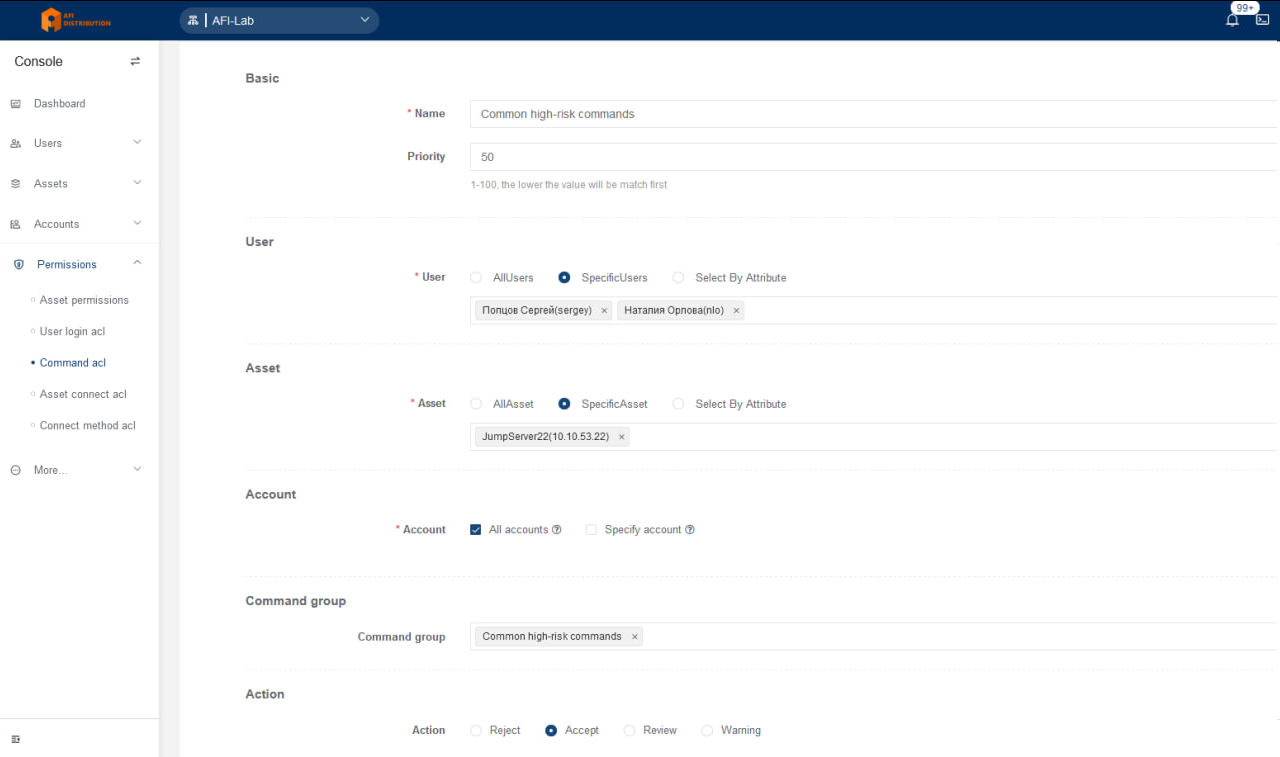
5. Click "Submit" to save the settings.
Troubleshooting
How to check system status and container logs
JumpServer is installed as a set of Docker containers performing various functions.
To check the state of the containers, log in to the server where JumpServer is installed and enter the following command:
# docker ps -aAll containers in the list should have the status Healthy
List of Containers
jms_panda
jms_magnus
jms_celery
jms_chen
jms_koko
jms_lion
jms_razor
jms_video
jms_web
jms_redis
jms_kael
jms_xrdp
jms_mysql
jms_core
To view the error log of a specific module, use the following command:
docker logs -f #CONTAINER_NAME --tail 200For example:
Web interface error log:
docker logs -f jms_web --tail 200Error log for Panda:
docker logs -f jms_panda --tail 200RemoteApp Troubleshooting
Description of the Interaction Between JumpServer, RDS Server, and Tinker
In this article, I will describe in detail how JumpServer, RDS Server, and Tinker interact so that any issues can be identified.
Description of the RDS and JumpServer Integration Process
-
JumpServer connects to the RDS server via SSH:
-
Installs the Tinker service on the RDS server and specifies the JS address (Core API parameter).
-
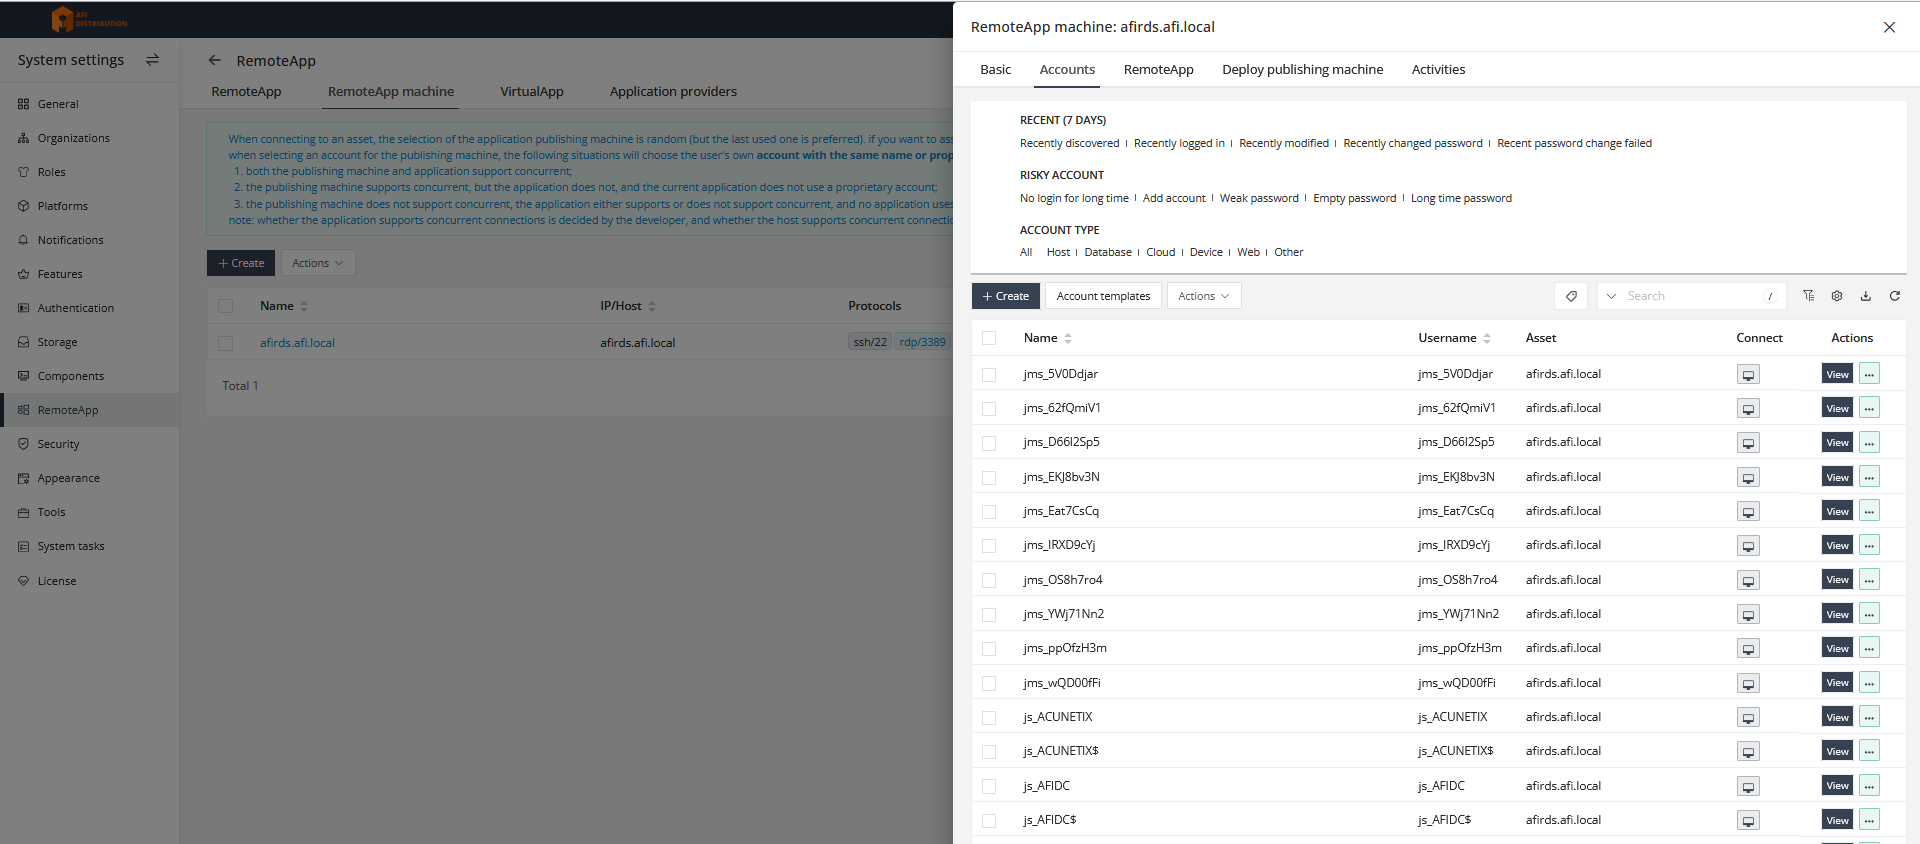
Creates local service accounts of the type
js_*andjms_*on the RDS server. -
Adds the created accounts to the "Remote Desktop Users" group.
Important: The "Remote Desktop Users" group name may differ in Windows, depending on the OS language. If these accounts are not present in the group, you will need to add them manually.
-
Tinker connects to JumpServer at the specified address (Core API parameter):
-
Tinker reports that it is running, and the RDS status changes to "online".
-
Downloads distributions of selected applets, such as Chrome and DBeaver, from the JS server using the same address specified in the Core API. Other applets may be downloaded from the internet. If there is no internet access, you can manually install the required applications.
-
Tinker installs the downloaded applets
Description of Tinker
Tinker is an auxiliary application for integration with JumpServer, assisting in maintaining communication between RDS and JS, installing applications (applets) required for publication, and managing the publication of RemoteApp applications during session initiation.
-
By default, it is installed in the folder:
C:\Users\[ACCOUNT]\AppData\Local\Programs\Tinker\
([ACCOUNT]is the account used for the integration of JS and RDS.) -
It installs the JumpServer Tinker Service - this service must always be running.
-
Detailed logs of Tinker's operation and errors are available in the folder:
C:\Users\[ACCOUNT]\AppData\Local\Programs\Tinker\data\logs
Tinker Applets
Applets are a set of applications and automation scripts for managing applications. By default, applets are installed in the folder:C:\Program Files\JumpServer
This folder contains executable applications and Python scripts with launch parameters that you can modify if necessary.
Final Checklist
-
OpenSSH is installed on Windows RDS, and port 22 is open on the Windows firewall.
-
The account used for integration with RDS has administrator rights on the RDS server.
-
The IP/Host field contains the IP address of the RDS server or its DNS name, which can be resolved by JumpServer.
-
The Core API field contains the URL of JumpServer, accessible from the RDS Server.
-
Accounts of the type
JS_XXandJMS_XXare created on the RDS server. -
Accounts of the type
JS_XXandJMS_XXare members of the Remote Desktop Users group on the RDS server. -
The JumpServer Tinker Service is running on the RDS server.
-
The RDS server status in the JumpServer interface: Normal.
-
The Status of applets in the properties of the RDS server in the JumpServer interface: Success.
Here are some screenshots for example:
Additional features
Custome Applet structure for RemoteApp
What is an applet?
An applet is a set of files that describe the process of installing and launching an application on Microsoft RDS via RemoteApp. This is necessary for JumpServer to initiate an access session to this application, automatically log in, and hide the authorization parameters from the user.
Applet Structure
Each applet must include the following files:
AppletName
  ├── i18n.yml
  ├── icon.png
  ├── main.py
  ├── manifest.yml
  └── setup.yml
main.py - script for launching and logging into the application
icon.png - applet icon
manifest.yml - metadata, i.e., applet description
setup.yml - file describing the installation process
i18n.yml - file for translation into various languages
File manifest.yml
Example based on the MySQL Workbench applet
The file manifest.yml contains general information about the applet and specifies its type and protocol.
# (required)
name: mysql_workbench8
display_name: "{{ 'MySQL Workbench' | trans }}"
comment: "{{ 'A tool for working with MySQL, to execute SQL and design tables' | trans }}"
# (required)
version: 0.1.1
# (required)
exec_type: python
# (required)
author: Eric
# general or web (required)
type: general
update_policy: always
edition: community
# (required)
tags:
  - database
# (required)
protocols:
  - mysqlworkbench

# translations into other languages
i18n:
  MySQL Workbench:
    en: MySQL Workbench
    zh: MySQL Workbench
    ja: MySQL Workbench

  A tool for working with MySQL, to execute SQL and design tables:
    en: A tool for working with MySQL, to execute SQL and design tables
    zh: 用于与MySQL一起工作的工具,用于执行SQL和设计表
    ja: MySQLでSQLを実行し、テーブルを設計するためのツール
File setup.yml
The file setup.yml describes the parameters for installing the applet on the RDS server.
# software installation type - msi, exe, zip, manual
type: msi
# URL to download the software distribution or file name if the distribution is included with the applet archive
source: mysql-workbench-community-8.0.31-winx64.msi
# installation arguments
arguments:
  - /qn
  - /norestart
# installation directory
destination: C:\Program Files\MySQL\MySQL Workbench 8.0 CE
# path and name of the executable file
program: C:\Program Files\MySQL\MySQL Workbench 8.0 CE\MySQLWorkbench.exe
md5: d628190252133c06dad399657666974a
Script main.py
main.py - the main script of the applet
The application is launched by running the command:
python main.py base64_json_dataThat is, the main.py script is launched, and the launch parameters are passed to it. The base64_json_data structure looks approximately as follows:
{
  "app_name": "mysql_workbench8",
  "protocol": "mysql",
  "user": {
    "id": "2647CA35-5CAD-4DDF-8A88-6BD88F39BB30",
    "name": "Administrator",
    "username": "admin"
  },
  "asset": {
    "asset_id": "46EE5F50-F1C1-468C-97EE-560E3436754C",
    "asset_name": "test_mysql",
    "address": "192.168.1.1",
    "protocols": [
      {
        "id": 2,
        "name": "mysql",
        "port": 3306
      }
    ]
  },
  "account": {
    "account_id": "9D5585DE-5132-458C-AABE-89A83C112A83",
    "username": "root",
    "secret": "test"
  },
  "platform": {
    "charset": "UTF-8"
  }
}
Contents of main.py
import sys

from common import (block_input, unblock_input)  # Import functions for blocking/unblocking input
from common import convert_base64_to_dict  # Import function to convert Base64 string to a dictionary (array)
from app import AppletApplication  # Import main application

def main():
    base64_str = sys.argv[1]  # Get the Base64 string from command-line arguments
    data = convert_base64_to_dict(base64_str)  # Convert Base64 string to a dictionary
    # The data dictionary contains all the parameters for launching the application: account, server name, database name, etc., depending on the application type
    applet_app = AppletApplication(**data)  # Pass dictionary data to the application launch function
    block_input()  # Block user input
    applet_app.run()  # Launch the application
    unblock_input()  # Unblock user input
    applet_app.wait()  # Wait for the application to complete

if __name__ == '__main__':
    try:
        main()  # Launch the main function
    except Exception as e:
        print(e)  # Output the error if it occurs
Contents of app.py
App.py typically contains all the main code for launching the application with the required parameters, making it the most important and complex part when developing a new applet. It is easier to base it on one of the scripts of existing applets that are similar in structure/type to the new applet being developed.
import sys  # Imports the sys module for working with system functions

if sys.platform == 'win32':  # Checks if the operating system is Windows
    from pywinauto import Application  # Imports the library for automating Windows GUI applications
    from pywinauto.controls.uia_controls import (
        ButtonWrapper, EditWrapper, MenuItemWrapper,
        MenuWrapper, ComboBoxWrapper, ToolbarWrapper
    )
    # Imports various controls for interacting with the application's GUI

from common import BaseApplication, wait_pid  # Imports the base application class and a function for waiting on processes

_default_path = r"C:\Program Files\MySQL\MySQL Workbench 8.0 CE\MySQLWorkbench.exe"
# Defines the default path to the MySQL Workbench application

class AppletApplication(BaseApplication):  # Defines the application class inheriting from BaseApplication

    def __init__(self, *args, **kwargs):  # Initializes the application
        super().__init__(*args, **kwargs)  # Calls the parent class constructor

        self.path = _default_path  # Sets the application's path
        self.username = self.account.username  # Retrieves the username from the account information
        self.password = self.account.secret  # Retrieves the password from the account information
        self.host = self.asset.address  # Retrieves the host address from the asset information
        self.port = self.asset.get_protocol_port(self.protocol)  # Retrieves the port based on the protocol
        self.db = self.asset.spec_info.db_name  # Retrieves the database name
        self.pid = None  # Placeholder for the application's process ID
        self.app = None  # Placeholder for the application object

    def run(self):  # Method to run the application
        app = Application(backend='uia')  # Creates an application object using UI Automation
        app.start(self.path)  # Starts the application using the specified path
        self.pid = app.process  # Saves the application's process ID
        if not all([self.username, self.password, self.host]):  # Checks if necessary parameters are provided
            print('缺少必要的参数')  # Outputs an error message in Chinese ("Missing required parameters")
            return

        # Accesses the main MySQL Workbench window and the "Database" menu
        menubar = app.window(title="MySQL Workbench", auto_id="MainForm", control_type="Window") \
            .child_window(title="Database", control_type="MenuItem")
        menubar.wait('ready', timeout=10, retry_interval=5)  # Waits for the menu to be ready
        MenuItemWrapper(menubar.element_info).select()  # Opens the "Database" menu

        # Selects the "Connect to Database" menu item
        cdb = menubar.child_window(title="Connect to Database", control_type="MenuItem")
        cdb.wait('ready', timeout=10, retry_interval=5)  # Waits for the item to be ready
        MenuItemWrapper(cdb.element_info).click_input()  # Clicks on "Connect to Database"

        # Inputs the host
        host_ele = app.top_window().child_window(title="Host Name", auto_id="Host Name", control_type="Edit")
        EditWrapper(host_ele.element_info).set_edit_text(self.host)  # Sets the host value

        # Inputs the port
        port_ele = app.top_window().child_window(title="Port", auto_id="Port", control_type="Edit")
        EditWrapper(port_ele.element_info).set_edit_text(self.port)  # Sets the port value

        # Inputs the username
        user_ele = app.top_window().child_window(title="User Name", auto_id="User Name", control_type="Edit")
        EditWrapper(user_ele.element_info).set_edit_text(self.username)  # Sets the username value

        # Inputs the database name
        db_ele = app.top_window().child_window(title="Default Schema", auto_id="Default Schema", control_type="Edit")
        EditWrapper(db_ele.element_info).set_edit_text(self.db)  # Sets the database name

        # Clicks the "OK" button to confirm the connection
        ok_ele = app.top_window().child_window(title="Connection", auto_id="Connection", control_type="Window") \
            .child_window(title="OK", control_type="Button")
        ButtonWrapper(ok_ele.element_info).click()  # Clicks "OK"

        # Inputs the password
        password_ele = app.top_window().child_window(title="Password", auto_id="Password", control_type="Edit")
        password_ele.wait('ready', timeout=10, retry_interval=5)  # Waits for the password field to be ready
        EditWrapper(password_ele.element_info).set_edit_text(self.password)  # Sets the password value

        # Clicks "OK" to complete the connection
        ok_ele = app.top_window().child_window(title="Button Bar", auto_id="Button Bar", control_type="Pane") \
            .child_window(title="OK", control_type="Button")
        ButtonWrapper(ok_ele.element_info).click()  # Clicks "OK"

        self.app = app  # Saves the application object for further use

    def wait(self):  # Method to wait for the application to complete
        wait_pid(self.pid)  # Waits for the process with the specified ID to complete
User manual
Connecting to Target Systems: All Possible Options
JumpServer provides multiple ways to connect to target systems. In this article, I will list the main options available.
Note:
The list of applications supported by JumpServer Client on Windows is provided below.
The list for macOS and Linux may differ.
For more details on installing and using JumpServer Client, see this article.
SSH
-
Built-in Web Interface
-
Local clients — Putty, xShell, MobaXterm, launched via JumpServer Client
-
Any SSH client — by copying one-time authentication parameters from the web interface using the SSH Guide option
Note: The lifetime of one-time authentication parameters is 5 minutes by default, but you can extend it and make them reusable.
-
Any SSH client — using fixed authentication parameters, requiring the PAM user password
(suitable for creating quick-connect shortcuts in connection managers like MobaXterm) -
SSH Selector — built-in SSH terminal with a target system selection interface
RDP
-
Built-in RDP client inside the web interface
-
JumpServer Enterprise:
-
Standard RDP client via downloaded RDP file from the JumpServer web interface
-
Standard RDP client launched via JumpServer Client
Note: Multi-monitor mode in RDP is supported only when connecting via the standard RDP client.
-
SFTP
-
Built-in SFTP client inside the web interface
-
Local clients — WinSCP, SecureFX, Xftp, launched via JumpServer Client
Databases (DBMS)
-
Built-in DB client in the web interface (Web GUI)
-
Built-in command-line client in the web interface (Web CLI)
-
JumpServer Enterprise:
-
External DB clients launched via JumpServer Client:
-
Navicat
-
PL/SQL Developer
-
DBeaver
-
Redis DM
-
SQL Server Management Studio
-
Another Redis DM
-
Toad for Oracle
-
-
Any DB client — by copying one-time authentication parameters from the web interface using the DB Guide option
Note: The lifetime of one-time authentication parameters is 5 minutes by default, but you can extend it and make them reusable.
-
Some options may be unavailable depending on the database type. See the dedicated article for details.
-
HTTP or Other Applications Published via RemoteApp
-
Inside the web interface
-
Standalone RemoteApp window via downloaded RDP file
-
Standalone RemoteApp window launched via JumpServer Client
HTTP or Other Applications Published via Panda
-
Inside the web interface
-
Through a local VNC client using one-time authentication parameters obtained from the web interface
Other Supported Protocols
-
XRDP
-
VNC
-
Kubernetes